INDEX 1. DVR Features....................................................................... 1 2. Layout 2.1 2.2 2.3 Front Panel............................................................................................... 1 Rear Panel ................................................................................................ 2 Remote Control ..................................................................................... 2 3. Installation 3.1 3.2 3.3 Installing the Hard Drive................
5.10 Miscellaneous Menu – Change Password....................... 9 5.11 Miscellaneous Menu - Color Set..................................... 9 5.12 Miscellaneous Menu - Time Set.................................... 10 5.13 Hard Disk Setup..................................................................................10 5.14 Motion Setup ........................................................................................11 5.15 Video Mode ..................................................................
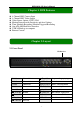
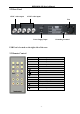
QSD004C4-250 User’s Manual Chapter 1: DVR Features z z z z z z z z 4 Channel BNC Camera Input 1 Channel BNC Video Output Video Source Option: NTSC / PAL Motion Detection with Sensitivity and Area Settings Time Schedule Recording / Motion Triggered Recording One ATA-100 Hard Drive Interface USB 2.0 Back up to computer Remote Control Chapter 2: Layout 2.
QSD004C4-250 User’s Manual 2.2 Rear Panel 1 BNC video output 4 BNC video inputs Fan Power Supply Input USB Port is located on the right side of the case. 2.
QSD004C4-250 User’s Manual Chapter 3: Installation (optional) 3.1 Installing Hard Drive Note: This model comes with a 250GB Hard Drive already installed, so this would only be necessary if you are replacing the hard drive. 1. Unplug the power supply. Don’t install or uninstall HDD when DVR is on!! 2. Carefully open the DVR case. 3. Connect the power cord and data cable to hard disk drive. The 4 pin connection is the DC power cable for HDD, and the wider cable is the standard hard drive IDE type connection.
QSD004C4-250 User’s Manual Chapter 4: System Boot 4.1 Detecting Installed Hard Drive After connecting the power, the system will boot-up and detect the installed hard drive. Checking HDD …… MASTER… On the screen it will show the hard drive information. 4.2 Recovering Lost Data RECOVER HDD? 04811-101735 (SELECT)YES/(MENU)NO A power error can cause data to be lost, the DVR system can automatically recover lost data after power is reconnected. 4.
QSD004C4-250 User’s Manual 4.4 Main Screen While the DVR is running, the monitor will display the information from the cameras as follows: Upper left: Percentage of space used on hard drive. Middle: Channel number (CH1 through CH4) Bottom right: Date and Time Bottom left: System status. (Refer to 6.1 Start Recording) Chapter 5: DVR Setup > 5.
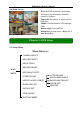
QSD004C4-250 User’s Manual [ MAIN MENU CAMERA SELECT RECORD SELECT RESOLUTION RECORD FRAME RECORD QUALITY SCHEDULE SET MISCELLANEOUS MENU HARD DISK SET MOTION SET VIDEO MODE FACTORY RESET 1234 1234 EACH 25 HIGH Note: If you are recording to enter Menu you need to push stop button to stop recording first. PAL PRESS (UP,DOWN), ENTER (SELECT) PRESS (MENU) TO EXIT Menu]: enter system menu [ Up] and [ Down]: move the cursor [ SEL]: select/modify settings [ Menu]: press again to exit 5.
QSD004C4-250 User’s Manual 5.4 Resolution There are two resolutions for video recording: EACH Mode: The DVR compresses and records each video channel separately so you can enlarge a single channel to full screen display and still be recording on all channels. You can also record on specific channels, for example, you can turn off the recording function of CH1 and CH2 and then the system will only record video on CH3 and CH4.
QSD004C4-250 User’s Manual 5.6 Record Quality There are three levels of recording quality: High, Normal, and Low. Higher quality uses more hard drive space. Record frame rate, record quality and available hard drive space will all affect the total recording time of the DVR system. 5.7 Schedule Set You can set the video recording method by Time, and Motion Detection Triggered Recording.
QSD004C4-250 User’s Manual 5.8 Miscellaneous Menu-Auto Record When the function is set to “ON” DVR will be awaked to record automatically by record schedule if DVR is without any manual operation in five (5) minutes. When you choose “OFF”, DVR will not record until you press the [ REC] button. 5.9 Miscellaneous Menu-Password Enable When this option is set to be “ON” you will be required to enter the password if you want to stop recording or enter menu.
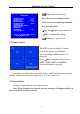
QSD004C4-250 User’s Manual 5.12 Miscellaneous Menu-Time Set TIME SET Configure system date and time: ∨ 2008/08/08 20:08:08 PRESS (UP,DOWN), ENTER (SELECT) PRESS (MENU) TO EXIT [ Up] and [ Down]: move the cursor [ SEL]: modify the value [ Menu]: exit and save 5.
QSD004C4-250 User’s Manual 5.14 Motion Set MOTION SET MOTION RECORD TIME: MOTION ALARM TIME: 10 OFF MOTION SET PRESS (UP, DOWN), ENTER (SELECT) PRESS (MENU) TO EXIT MOTION RECORD TIME: This number indicates how many seconds the motion detection recording continues after a motion triggered event ends. MOTION ALARM TIME: This number indicates how many seconds the buzzer inside the DVR will sound after the DVR has been triggered by motion. CONT: Continuous alarm until any key is pressed to stop.
QSD004C4-250 User’s Manual 5.15 Video Mode Select NTSC or PAL video source (NTSC is used in the United States). 5.16 Factory Reset Press [ SEL] button to reload factory defaults, then the DVR will reboot, all custom settings (including password) will be restored to factory default.
QSD004C4-250 User’s Manual 1. 2. 3. 4. 5. 6. 7. 8. Hard Drive Usage (Displayed as a percentage) Recording symbol (channel is currently recording) Channel Number Record Resolution (QUAD or EACH) Status (REC, Play, FF1, FF2, FF3, REW, PAUSE) HDD Info. ([M] Master Hard disk) Record Schedule: (T) Continuous (M) Motion Detection (-) No Recording The date and time on the DVR 6.2 Stop Recording Press [ Stop] button to stop recording. If you have activated password protection you need to input the password. 6.
QSD004C4-250 User’s Manual Chapter 7: Playback Press [ Play] button to play the latest recording. During playback press the [ Menu] button to list all recorded video clips from the hard drive. Newest video will be listed at the top. Press [ Up] and [ Down] to move the cursor and select an event, press [ Play] button to start playback. 1. Starting time of the event 3. MOTION: Motion Triggered event 5. “*” marks un-played video recording 2. TIME: continuous recording 4.
QSD004C4-250 User’s Manual Chapter 8: USB Programming By connecting the DVR to a PC you can use PC Viewer software to play back and backup DVR recorded video through the USB 2.0 port. 8.1 PC Viewer Program 1. 2. 3. 4. Put the USB Driver Program CD into your CD-ROM Drive Open CD directory Double click on the “PCViewerInstall.
QSD004C4-250 User’s Manual Item Remark 1. Capture picture Save an image of current frame 2. Save video clip 3. Directory Setting Save DVR’s video clip to PC in .mys/.avi file Change location of capture directory On PC 4. Time Search Search for time file on DVR hard disk 5. DVR event list Open event list recorded in DVR 6. DVR Mode* To switch working mode between PC viewer 7. PC Mode* 8. Channel selection keys mode and DVR viewer mode CH1, CH2, CH3, CH4, QUAD 9.
QSD004C4-250 User’s Manual Chapter 9: Specifications DVR ITEM DESCRIPTION Video Format NTSC / PAL Operation System None Camera Input Channel 4 channel Composite BNC Video Output Channel 1 channel Composite BNC Display Frame Rate Recording Frame Rate Recording Frame Rate (Each Mode) NOTE Stand-alone NTSC 120 frames/second 4×30 frames/second PAL 100 frames /second 4×25 frames/second NTSC Max.30 fps (Quad) Quad Mode PAL Max.
QSD004C4-250 User’s Manual CAMERA Dimension: 46(W) × 46(D) × 107(H)mm Color Video Camera All Weatherproof Camera with 11 IR LEDs for Night Vision Easy Installation – Wall Mount or Standing 1/4” Color CMOS image sensor Horizontal Resolution: 380 TVL Minimum luminance: 1.5Lux/F2.0 Lens: 6mm Power Supply: DC12V Power Consumption: 50mA Weight: 280g Operation Temperature: -20℃ - +55℃ Auto Gain Control: On/Off Video Output: 1.0Vp-p 75 Ohm Auto Iris: 1/50 1/6000 S/N ratio > 48dB Chapter 10: Appendix 10.
QSD004C4-250 User’s Manual 10.2 DVR Accessories (included) Q-SEE Product Warranty Thank you for choosing our products. All of our products users have a conditional free warranty repair service for hardware within 12 months starting from purchase date, and a free exchange service within one month (valid for manufacturing defects). Permanent upgrading service is provided for the software.
QSD004C4-250 User’s Manual Customer Information Card User’s Name Mr./Mrs. Company Name Postal Address Postal code Phone Number E-mail Model Number of Product Serial Number of Product Purchase Date Distributor If you have questions: Contact Us: Mailing Address: Customer Service: DPS Inc. Phone: 877-998-3440 x 538 8015 E. Crystal Dr Email: cs@dpsi-usa.com Anaheim, CA 92807 Website: Tech Support: http://www.q-see.com Phone: 877-998-3440 x 539 Fax: Email: ts@dpsi-usa.