Remote Monitoring Setup Guide DVR MODELS QR, QSDR & QSD9004 PC WITH WINDOWS OPERATING SYSTEM iPHONE ANDROID BLACKBERRY* * Select Models SETUP GUIDE FOR REMOTE INTERNET AND SMARTPHONE MONITORING, MYQ-SEE DDNS, AND EMAIL NOTIFICATION RemoteMonitorGuide.
Thank you for purchasing this Q-See product. Every effort has been made to make this DVR simple to assemble and use. However, if you should run into any difficulties during its installation or operation, we are here for you. ADDRESS CUSTOMER SERVICE Q-See Products Digital Peripheral Solutions, Inc. 8015 E. Crystal Drive Anaheim, CA 92807 Phone: 877-998-3440 x 538 (M-F, 8-5 PST) Email: cs@dpsi-usa.com Live Chat at www.q-see.
TABLE OF CONTENTS TABLE OF CONTENTS NETWORK SETUP 4 DHCP 4 PPPoE 4 Static 5 DDNS Setup 6 Port Forwarding 7 To access the DVR from a remote computer 7 To access the DVR through Internet Explorer 8 EMAIL NOTIFICATION SET-UP 11 Yahoo smtp setting 12 Hotmail smtp setting 12 SMARTPHONE SETUP 13 Windows 13 iPhone 15 Android 16 Blackberry 17 Supported Blackberry Models 17 Setup and operation on the Blackberry phone viewer 18 Q-SEE PRODUCT WARRANTY 22 3 RemoteMonitorGuide.
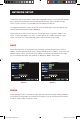
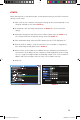
NETWORK SETUP The Network Setup menu options need to be configured in order to access the DVR remotely over a network or the internet. From the Network Setup menu, select the Network Type (DHCP, PPPoE, or Static), Port and Web Port (80 and 9000 by default). To configure the Network settings of the DVR, from the Main Menu, select the Network icon and the Network Setup menu opens (IMAGE 12). Type can be set to DHCP, PPPoE or Static. To have the router assign the IP address, use DHCP.
STATIC When selecting Static as the Network type, set the Network setting on the DVR to match the settings on your router. 1. Type “cmd” on your computer’s run program to bring up the command prompt on any computer attached to your Router (IMAGE 14) 2. At the prompt, type: “ipconfig” (see red arrow on IMAGE 14) to access the router settings 3. Write down the gateway and subnet mask numbers (Green arrows on IMAGE 14) so you can enter them into the network settings of the DVR (IMAGE 15) 4.
DDNS SETUP Dynamic Domain Name Service (DDNS) provides the capability for a networked device using the Internet Protocol Suite to notify a DDNS host to change the active DNS configuration of its hostnames or addresses. This is a useful feature that your Q-See DVR system is equipped with and can be helpful in avoiding any issues that might occur due to frequent or unplanned changes to your Public/WAN IP address.
IMAGE 12 IMAGE 18 NOTICE: You need to put your public DNS. This can be found in your Router Status tab. Usually there are 2 DNS entries (DNS1 & DNS2). Use DNS 1 only. If you router does not list the DNS address get it from your Internet Service Provider. 7. Enter the User Name, Password and Domain Name that you registered for through http://myq-see.com. Click the APPLY button at the bottom of the screen and then the EXIT button. This should return you to the Network Setup menu. 8.
5. Follow the instruction on the website (The top set of instructions are done on the DVR. The bottom set of instructions are done on the router) 6. Verify the ports are open and traffic is allowed A. Go to www.canyouseeme.org B. Type the port number that your DVR requires in the box. By default these DVRs use ports 80 and 9000. C. Verify that the port(s) is open. i. If the port is open, you will see the following message:”Success. I can see your service…” ii.
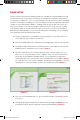
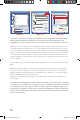
You need to allow Pop-ups. 1. Go to the Internet Explorer tool bar and select the TOOLS option. 2. Then select the POP UP BLOCKER option and select TURN OFF POP-UP BLOCKER. You will also need to enable Active X controls. 1. Go to the Internet Explorer tool bar and select the TOOLS option, then INTERNET OPTIONS. 2. Click on SECURITY TAB, then TRUSTED SITES, then SITES. (IMAGE 20) 3. Uncheck the box for Require Server verification.
X Security Settings Settings -- Trusted Trusted Sites Sites Zone Security Zone Settings Security General .NET Framework ? X Internet Properties Privacy Content Connections Programs Advanced Security Privacy General Security Privacy To create home page tabs, type each address on its own line.
EMAIL NOTIFICATION SET-UP 1. Make sure the DVR firmware version is 090716 or newer 2. Make sure your DVR has been set for network and can be seen from internet. 3. On the DVR, we need to setup the motion recording first : A. Go to MENU - DEVICES - MOTION. Turn on all the cameras and set to 2 or 3. Click APPLY and EXIT B. Go to MENU - RECORD and RECORD SET - TIME SCHEDULE and click on SCHEDULE, then click on ALARM at the bottom (check mark), then make the box red color all across the Sunday. Click on COPY.
NOTE 1* Some of router does not giving out the Public DNS address, in this case call up the ISP and ask them what is my public DNS address. Also you can try this step temporarily: From a PC on the same Router as DVR, open up the Command DOS Prompt and: ping smtp.gmail.com you should get a reply from an IP address. Write down this IP number and you will need to use this IP in the email setting in DVR like below: A. Turn ON email B. SSL : ON C. Port : 00465 D.
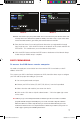
SMARTPHONE SETUP This surveillance system can be configured to be viewed remotely from a 3G Smartphone. This DVR is compatible with mobile phones running Windows Mobile Pro, Symbian operating systems, iPhone, iPad, Android and some Blackberry models. On the DVR, go to Menu – Device – Mobile and put the User name, Password and Port number. By default : User name: admin / Password: admin / Port 18004. This port 18004 needs to be forwarded in your router to the IP address of the DVR.
4. After finishing the installation, click the icon named “Asee” shown as PICTURE 4 to run the program. 5. Now you are allowed to enter into the program screen shown as PICTURE 5.
Click OK to confirm the above setting, and system will return back the previous menu. Auto-connect: When tick-selecting AUTO-CONNECT option, the mobile phone will be auto-connected to the DVR. Click any area of screen to toggle display modes between normal view and full screen. IPHONE 1: On your iPhone, go to APPSTORE and Search for ASEE. Download and install this program. After finishing installation, ASEE icon will be displayed on mobile phone interface shown as PICTURE 15.
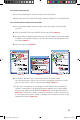
ANDROID 1. Enter into Program option and highlight MARKET icon shown as PICTURE 1. PICTURE 1 PICTURE 2 PICTURE 3 2. Enter into the Market interface shown as PICTURE 2. 3. Click SEARCH icon on the upper right corner and input “Asee” shown as PICTURE 3, to search for the Asee program. PICTURE 4 PICTURE 5 PICTURE 6 PICTURE 7 4. Highlight and install the program you searched shown as PICTURE 4 and PICTURE 5 5.
6. Clicking on the Asee icon in PICTURE 7 will display the screen in PICTURE 8, where you can click on the Open button on the bottom of the screen to display the screen in PICTURE 10 to view the cameras 7. To return to this screen you would go to the program list on the phone and click on the Asee icon shown in PICTURE 9.
6. Click BROWSER button and tick-select ASee.alx file shown as PICTURE 3 7. Click FINISH button to finish the installation shown as PICTURE 4 PICTURE 1 PICTURE 3 PICTURE 2 PICTURE 4 Setup and operation on the Blackberry phone viewer 1. The Blackberry viewer will be installed to the Downloads directory shown as PICTURE 5 2. Enter into the Downloads directory, and then click the ASee icon shown as PICTURE 6 PICTURE 5 PICTURE 6 18 RemoteMonitorGuide.
3. Enter into interface (PICTURE 7) 1 Connect/disconnect 2 full screen 3 snapshot 4 setup 5 help 6 Channel Selection 7 PTZ Control PICTURE 7 4. Enter the Monitor DVR info in the Setup Menu (PICTURE 8, 9) A. Select the Network Type supported by Blackberry phone (PICTURE 10) B. Click SAVE button to save the above setting, and system will return back to Live display C. Click the HISTORY button to enter into the History List shown as PICTURE 11, 12 D.
PICTURE 12 PICTURE 13 PICTURE 14 PICTURE 15 PICTURE 16 5. Click NEXT PAGE icon to search Channel option shown as PICTURE 15 and PICTURE 16, and then choose the channel you want to display. 6. Click FULL SCREEN icon to enter into full screen display mode, again click the [Trackball] button of mobile to quit the full screen mode. 20 RemoteMonitorGuide.
7. Click NEXT PAGE button to find the PTZ Control icon and enter into the mode. Now you could freely control your PTZ camera through your Mobile phone. (PICTURE 17) 8. Click HELP button to view the software’s Help instruction. 9. Click CLOSE button to exit the program shown as PICTURE 18. PICTURE 17 PICTURE 18 21 RemoteMonitorGuide.
Q-SEE PRODUCT WARRANTY Thank You for Choosing a Q-See Product! All of our products are backed by a conditional service warranty covering all hardware for 12 months from the date of purchase. Additionally, our products also come with a free exchange policy that covers all manufacturing defects for one month from the date of purchase. Permanent upgrading service is provided for the software.
Questions or Comments? Contact Us MAILING ADDRESS Q-See Products Digital Peripheral Solutions, Inc. 8015 E. Crystal Drive Anaheim, CA 92807 CUSTOMER SERVICE Phone: 877-998-3440 x 538 (M-F, 8-5 PST) Email: cs@dpsi-usa.com Live Chat at www.q-see.com (M-F, 8-5 PST) GENERAL TECH SUPPORT FAX 714-998-3509 WEBSITE http://www.Q-See.com Phone: 877-998-3440 x 539 (M-F, 8-5 PST) Email: ts@dpsi-usa.com Live Chat at www.q-see.
Digital Peripheral Solutions, Inc. 8015 E. Crystal Drive Anaheim, CA 92807 24 RemoteMonitorGuide.