
Full Product Manual


64
PICTURE 7-2
PICTURE 7-3
PICTURE 7-4
7.3 ALARM CONFIGURATION
Alarm configuration allows the NVR to begin recording based on input from other remote
sensors such as infrared motion detectors or contact alarms which are connected to it.
There are five submenus; Sensor, Motion, Video Loss, Other, and Alarm Out.
SENSOR
In this window you can setup optional external sensors to cause the NVR to begin recording.
There are three tabs in this window: Basic, Alarm Handling and Schedule.
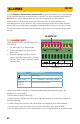
Basic Tab
This allows you to enable the input from
attached sensors. You can also identify the
sensors by name for ease in determining
location.
Set the alarm type according to whether the
alarm is NO (Normally Open) or NC (Normally
Closed). See your alarm’s manual for details.
Alarms can be individually configured or
globally set using the All button.
Alarm Handling Tab
Configure how you want the NVR to handle
the input from an activated alarm. Each
sensor input can be set to launch individual
sequences of action or they may be globally
set through the All button to have the same
results.
Hold Time: determines the time allowed
between consecutive alarm events.
If the alarm is triggered again within
this time, it will be treated as a single
event and the NVR will continue
recording before stopping.
Trigger: This is what the NVR will do once
activated by an alarm. Selecting
Setting will open a new window with
three tabs; Alarm, To Record, To
PTZ
Alarm allows you to set whether a
buzzer will sound, which camera (if
any) will display in full screen mode,
whether an e-mail will be sent and
whether a signal will be sent via the
ALARM OUT port.