QT SERIES IP CAMERAS QUICK START
Thank You for Choosing a Q-See Product! We are proud to back up our products with conditional service warranty covering all hardware for 24 months from the date of purchase. But, we are also here to help you get the most out of your system even if there aren’t any issues. Our self-help Knowledge Base, located at www.Q-See.com/Support has the answers to the most common questions. If you can’t find the solution to your problem, please feel free to contact our live support during the hours shown below.
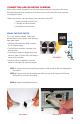
CONNECTING AND MOUNTING CAMERAS What makes Internet Protocol (IP) or Network cameras different is that they each have a little computer processor inside them that allows them to talk to the NVR over a network including the Internet. There are three ways you can connect your cameras to your NVR: 1. Directly through the PoE Ports 2. Through your local network 3. Remotely over the Internet USING THE POE PORTS This is the simplest method.
ON YOUR LOCAL NETWORK Instead of running the cable directly between your camera and NVR, you can connect the camera to the same network used by your NVR.
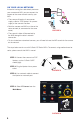
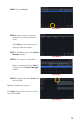
STEP 5. Click on Search. PICTURE 7 STEP 6. Select a camera or cameras from the list by checking the box to its left. Click Refresh, if the camera you’re looking for does not appear. STEP 7. Click OK to return to the Device Manager window. PICTURE 8 STEP 8. The camera is still disabled. Select a camera and click on Setup in the lower left of the Device Manager window. PICTURE 9 STEP 9. Check the box titled Enable and then click OK. Repeat to enable other cameras.
OVER THE INTERNET This allows you to connect to cameras in a completely different location. • You will need to use the IP Tool (PC) or the NVMS software (Mac) included on the Manuals and Software CD or by download from www.Q-See.com/support. Router NVR• Follow instructions NVRin theNetwork Port IP Camera Manual (also on the CD) to get the IP POE POE POE address of the camera.
CONFIRMING THAT PORTS ARE OPENED Like your NVR, your cameras feature UPnP technology that allows them to communicate with the network and through to the Internet. Two “ports” (think of them as doorways through the firewall) are used; 85 and 6036. You will want to verify that these have been automatically opened by using an online tool at www.canyouseeme.org using the same computer. STEP 6. Enter “85” into the box labeled “What Port?” STEP 7. Click on the Check button. STEP 8.
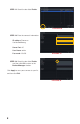
STEP 11. Check the box titled Enable. PICTURE 16 STEP 12. Enter the camera’s information: IP address: Shown on CanYouSeeMe.org Server Port: 85 User Name: admin Password: 123456 PICTURE 17 STEP 13. Check the box titled Enable and then click OK to return to the Device Manager window. Click Apply to save your cameras to your list and then click Exit.
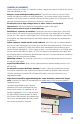
CAMERA PLACEMENT When installing your camera, it is important to select a proper site not only for field of view, but for other considerations as well: Distance from viewing/recording device. The further the camera is from the NVR or monitor, the higher the chances of signal degradation. The camera’s power supply should be located as near to the camera as possible when the distance exceeds 200’ as the power level will drop over extended distances resulting in a decrease in video quality.
Because your camera is weatherproof, it requires less protection than weather-resistant cameras and it can be placed in more exposed locations if needed. Keep in mind that most Q-See QT IP cameras are designed to operate between -40°F to 122°F (-40°C to 50°) with a relative humidity of up to 95%) and consider wind chill and other environmental factors when selecting your location. Specialty cameras are also available from Q-See which are able to operate in more extreme environments.
REMOTE CONNECTION When not directly connected to an NVR, it can be directly accessed using a computer, mobile phone or tablet. The camera will need to be connected to the Internet through a local network using a standard Ethernet cable and its IP address must be obtained following the steps below. If you’ve already followed these steps to connect to the camera from an NVR, you may skip to the sections covering use on a computer or mobile device. STEP 1.
This website will also display your Public IP address near the top of the page above the box where you entered your port number. This is the number which you will use to access the camera using the NVR, a web browser or your mobile device from outside of your local network (away from the building in which your DVR is located). You will use this Public IP address on your computer or mobile device. IF CAMERA PORTS AREN’T OPENED If canyouseeme.