
User manual


109
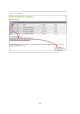
C onfigure Spare Drive
You can add a spare drive to or remove a spare drive from a RAID 5, 6, or 10 configuration.
Follow the steps below to use this feature.
1. Make sure the status of the RAID 5, 6, 10 configuration is “Ready”.
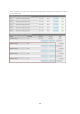
2. Install a hard drive on the NAS. If you have a hard drive which has already been formatted as
single disk volume on the NAS, you can configure this hard drive as the spare drive. You are
recommended to use hard disk drives of the same storage capacity for the RAID configuration.
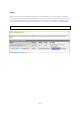
3. Select the RAID volume and click “CONFIGURE SPARE DRIVE”.
4. To add a spare drive to the selected configuration, select the hard drive and click “CONFIGURE
SPARE DRIVE”. To remove a spare drive, unselect the spare drive and click “CONFIGURE SPARE
DRIVE”.
5. All the data on the selected hard drive will be deleted. Click “OK” to proceed.
The original data on the RAID 5, 6, or 10 disk volume will be retained. After the configuration
completes, the status of the disk volume will become “Ready”.
A hot spare drive must be removed from the disk volume before executing the following action:
Online RAID capacity expansion
Online RAID level migration
Adding a hard drive member to a RAID 5, RAID 6 or RAID 10 volume