
User manual


655
Config ure DDNS s erv ic e o n QNA P NA S
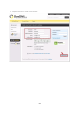
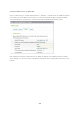
Login your NAS and go to “System Administration” > “Network” > “DDNS”. Enter the DDNS information
you registered from the DNS service provider. You may also schedule the NAS to update the DDNS
record periodically by configuring the “Check the External IP Address Automatically” option.
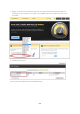
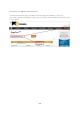
After finishing the settings, the NAS will start to update the WAN IP to the DDNS provider for domain
name mapping. You can now connect to the NAS by the domain name (qnap.dyndns-office.com) on the
Internet.