User’s Guide Dell UltraSharp U2417HJ Model No.
Notes, Cautions, and Warnings NOTE: A NOTE indicates important information that helps you make better use of your computer. CAUTION: A CAUTION indicates potential damage to hardware or loss of data if instructions are not followed. WARNING: A WARNING indicates a potential for property damage, personal injury, or death. ____________________ Information in this document is subject to change without notice. © 2013-2016 Dell Inc. All rights reserved.
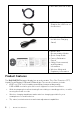
About Your Monitor Package Contents Your monitor ships with the components shown below. Ensure that you have received all the components and Contacting Dell if something is missing. NOTE: Some items may be optional and may not ship with your monitor. Some features or media may not be available in certain countries. NOTE: To set up with any other stand, please refer to the respective stand setup guide for setup instructions.
• DP Cable (Mini-DP to DP) • USB 3.0 Upstream Cable (Enables the USB Ports on the Monitor) • Micro USB cable (Enables the Wireless Charging Stand) • Drivers and Documentation Media • Quick Setup Guide • Factory Calibration Report • Safety, Environmental, and Regulatory Information • Wireless Safety and Regulatory Information Product Features The Dell U2417HJ flat panel display has an active matrix, Thin-Film Transistor (TFT), Liquid Crystal Display (LCD) and LED backlight.
• Ultra-thin bezel minimizes the bezel gap in multi-monitor usage, enabling easier set up with an elegant viewing experience. • Removable stand and Video Electronics Standards Association (VESA™) 100 mm mounting holes for flexible mounting solutions. • Extensive all digital connectivity with DisplayPort, mini DisplayPort, HDMI (MHL), USB 3.0 helps future proof your monitor. • Plug and play capability if supported by your system. • Color gamut of 96% sRGB (CIE1931) with an average Delta E of <4.
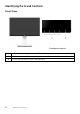
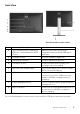
Identifying Parts and Controls Front View Front panel controls Label 4 Description 1 Function buttons (For more information, see Operating the Monitor) 2 Power On/Off button (with LED indicator) | About Your Monitor
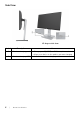
Back View Back View with monitor stand Label Description Use 1 VESA mounting holes (100 mm x 100 mm - behind attached VESA Cover) Wall mount monitor using VESAcompatible wall mount kit (100 mm x 100 mm). 2 Regulatory label Lists the regulatory approvals. 3 Stand release button Releases stand from monitor. 4 Security lock slot Secures monitor with security lock (security lock not included). 5 Barcode serial number label Refer to this label if you need to contact Dell for technical support.
Side View 45-degree side view 6 Label Description Use 1 Wireless charging pad • Charge your Qi (WPC) or PMA compliance devices. • Align your device to the pad to get max charging. 2 Wireless charging LED | About Your Monitor Indicates the wireless charging status.
Bottom View Bottom view without monitor stand Label Description Use 1 AC power cord connector Connect the power cable. 2 Dell Soundbar mounting slots Attach the optional Dell Soundbar. (Concealed below removable plastic sheets) 3 DP in connector Connect your computer with DP cable. 4 Mini DisplayPort in connector Connect your computer with Mini-DP to DP cable. 5 DisplayPort out (MST) connector DisplayPort output for MST (Multi-Stream Transport) capable monitor. DP 1.
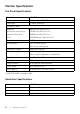
Monitor Specifications Flat Panel Specifications Model U2417HJ Screen type Active matrix - TFT LCD Panel type In Plane Switching Viewable image Diagonal 604.70 mm (23.8 inches) Horizontal, Active Area 527.04 mm (20.75 inches) Vertical, Active Area 296.46 mm (11.67 inches) Area 156246.28 mm2 (242.18 inch2) Pixel pitch 0.
Supported Video Modes Model U2417HJ Video display capabilities (HDMI & DP playback) 480p, 480i, 576p, 720p, 1080p, 576i, 1080i Preset Display Modes Display Mode Horizontal Frequency (kHz) Vertical Frequency (Hz) Pixel Clock (MHz) Sync Polarity (Horizontal/ Vertical) VESA, 720 x 400 VESA, 640 x 480 31.5 70.1 28.3 -/+ 31.5 60.0 25.2 -/- VESA, 640 x 480 37.5 75.0 31.5 -/- VESA, 800 x 600 37.9 60.3 40.0 +/+ VESA, 800 x 600 46.9 75.0 49.5 +/+ VESA, 1024 x 768 48.4 60.0 65.
720 (1440) x 480i 60 720 (1440) x 576i 50 Electrical Specifications Model U2417HJ Video input signals AC input voltage/frequency/ current Inrush current • HDMI 1.4 (MHL 2.0)*, 600mV for each differential line, 100 ohm input impedance per differential pair • DisplayPort 1.2**, 600mV for each differential line, 100 ohm input impedance per differential pair 100 VAC to 240 VAC / 50 Hz or 60 Hz ± 3 Hz / 1.5 A (typical) • 120 V: 42 A (Max.) at 0 °C (cold start) • 240 V: 80 A (Max.
Physical Characteristics Model U2417HJ Connector type DP, black connector (include DP in and DP out); Mini DisplayPort; HDMI (MHL); USB 3.0 Signal cable type • Digital: detachable, HDMI, 19 pins • Digital: detachable, MHL, 19 pins • Digital: detachable, Mini-DP to DP, 20 pins • Universal Serial Bus: detachable, USB, 9 pins Dimensions (with stand) Height (extended) 505.2 mm (19.89 inches) Height (compressed) 415.2 mm (16.35 inches) Width 539.1 mm (21.22 inches) Depth 201.0 mm (7.
Environmental Characteristics Model U2417HJ Temperature Operating 0 °C to 40 °C (32 °F to 104 °F) Non-operating • Storage: -20 °C to 60 °C (-4 °F to 140 °F) • Shipping: -20 °C to 60 °C (-4 °F to 140 °F) Humidity Operating 10% to 80% (non-condensing) Non-operating • Storage: 5% to 90% (non-condensing) • Shipping: 5% to 90% (non-condensing) Altitude Operating 5,000 m (16,400 ft) (maximum) Non-operating 12,192 m (40,000 ft) (maximum) • 250.99 BTU/hour (maximum) • 54.
or Activate the computer and the monitor to gain access to the OSD. NOTE: This monitor is ENERGY STAR®-compliant. * Zero power consumption in OFF mode can only be achieved by disconnecting the main cable from the monitor. ** Maximum power consumption with max luminance, and USB active. *** Energy consumption (On Mode) is tested at 230 Volts / 50 Hz. This document is informational only and reflects laboratory performance.
Pin Assignments DisplayPort Connector Pin Number 14 20-pin Side of the Connected Signal Cable 1 ML0(p) 2 GND 3 ML0(n) 4 ML1(p) 5 GND 6 ML1(n) 7 ML2(p) 8 GND 9 ML2(n) 10 ML3(p) 11 GND 12 ML3(n) 13 GND 14 GND 15 AUX(p) 16 GND 17 AUX(n) 18 GND 19 Re-PWR 20 +3.
Mini DisplayPort Connector Pin Number 20-pin Side of the Connected Signal Cable 1 GND 2 Hot Plug Detect 3 ML3(n) 4 GND 5 ML3(n) 6 GND 7 GND 8 GND 9 ML2(n) 10 ML0(p) 11 ML2(p) 12 ML0(p) 13 GND 14 GND 15 ML1(n) 16 AUX(p) 17 ML1(p) 18 AUX(n) 19 GND 20 +3.
HDMI Connector Pin Number 16 19-pin Side of the Connected Signal Cable 1 TMDS DATA 2+ 2 TMDS DATA 2 SHIELD 3 TMDS DATA 2- 4 TMDS DATA 1+ 5 TMDS DATA 1 SHIELD 6 TMDS DATA 1- 7 TMDS DATA 0+ 8 TMDS DATA 0 SHIELD 9 TMDS DATA 0- 10 TMDS CLOCK+ 11 TMDS CLOCK SHIELD 12 TMDS CLOCK- 13 CEC 14 Reserved (N.C.
MHL Connector Pin Number 19-pin Side of the Connected Signal Cable 1 TMDS DATA 2+ 2 TMDS DATA 2 SHIELD 3 TMDS DATA 2- 4 TMDS DATA 1+ 5 GND 6 TMDS DATA 1- 7 MHL+ 8 TMDS DATA 0 SHIELD 9 MHL- 10 TMDS CLOCK+ 11 GND 12 TMDS CLOCK- 13 CEC 14 Reserved (N.C. on device) 15 DDC CLOCK (SCL) 16 DDC DATA (SDA) 17 GND 18 VBUS (+5V, 900mA maximum) 19 CBUS Plug and Play Capability You can install the monitor in any Plug and Play-compatible system.
Universal Serial Bus (USB) Interface This section gives you information about the USB ports that are available on the monitor. NOTE: This monitor is Super-Speed USB 3.0 compatible. Transfer Speed Data Rate Power Consumption* Super-speed 5 Gbps 4.5 W (Max, each port) High speed 480 Mbps 4.5 W (Max, each port) Full speed 12 Mbps 4.5 W (Max, each port) * Up to 2A on USB downstream port (port with compliance devices or normal USB devices.
USB Downstream Connector Pin Number 9-pin Side of the Connector 1 VCC 2 D- 3 D+ 4 GND 5 SSTX- 6 SSTX+ 7 GND 8 SSRX- 9 SSRX+ USB Ports • 1 upstream - back • 4 downstream - back • Power Charging Port- the port with lightning icon; supports fast current charging capability if the device is BC1.2 compatible. NOTE: USB 3.0 functionality requires a USB 3.0-capable computer. NOTE: The monitor's USB interface works only when the monitor is On or in the power save mode.
Maintenance Guidelines Cleaning Your Monitor CAUTION: Read and follow the Safety Instructions before cleaning the monitor. WARNING: Before cleaning the monitor, unplug the monitor power cable from the electrical outlet. For best practices, follow the instructions in the list below while unpacking, cleaning, or handling your monitor: 20 • To clean your anti-static screen, lightly dampen a soft, clean cloth with water.
Using the Wireless Charging Stand The stand of your monitor allows you to charge a Qi (WPC)/PMA certified smartphone or mobile device wirelessly. For more information about wireless charging standards and certified devices, please visit: http://www.wirelesspowerconsortium.com/ and http:// www.merger.powermatters.org/ Setting Up the Wireless Charging Function NOTE: Always enable USB in Standby mode in OSD (under Energy Setting) before you can use the wireless charging function.
Charging Your Mobile Device Wirelessly To charge your mobile device wirelessly: 1. Read the documentations that come with the mobile device for information on how to use the wireless charging function correctly. 2. Make sure that the charging area of the wireless charging stand is clear of any object and then place your mobile device on the center of the charging area. 3.
WARNING: Do not charge a non Qi (WPC)/PMA certified device, or place any other object in the wireless charging area. If you use a Qi (WPC)/PMA certified wireless charging cover for the mobile device, do not place the cover in the charging area without the mobile device installed. WARNING: Do not place any magnetic storage media (like floppy disks or credit cards) near the charging area. Otherwise the data on the media will be accidentally erased.
Wireless Monitor and Wireless Charging Stand Safety and Regulatory Information www.dell.com/support Safety Dell Wireless devices, like other radio devices, emit radio frequency electromagnetic energy. Dell Wireless devices operate within the guidelines found in radio frequency safety standards and recommendations.
Notice: The FCC regulations provide that changes or modifications not expressly approved by Dell Inc. could void your authority to operate this equipment. These limits are designed to provide reasonable protection against harmful interference in a residential installation. However, there is no guarantee that interference will not occur in a particular installation.
Canada, avis d’Industry Canada (IC) La circuiterie numérique de Classe B de cet appareil est conforme à la norme canadienne ICES-003. Cet appareil est conforme aux normes d’exemption de licence RSS d’Industry Canada. Son fonctionnement est soumis aux deux conditions suivantes : (1) cet appareil ne doit pas causer d’interférence et (2) cet appareil doit accepter toute interférence, notamment les interférences qui peuvent affecter son fonctionnement.
Europese unie, verklaring van naleving van de R&TTE-richtlijn Hierbij verklaart Dell Inc. dat dit draadloze apparaat van Dell voldoet aan de essentiële vereisten en andere relevante bepalingen van Richtlijn 1999/5/EC. Euroopa Liit, direktiivi R&TTE nõuetele vastavuse tunnistus Dell Inc. kinnitab käesolevaga, et Dell Wireless Device vastab direktiivi 1999/5/EÜ olulistele nõuetele ja asjakohastele sätetele. Ey:N Vaatimustenmukaisuusvakuutus Dell Inc.
Unia Europejska, deklaracja zgodności z dyrektywą 1999/5/WE Niniejszym firma Dell Inc. oświadcza, że to urządzenie bezprzewodowe firmy Dell spełnia zasadnicze wymogi oraz inne odnośne przepisy dyrektywy 1999/5/WE. União Europeia, Declaração de conformidade da R&TTE Pelo presente, a Dell Inc. declara que este Dispositivo Sem Fios Dell está em conformidade com os requisitos essenciais e outras provisões relevantes da Directiva 1999/5/EC.