
Installation guide


14
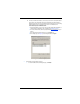
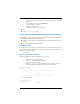
g. To log on to this target, return to the Windows Server window, and then click LogOn.
The status should change from Inactive to Connected.
Step 10. Configure Second Blade (if provided)
To configure a second blade (if provided), repeat Step 9. Use Table 2 on page 5 to build the blade option configuration.
Step 11. Configure iSR6200s for Connecting Remote SANs Using
SmartWrite
Configuration requirement:
■ At least one Fibre Channel port of the iSR6200 must be connected to a Fibre Channel SAN.
■ QLogic recommends that you use Fibre Channel WWPN-based zoning. Add each iSR6200 Router’s Fibre
Channel WWPN to all zones in the Fibre Channel switch to which it is connected. The Fibre Channel switch
zoning changes allow the iSR6200 Router to discover all devices in that Fibre Channel zone.
Additional requirement for remote SAN island connectivity:
■ The GbE port IP addresses of both local and remote routers must be set so that the routers are accessible to
each other.
■ The management port IP address of both local and remote routers must be set so that the routers are accessible
to each other.
■ QLogic recommends that you have installed the SmartWrite™ feature (license) on each router.
Associate remote iSR6200 to local iSR6200:
Using the GUI:
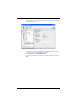
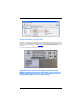
1. Start Router Manager and connect to a local iSR6200 using the management port IP address.
2. On the Wizards menu, click Add Remote Router Wizard.
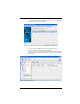
3. Type the remote router management port IP address, and then click Next.
4. In the password dialog box, type the local router and remote router passwords (the default password
for both is config).
The Status information window shows the status of this operation.
Using the CLI:
1. To associate the local and remote routers, issue the remotepeer add command.
2. To view the list of remote routers, issue the show remotepeer command.
For additional information, see the iSR6200 Command Line Interface (CLI) User’s Guide.
Import Fibre Channel devices from remote SAN to local SAN:
Using the GUI:
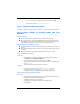
1. Run the Map Remote Initiator/Target Wizard to establish connection between local and remote devices.
2. Select the device to be mapped by expanding the router tree.
3. Click Next to select the other device for this mapping.
If SmartWrite licenses are enabled, the window shows the SmartWrite features.
4. Enable SmartWrite.