
User`s guide


7 – Setting Up Connections
Configuring LUNs for a Device
7-34 FS0054603-00 C
Q
3. Do one of the following:
❑ Click OK to save the changes until you exit the Fibre Channel Port
Configuration dialog box, where you determine what happens to all the
configuration changes (see section 7.2, step 3).
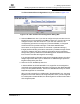
If SANsurfer FC HBA Manager detects an invalid LUN configuration during
an attempt to save the configuration, the invalid
configuration—automatically configure invalid LUNs message displays. Do
one of the following:
❑ Click Yes if you want the software to auto configure the invalid LUNs with
the default paths. The configured invalid LUNs with defaults confirmation
message displays. Click OK.
❑ Click No if you do not want to auto configure the invalid LUNs. The
configuration changes you made are not saved. You can change the
configuration manually and then save the changes.
❑ Click Cancel to not apply the changes.
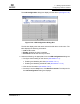
7.5.1
Configure LUN Masking for this Device
You can configure LUN masking—set LUNs as masked or unmasked from the
operating system. Enabling a LUN sets the LUN as unmasked; disabling a LUN
sets the LUN as masked. You can mask disk and tape devices. Use the following
options as appropriate:
■ Enabling and disabling LUN masking on all LUNs (see section 7.5.1.1)
■ Enabling and disabling LUN masking on individual LUNs (see section 7.5.1.2)
7.5.1.1
Enabling and Disabling LUN Masking on All LUNs
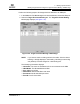
Perform the following steps to configure all LUNs attached to this device (disk or
tape) as enabled or disabled:
1. From the LUN Configuration dialog box, right-click in the Enable heading.
2. From the pop-up menu, select one of the following:
❑ Enable All LUNs to configure LUN masking on all LUNs enabled
❑ Disable All LUNs to configure LUN masking on all LUNs disabled
❑ Invert State to enable currently disabled LUNs and disable currently enabled
LUNs