
Installation guide


62
EMC Host Connectivity with QLogic Fibre Channel HBAs and CNAs in the Windows Environment
Installation and Configuration
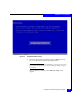
8. If you are installing an operating system for the first time,
highlight Unpartitioned Space on the adapter. Then:
•Press Enter to use the entire disk as one partition
or
•Press C to create a custom partition, and then specify the
partition size
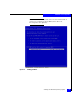
If the new disk is displayed as Unformatted or Damaged you
must delete the partition before continuing. To do this, press D,
and follow the onscreen delete instructions. After you delete the
partition, the disk will then appear as Unpartitioned Space.
If you are reinstalling Windows, the setup software prompts you
to overwrite or upgrade:
• To overwrite, press Esc and follow instructions.
• To upgrade, press Enter.
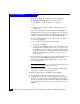
• To create a new hard-disk partition, you must first delete the
existing partition, and then create a new one. To do so, select
the partition you want to delete, press D, and then follow the
onscreen instructions to complete the deletion of the partition.
Once the system deletes the partition, you can press C to
create a new one.)
9. The setup software prompts you to specify the file system format
for the partition. Select NTFS file system format (which is
suitable for most sites) and press Enter, unless you have other
specific requirements.
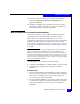
Note: For background information on the choice of the NTFS file system,
refer to Microsoft Knowledge Base Article 184006.
Setup formats the partition, copies the Windows system files to
the partition, and starts rebooting the server.
10. When prompted, remove the diskette and CD-ROM.
11. If your system prompts you to press any key to boot from
CD-ROM, do not press a key. Instead, allow the system to boot
from the array (if external) or the local disk (if internal). After
booting, the system continues installation, displays the Windows
banner, and begins auto detection of mass-storage devices and
adapters.