PR EL IM IN ZigBee Pro Honeycomb Automated Shade AR Y Operation Manual Revision A 12/29/2015 1
TO OUR CUSTOMER It is our mission to bring you a high quality product that fits our high standards for innovation, beauty and simplicity. To do so we have released our Second Generation QMotion® Automated Roller Shade to bring you a great shade experience. This design has many features that you may or may not have noticed that will make your shade more reliable and ready for our future development plans.
Table of Contents PR ZigBee Pro Specifications ……………………………………………………………….…………………...# ZigBee Coordinator/Router Programming Instructions..……………………………….………………….# EL ZigBee Honeycomb Cellular Shade Programming Instructions...………………………….…………….# ZigBee Remote Programming Instructions... ……………………………………………….……………..# IM Glossary………….……………………………………………………………………….……………………# Revision History... ……………………………………………………………………….
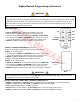
ZigBee Coordinator / Router Programming Instructions READ AND UNDERSTAND EACH SECTION BEFORE PERFORMING REQUIRED STEPS Refer to appropriate user manual whenever a QMotion Coordinator/Router is NOT USED to establish the coordinator network. Instructions for allowing Routers and End Devices to join the coordinator network will vary by manufacturer. CREAT A NEW NETWORK (Coordinator) 1. POWER the COORDINATOR/ROUTER by connecting __the power supply using the MICRO USB cable provided 2.
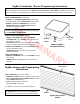
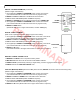
ZigBee Remote Programming Instructions IMPORTANT READ AND UNDERSTAND EACH SECTION BEFORE PERFORMING REQUIRED STEPS Most programming instructions start with the shade in the upper limit position. If a remote is paired to the shade, pushing the UP button will send the shade to the Upper Limit Position. If no remote is paired to the shade, remove the Honeycomb fascia, slide out the motor and battery holder and push the shade up manually. Replace the motor and fascia.
READ AND UNDERSTAND EACH PROGRAMMING SECTION BEFORE PERFORMING REQUIRED STEPS DELETE / UNLEARN A REMOTE (or Channel) (Shade at Upper Limit Position) 1. Use a paperclip to PRESS the PROGRAM button on back of the remote (The channel LEDs will scroll back and forth when in program mode) 2. PRESS and HOLD the UP button until Shade moves downward 3. TUG the shade 6-10 inches (Shade will JOG in response) 4. PRESS the CHANNEL button until desired Channel is lit by GREEN LED 5.
Glossary Fascia The removable covering that hides the internal shade components and battery holder. PR Long Tug Tug shade hembar more than 2 inches. A long tug will cause the shade to stay at the position it was tugged to. Two long tugs done within 10 seconds of each other will send the shade to the upper limit position. EL Micro Tug Tug shade hembar up to 1 inch. A micro tug will send the shade to the next highest position IM IN Short Tug Tug shade hembar 1 to 2 inches.
FCC Warning: Changes or modifications to this device not expressly approved by QMotion ® Incorporated -Advanced Shading Systems could void the user’s authority to operate the equipment. NOTE: This equipment has been tested and found to comply with the limits for a Class B digital device, pursuant to Part 15 of the FCC Rules. These limits are designed to provide reasonable protection against harmful interference in a residential installation.