
User's Manual

4
PRELIMINARY
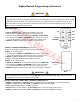
ZigBee Coordinator / Router Programming Instructions
CREAT A NEW NETWORK (Coordinator)
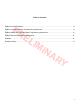
1. POWER the COORDINATOR/ROUTER by connecting
__the power supply using the MICRO USB cable provided
2. PRESS and HOLD the NETWORK button until the
__GREEN LED illuminates (GREEN LED illumination
__indicates the network is active)
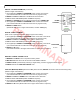
Network
Button
Micro USB
Port
JOIN AN EXISTING NETWORK (Router)
1. PRESS the NETWORK button on the NETWORK
__COORDINATOR or any ROUTER already connected to
__the coordinator network
__(RED LED will pulsate on all coordinator/routers present
__on the coordinator network when open to joining)
2. PRESS the NETWORK button on the ROUTER that will
__join the coordinator network
__(GREEN LED will illuminate when connected to the
__coordinator network)
QMotion ZigBee
Coordinator/Router
This first device that establishes the network is designated
as the NETWORK COORDINATOR
LEAVE A NETWORK (Router)
1. PRESS the NETWORK button on the ROUTER three (3)
__times quickly
__(GREEN LED will turn OFF when not connected to a
__network)
READ AND UNDERSTAND EACH SECTION BEFORE PERFORMING REQUIRED STEPS
Refer to appropriate user manual whenever a QMotion Coordinator/Router is NOT USED to establish the coordinator
network. Instructions for allowing Routers and End Devices to join the coordinator network will vary by manufacturer.
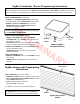
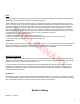
LED
JOIN A NETWORK (Honeycomb Shade)
1. REMOVE the FASCIA cover to expose the battery holder
2. PULL the BATTERY TAB or POWER CYCLE the shade
__(See POWER CYCLE section)
3. TUG the shade hembar 10-20 inches
__(Shade will JOG in response)
The shade is now joined to the coordinator network.
The GREEN LED on networked devices will FLASH for 1
second when a new device joins the coordinator network
Fascia Cover
Hembar
ZigBee Honeycomb
Shade
ZigBee Honeycomb Programming
Instructions