
Setup guide


,%-
!-
$
'
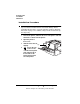
7 Secure the interface card to the interface panel with the two
screws you removed earlier.
8 Reinstall the controller board panel on the printer.
9 Tighten the two screws.
10 Push the fuser unit back in.
11 Close the printer’s front cover.
12 Reconnect all interface cables.
13 Reconnect the power cord, and turn on the printer.
»Note:
In compliance with UL guidelines, “The appliance inlet is
considered to be the main disconnect device.”
14 Print a startup page.
Check that the startup page lists the interface just installed
under “Options.”
& '#
Once a network interface is installed, refer to the following for more
information:
For a CrownNet interface,
refer to the
QMS CrownNet Setup
Guide
for information on connecting to the network, installing
the software, and configuring the interface and the network. In
addition, chapter 2, “Printer Configuration,” of
QMS CrownNet
System Administrator’s Guide
, provides complete configuration
information.
For a DECnet-TCP/IP interface, refer to the
QMS DECnet-TCP/IP
Setup Guide
and the
TCP/IP Protocol Option User’s Guide
.
Your application and network documentation contain information
on printing over the network.
('#
Once a LocalTalk interface is installed, refer to the following for more
information:
EDNord - Istedgade 37A - 9000 Aalborg - telefon 96333500