Copyright © 2009 All Rights Reserved by QOMO HiteVision. www.qomo.
Table of Contents Part 1. QRF900 ARS Overview ................................................................................................... 4 Part 2. Hardware & System Installation Illustration .................................................................... 5 2.1 Student Keypad................................................................................................................. 5 2.1.1 Specifications.......................................................................................
.1.2.10 Free Style Normal/Rush/Elimination: ............................................................................ 54 3.1.2.11 Comparison of Mode Selections and Their Functions ................................................... 55 3.1.3 Logon and Force Login .................................................................................................. 57 3.1.3.1 Logon..............................................................................................................................
Part 1. QRF900 ARS Overview Thank you for purchasing the QRF900 Audience Response System (ARS). The QRF900 ARS uses a 2.4G RF technology to receive instant feedback from the participants (up to 400 persons) simultaneously. Working completely out of Microsoft PowerPoint, the QClick ARS software is easy to learn and easy to use. The quiz question and the answer can be easily and quickly created using built-in PowerPoint templates.
Part 2. Hardware & System Installation Illustration 2.1 Student Keypad 2.1.1 Specifications Dimensions (L× W× H): 126.85mm×52mm×25.46mm Keys: 21 Power required: 2 AA Batteries RF transmission distance: ~200 feet Battery life: 6 months to 1 year depending on usage Function: Transmit response signals 2.1.2 Illustration 2.1.2.1 Student Keypad Layout: 1. LCD 2. Power: Turns unit on and off 3.
4. Up Key: Scrolls the screen display up 5. Right Soft Key: Confirms an operation that appears on the bottom right of screen; When exiting from the answer screen during homework or paper quiz mode, this button is also used to enter into the function selection menu 6. Left Key: Scrolls to the left 7. OK/Menu Key: Confirms a selection or enters the main menu 8. Right Key: Scrolls to the right 9. Del Key: Deletes an exam during paper quiz or homework mode also used to backspace 10.
2.1.2.2.2 Menu Screens: Operations under these menu displays: • • • Use the “Up Key” or “Down Key” to scroll through the selection of the menu items. The item selected will be highlighted. Press the “OK/Menu Key” to select the menu item To use the shortcut to select a menu item, press the “Choice Key” corresponding to the item number in front of the item. 2.1.2.2.3 Input Screens: Operations under these menu displays: The displayed cursor prompts the user to input characters or numbers.
2.1.2.2.4 Confirmation Screens: Operations under these menu displays: Note: Some operations require the user’s confirmation because these operations are not recoverable. For example, deletion of an exam is not recoverable. Once it is deleted, it is permanently removed. • • Press the “Left Soft Key” to confirm an operation. Press the “Right Soft Key” to cancel the current operation. 2.1.2.2.
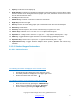
To set a user name, follow these steps: 1. 2. 3. Under the NoHost screen, press the “OK/Menu Key” to enter into the main menu. Select “5.SetUserName” submenu. Under the “SetUserName” screen, enter a valid user name and then press the OK/Menu Key” to save it. Note: All submenu items can be selected by directly pressing their corresponding item numbers displayed at the front of each item. (2) Finding classes: To find a class to log into, follow these steps: 1.
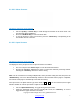
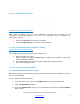
To login, follow these steps: 1. Under the NoHost screen, press the “Send Key” to log into the class you had logged into the last time. The name of the logged in class, the teacher’s name and the channel number will be displayed on the LCD screen. OR 2. Under the main menu, select “ClassList” to display the class list. Select a class and press the “OK/Menu Key” or “Left Soft Key” to login. After successfully logging in, the LCD login screen shows various displays according to the activity mode selected.
Under the Normal Exam screen, the following functions can be performed: • When the exam begins, the screen will display the titles automatically. • Enter your answer by pressing the “Choice Keys” and then press the “OK/Menu Key” to send your answer. A message will be displayed to acknowledge the operation. The student responses will be displayed on the individual student screen for reference. Note: The function of “Send Key” is re-registration.
2) If the test ID selected for the quiz is not saved in the student keypad, the creating a new test screen will display. Only the test title can be modified on this screen. Press the “Left Soft Key” to start the exam. The following functions can be performed in the Paper Quiz Screen: • • • Enter your answers by pressing the “Choice Keys”. Press the “OK/Menu Key” or the “Down Key” to save the answer to your keypad. The cursor will advance to the next question.
c) Rush Quiz and Roll Call Screen: This applies when the instructor has selected the Rush Quiz (left picture) and Roll Call (right picture) activity modes. In the Rush Quiz and Roll Call Screens, the following functions can be performed: • • Press any key (except “Up Key”, “Down Key”, and “Right Soft Key”) to respond to the Rush Quiz or Roll Call. If it is in Rush Quiz, the Normal Exam Screen will be displayed to allow a student to submit an answer.
• Press the “Right Soft Key” to exit the exam. You will be prompted for confirmation. Press the “OK/Menu Key” to exit the current exam or the “Right Soft Key” to cancel the operation and return to the previous screen. If “OK/Menu Key” is pressed, the keypad will display the NoHost screen. 2.1.2.2.7 Homework Mode: To use the student keypad for homework management, follow these steps: Under the main menu, select “3.
To create a new test answer frame, follow these steps: 1) “Exam Id:” This item will be used to match the Test taken when the homework is submitted and the ID is also used for identification when searching for a test later. The ID will be assigned if the Test is in electronic format which is delivered through the software when you choose the Homework or Paper Mode.
Using the student keypad for a hardware test, follow these steps: 1. The QClick software must be in the hardware test mode in order to test the student keypad hardware. Refer to Part 3. Software in session 3.5.3 Hardware test. 2. Under the main menu, select item “6.HardwareTest” submenu to enter into the Hardware test screen display. 3. Enter the channel number, which is the same as the host machine’s channel number selected by the PC software. 4. Press the “OK/Menu Key”.
After the minutes you set without any interaction, the keypad will enter into a sleep mode which will shut down the screen’s display. The user can press any key to wake up the keypad and return to the previous display. 2.1.2.2.10 Routine steps using the student keypad: • Taking a quiz with the pace controlled by the instructor Student Keypad Operation Form 1 Offline (No selected) 2 Class selected the quiz has started.
7 The quiz is loaded and ready but the timer has not started. The student keypad not previously used for this test. Yes Power Up No Host Display, need to search for the class and register. 8 The quiz is loaded and ready but the timer has not started. Yes Enter and send the answer Receives the message “Wait to Start” 9 The quiz is loaded and running, the timer started. The student keypad joined the class previously. Yes Power Up Registered for the class and received the register number.
1. If you didn’t join the class previously, you may have to search for the current class and then register and join the class. 2. If you joined the current class previously, simply press the Send Key to get a short cut to directly register for the class. 3. If your keypad ID is not listed in the current class, you will need to set your keypad ID to the one listed in the class, or try to force a login. The instructor will choose to allow your participation. 4.
2.2.2 Illustration 2.2.2.1 Instructor Keypad Layout: 1. LCD 2. Power: Turns unit on and off 3. Left Soft Key: Confirms an operation that appears on the bottom left of the screen 4. Up Key: Scrolls screen display up 5. Right Soft Key: Confirms an operation that appears on the bottom right of the screen. 6. Left Key: Moves cursor to the left 7. OK/Menu Key: Confirms a selection or enters the Main Menu 8.
In Session Mode: Displays student information 13. View Key: In Normal Mode: Displays student records In Session Mode: Displays current question and correct answer 14. Question Key: Displays the names of students who have a question 15. Start/Pause Key: Starts and pauses 16. Stop Key: Stops current activity 17. Slide Up Key: Displays previous PowerPoint slide or previous question, also used as a page up key 18. Result Key: Displays histogram of results 19. Report Key: Displays Score Board 20.
14. Start/Pause/Login Key: “Up Key” PC keyboard 15. Result Key: “Left Key” PC keyboard 16. Report Key: “Right Key” PC keyboard 17. Slide Down Key: “Page Down Key” PC keyboard 18. F1 Key: “Down Key” PC keyboard 19. F2 Key: Free Style cut picture function key 20. ESC Key: “ESC Key” PC keyboard 2.2.2.3 NoHost Screen The instructor keypad works both in the normal mode and in the session mode. Press the Up/Down Key to select either the normal or session mode. Press the OK/Menu Key to enter the mode you desired.
2.2.2.3.2 Operation mode selection screens display: Use the Up Key or Down Key to select the normal mode or session mode. The normal mode is used for the normal quiz selection. To conduct the normal quiz session, the needed hardware will include the instructor keypad, student keypads, the main receiver, PC and a display device. The session mode is used for conducting quiz sessions just using the instructor keypad and student keypad.
2.2.2.4.2 Input screen display: Operations available under the input menu screen: Note: The displayed cursor highlighted indicates that the user can input characters. • • • • • User can use the Up Key, Down Key, Left Key or Right Key to move the cursor to select the desired character or number from the list of valid characters or numbers display. Press the Left Soft Key to enter the selection.
(2) Login to a class: After finding a class, follow these steps to login: a) Under the NoHost screen, press the Right Key to login to any class logged into previously. There is a list of classes logged into previously stored in the keypad. OR b) Select the normal mode and press the OK/Menu Key under the NoHost Screen to enter into the main menu, and then select the item ClassList. The previously logged in class list will be displayed.
• • • • The selected activity mode The selected class name The instructor name The number of registered student key pads over the number of total students in the class. 2.2.2.4.4 Functions after login: The following functions are available once the Instructor keypad is logged in: λ λ λ λ λ 1. The displayed PowerPoint slides can be selected up or down by pressing the Slide Up Key or Slide Down Key. An exam can be started, paused, or stopped by pressing the Start/Pause Key or Stop Key.
student name and the answer report. Note: A message will be displayed if the student list is empty λ View the histogram of the current question and grade in the instructor keypad. On the currently displayed screen, press the “OK/Menu Key” to enter into the Network Function menu. Select “ExamResult” to display the histogram. Note: This function only applies to the Normal Quiz and Elimination activity mode. λ Respond to student’s questions: View the name of the student who has a question: 1.
The Free Style mode is the only one allowing an instant question: 1. On the currently displayed screen, press the OK/Menu Key to enter into the network function menu. Select “SetQuestion” to view the question type list. 2. Select a question type from the list and then press the OK/Menu Key to go into the setting answer screen. 3. In the item “Option Sum:” enter the total number of choices for this question and in the item “Answers:” enter the correct answer for the question. 4.
4. Press the OK/Menu Key to confirm the setting. After the minutes you set without any interaction, the keypad will enter into a sleep mode which will shut down the screen’s display. The user can press any key to wake up the keypad and return to the previous display. 2.2.2.5 Session Mode This mode needs to use more power. When the power is sufficient, it only can last about 35 hours.
Note: No main receiver or a PC is needed for conducting a session in this mode. 1. Select the session mode in the instructor keypad. 2. Select the function Begin Session. If the keypad has reached maximum storage, you must purge some of the existing data. Refer to session 2.2.2.4.6 Session List for detailed instructions. Note: Before purging data, make sure you have uploaded the session into the QClick database system. Otherwise, the session data will not be recovered after the purging.
2. Once you choose the No Free Style activity mode, the LCD screen will display a list of the answer sheets. Select the answer sheet desired by pressing the OK/Menu Key. The keypad will enter into the quiz session and display the activity mode and teacher name on the LCD screen. 3. If you choose the Free Style Activity mode, there is no need for an answer sheet. The correct answer for each question is entered by the instructor after each question response is finished. 4.
Up Key or Slide Down Key to go to the previous or next question. 6. Press the Left Soft Key to complete the current session.
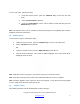
This display shows a Rush Quiz session example. There are a total of 6 questions and the keypad is currently on question 1. No students have registered for the selected class and there is 34 students in this class. The third line shows the testing time in seconds. These functions can be operated under the activity display: Press the OK/Menu Key to enter the main menu for the control function selection for this session. Press the Report Key to view the current list of registered students.
type of question. Press the Start/Pause Key to start/pause the test timer. Whether the timer works, you can press the Up Key or Down Key to increase or decrease the time by 5 seconds. Press the Stop Key to stop the timer. Press the Slide Up/Down Key to select the previous or next question. Press the Report Key to view the answers of a registered student for the current question. Note: This funciton is only active when the timer is stopped. Press the Right Soft Key to exit the session.
3. Select the session mode in the instructor keypad. 4. Select the Loading Info function. The instructor keypad will automatically begin searching for the available classes. Select the desired class. Note: While loading the class information and the answer sheets, keep the main receiver plugged in. 5. Select LoadStudentInfo and load the class and student information into the instructor’s keypad. 6. The instructor’s keypad can store up to 8 classes.
To upload the session data, follow these steps: (You must have at least one stored session to upload) Note: The main receiver and a PC are needed for uploading the session data 1. Plug the main receiver into a PC. 2. Set the QClick software to the Receiving Session Data mode. Refer to Part 3 Software, 3.4.2 Receive Session for detailed instruction. 3. Select the session mode in the instructor keypad. Go to the Loading Info selection screen. Then select the function Upload Session. 4.
1. Select the session mode in the instructor keypad, and then select the function Class List. 2. The classes which have been downloaded in the keypad will be displayed on the LCD screen. Use the Up/Down Key to scroll through the selections. Press the Del Key and then press OK/Menu Key to delete the selected class. Press the Right Soft Key to return to the session mode main menu. If you press the Del Key to delete the selection, the keypad will prompt you for confirmation.
2.2.2.5.5 Session List: The Session List function provides the list of sessions which have been conducted and stored in the instructor keypad and the selection of session’s data you desire to delete from the keypad memory in order to make room for storing new session data. The maximum number of sessions the instructor keypad can store is 8. If all storage is used, you will not be able to conduct a session using the session mode.
2.4 Carrying Case[li rong2] Holds the student remotes, instructor remote, receiver, software disk, and cables Copyright © 2009 All Rights Reserved by QOMO HiteVision. www.qomo.
Part 3. Software Software Overview The QClick Software has 5 main sections: Quiz Genius, Exam Editor, Template Design, Reports and Settings. The Quiz Genius allows you to set up classes, to conduct quizzes, games, take a survey and vote. The Exam Editor allows the creation and editing of the PowerPoint exam slides and the selection of the slide question answers. It can also be used for creating and editing answer sheets for examinations without using PowerPoint files.
program prior to installing the new program. The default installation path is : C:\QOMO, and will produce one shortcut icon on the desktop: QClick. Using the QClick Software 3.1 Quiz Genius Note: One PPT file = one quiz paper One slide = one question Run the QClick program by double clicking the QClick icon on the desktop. If the QRF900 receiver is plugged into the USB port, the software will automatically switch to QRF900 software. Otherwise, the software will prompt you from a system selection window.
embedded under the student record. 3.1.1 The Normal Routine of Running a Quiz Genius: To set up a quiz genius, follow these steps: icon, refer to session 1.1.1 Class for detail set 1. Set up a class by clicking the Class up. 2. Select a participation mode from the Participate Mode 3. You may choose the free style by checking or un-checking the Free Style box ; 4. Load an exam file, or an answer sheet, by clicking the Load the browser; 5.
Multiple Mode, Survey test ID number can be changed No Normal, Rush, Eliminati on, Multiple Mode, Survey Any format of exam files The loaded exam file name is used as the title name, and the system default test ID number can be changed Yes No No No Paper Quiz, Homewo rk Hardcopy The loaded answer sheet file name is used as the title name, and the system default test ID number can be changed Yes* No No No Vote System PPT file The loaded vote file name is used as the title name, and the sys
can be imported from a spreadsheet or entered into the QClick system. To create, to select or to modify class information, follow these steps: 1. Click the Class Settings window. 2. Select a class from the Class Name drop-down list. A student roster associated with the class will be displayed and may be edited or modified. 3. To add a new class, select the Add tab. Type in the new class name and click the button under the Quiz Genius Tab window to display the Class Add button.
button to 6. To add or remove the students to or from the class, click the Manage display the Manage Students window. 7. To import or export the student roster from or to a spreadsheet, click the Import or Export 8. button to display the file browser. To set up the grouping for the students in the class, click Grouping Group Management window. to display the Copyright © 2009 All Rights Reserved by QOMO HiteVision. www.qomo.
button for the There are two grouping methods, random and manual. Click the Random random grouping, the software will randomly select students for the grouping. Click the Manual button to display Group Edit window for the manual grouping. You can simply click and hold the left mouse button to drag and drop a student from one group to another group. 9. Select the subject associated with the class from the Subject Name drop-down list. Copyright © 2009 All Rights Reserved by QOMO HiteVision. www.qomo.
10. You may Add, Delete, or Modify a subject name in the subject list by clicking the Edit button next to the Subject Name drop-down list. 11. Select the teacher associated with the class from the Teacher Name drop-down list. 12. You may Add, Delete, or Modify a teacher information by clicking the Edit button next to the Teacher Name drop-down list. The teacher list can be imported or exported from a spreadsheet by clicking the Import teacher group window. or Export button under the 13.
Note: Once the loading is finished, the color of then Load button changes into green. 3.1.1.5 Title The QClick system uses the title information to associate the quiz or an activity. The title name and the test ID are used in the quiz management and for the searching use in the student keypads which storing the quiz information. For example, the student keypad may store the homework questions to complete at home. The title and test ID help locate the homework.
Blue/Orange color – indicates response signal received. The color is toggled between blue and orange each time the answer is changed, the system only record the last response received before the test ends. Tool Status Bar: 1.
Hand Raise: Indicates the number of students who use the raise hand function in their keypad. Answered/Total: Indicates the ratio of the number of people who answer the question to the total number of people who have logged on. Question Done: When the question is finished, the sign “Done” will display. Question No: Indicate the current question number. Page/Total: The current page number of the total pages. To begin gathering responses from the students, click the Start/Pause button or using the button.
Press the F1 key to show the detail response answer for each participant. By pressing the Report button (using the PC or the instructor’s remote mouse, or through the instructor remote Report key), the instructor can view the responses to the individual questions. The results are displayed in a table. The table shows the register number, the student ID, the student names, the group number, point information and the response time.
3.1.1.8 Exit You can exit the current quiz session by pressing the ESC key on the PC keyboard or on the button on the screen (using the PC or the instructor remote keypad, or by pressing the Exit instructor’s remote mouse). The system will prompt you to save the data to the system database, when the completed session is completed. Note: If the completed session data is not saved, it will be permanently lost. 3.1.
When the current homework session is running but before the Start button is pressed or pressed again, the homework session stays in the state of assigning (Sending Homework). Pressing the Start button will trigger Homework mode switching from the state of assigning (Sending Homework) to the state of Receiving. 3.1.2.4 Rush Quiz: This mode is similar to the normal mode.
correct or incorrect answer information. When you select the Vote activity mode, the system allows you to only load the vote file in PowerPoint format. No answer sheet is needed. In this activity mode, the audience’s response is either a positive or a negative with no correct answer. 3.1.2.9 Roll Call: The Roll Call mode allows the instructor to take attendance.
7. The system white board tool contains these controls: button – Click the button to select the pen function. Pen Eraser button – Click the button to select the eraser function. Color button – Used for the selection of a color for the pen. Clear button – Click the button to clear all images on the white board screen. drop-down list – Click to select the thickness number for the pen. Pen Thickness The larger the number, the thicker the line. Import button – Click this button to import an image file.
Quiz No-Free Paper √ √ √ √ √ No-Free Homework √ √ √ √ √ No-Free Rush √ √ √ √ √ No-Free Elimination √ √ √ √ √ No-Free Survey √ √ √ √ No-Free Vote √ √ √ √ √ √ √ No-Free Roll Call Free Normal √ √ √* √** √ Free Rush √ √ √* √ √ Free Elimination √ √ √* √ √ “√” (Yes) means the activity mode can support the function. Blank (No) means the activity mode cannot support the function. “*” Provide answers after a quiz question answer or a session is completed.
3.1.3 Logon and Force Login 3.1.3.1 Logon Prior to using the QClick system, both the Instructor and the student will need to logon to the system The instructor must select a class containing a list of the student ID’s before starting a quiz session. If the students want to participate in the quiz or exam, they need to set up their keypad student IDs. These ID numbers should be from the class student roster list.
3. To reject the student to Force Login, click the Remove will be unable to attend the session quiz. button. The student 4. Whether the student is permitted to Force Login or not, the “Invalid ID” is displayed on the student keypad before permission. After the instructor approves the Force Login, the student should try one more time to logon to the system RF network. 3.2 Exam Editor The QClick system software allows you to take bulleted PowerPoint slides and convert them easily at the touch of a button.
7. To close the edited PowerPoint quiz file, click the Close button. 8. To set up the PowerPoint quiz file, click the PowerPoint Setup button. This will display you to the PowerPoint Setup window. Refer to the session 3.2.8 PowerPoint Setup for further details. button. This will display 9. To set up an answer sheet, click the Answer Sheet Setup the Answer Sheet Setting window. Refer to the session 3.2.11 Answer Sheet Setup for further details.
3.2.5 Del: The Del function is used to delete a slide from the PowerPoint editing quiz file. The software will prompt you for confirmation of delete when the Del button is clicked. 3.2.6 Save: The Save function is used to save the current edited PowerPoint quiz file. The default path is: “(Installation Path)\ QClick \ User\QRF900 \Paper_Base.” 3.2.7 Close: The Close function closes the current PowerPoint editing quiz file.
To set up questions for an opened PowerPoint quiz file, follow these steps: 1. Open a PowerPoint quiz file from the Exam Editor, refer to session 2.1 Open; or click Open in the menu bar shown at the top of this window, allowing you to open an existing PowerPoint quiz file. You can also create a new PowerPoint quiz file from the Exam Editor, refer to session 2.2 New; or click on New shown in the menu on the top of this window to open a new PowerPoint quiz file. 2.
a selection of options to be deleted. When you add or delete the options, the Correct Answer Selection will be automatically updated. • Correct Answer Selection: -- Click on the Ratio button next to the letter option to indicate the correct option. If you choose not to have a correct answer for the question, then click the Ratio button to “No Correct Answer”. • Point: -- The point value is specified for correct answers. The valid point number is from 1 to 250 and the default value is set to 10.
3.2.9 Standard Setup Refer to section 3.2.8 PowerPoint Question Setup regarding the menu Standard in the Question Setting window. The state education standard can be set up for a question setting. Click the menu Standard under the Question Setting window, the Standard set up window will display. The standard hierarchical chart is displayed on the right of the window. Select a standard applied for the question setting from the chart by clicking the corresponding check box, and then click the Ok button.
• Delete: -- The Delete function is used to delete a standard from the hierarchical standard chart. Select the standard you desire to delete by clicking the check box on the right hierarchical standard chart window. Then click the Delete button to delete the standard. The software will prompt you for confirmation of the deletion. • Save: -- Click the Save button to save all the standard setting changes.
• Import: --The Import function allows you to import the Microsoft spreadsheet format of answer sheet into this Answer Sheet Setting window. Clicking the menu Import to bring you to the import file browser to allow you to select a file name. Then click the Open button to confirm the importing. • Export: -- Export function is used to export the answer sheet setting in this Answer Sheet Setting window to a Microsoft spreadsheet format file.
5. To add a name or identification for new slides; click on the Template Name text box to enter the name for the current design template being edited, and then press the “Enter” key. 6. Typically, a new template will be displayed in the template list in alphabetical order. If you choose to re-assign the placement, click the block you desire to assign on the PowerPoint Slide display (Question Title, Options…) and then click the Option Assignment drop-down list to select either “Qu_Title” or “Options”.
3.3.4 Del: The Del function will delete the template slide from the opened PowerPoint template file. The software will prompt you for deletion confirmation when the Del button is clicked. 3.3.5 Save: The Save function will save the currently edited PowerPoint template file “.POT”. The default save path is “(Installation Path)\QClick\User\QRF900\Module”. 3.3.6 Close: The Close function will close the currently edited PowerPoint template file. The software will prompt you to save.
3.4.1 Reports 3.4.1.1Reports Click the Reports tab on the QClick main window then click Report. This opens the reports tool.
In the Reports interface, there are several filters to help you select an engaged session from which you want a report. If you select All for a filer selection, the filter functioning is Off. The filters are: Test Title – Related to an individual electronic or paper test title used in the system. Activity Mode – The mode selected during a test. These modes include Normal Quiz, Paper Quiz, Rush Quiz, Elimination and Multiple Mode. Type – Indicates session type.
3.4.1.1.1 Create New Session To create a new session, follow these steps: In Data Manager groups, click the New button to begin creating a new session. 1. Type in a session name into the Session box. 2. Type in a test title name into the Test Title box. The test title should correspond to the electronic or paper copy test title or a file name loaded in a classroom activity.
10. Select the question mode by selecting from the drop down list Question Mode for the question you are working on. 11. Select the difficulty level by selecting from the drop down list Difficulty Level for the question you are working on. 12. Enter a correct answer for the question you are working on into the box labeled Correct Answer. The default is set to No Answer. 13.
message saying “The session already exists”; the importing is still successful. 3.4.1.1.3 Edit a session Select a session you wish to edit and then click the Edit button in the Data Manager Groups to open the Edit Session window. This window contains two tabs; Edit Question and Edit Student Answer Sheet. Under the Edit Question tab, you can change the session name, session type, session date, and subject, if desired. All question information contained in the session can also be modified.
This following section will demonstrate how to: Modify session information Re-assign the type of questions Copyright © 2009 All Rights Reserved by QOMO HiteVision. www.qomo.
Re-calculate the questions (including point value) Re-grade the students test MODIFY SESSION INFORMATION Session information is contained in both the Edit Question and Edit Student Answer Sheet tabs. To modify the information in a session, follow these steps: 1. Click either the Edit Question or Edit Student Answer Sheet tab. 2. Move the cursor into the Session text box by clicking the session name edit box and then type the text directly into the box to change the session name. 3.
Change the point value of a question Change the associated standard of a question Follow these steps to edit a Question 1. Click the Edit Question tab. 2. Select a question you wish to edit by clicking the question number and highlighting it. 3. Click the Correct Answer edit box in the Questions area and type in the new correct answer into the box. If the question type is single or multiple choices, then typing the character should be within the range.
5. Click the Answer editing box in the Answer for Question area and type in the new correct answer. If the question type is single or multiple choices, the typing character should be within the range. For example, with a single choice of 4 questions, the maximum allowed is ‘D’. 6. Click the Save button then click the Close button or click the Save and Close button to close the edit session window. The saved edited session data will be recorded in the system database.
4. The Merge window consists of two sections. The top section lists all the sessions to be merged, and the lower section lists a single session to be created. Create a new session name by clicking the area under the session title, then type in your text. 5. At the bottom of the Merge window there is a check box, you may choose to replace the old sessions with the new one. 6. Click the Save button to begin merging. The new created session will be stored in the system database. 3.4.1.1.
3.4.1.1.7 Create Report The QClick reporting system generates various category reports using the student class activity performance data. There are four categories of reports, each report focusing on different areas.
Export reports All reports include a Report Title which includes: Class Name Date of Session Subject Name Teacher Name Session Name Additionally, each report includes the following: STUDENT GRADE REPORT The student grade report lists students overall performance in the session. This list includes: Report Title Student name and ID Correct answer ratio relating to the total number of questions. Correct answer percentage.
STUDENT RESPONSE RESULT The student response report provides detailed information for each question by the student. This report includes: Report Title Student name and the total points earned during the session Questions and option content Student answer and checker Copyright © 2009 All Rights Reserved by QOMO HiteVision. www.qomo.
QUESTION REPORT The question report provides a composite analysis of each question. The question report list includes: Report Title Question and option content A table listing all of the student responses to the question Answer Key per question Distribution bar chart for the selected options. Copyright © 2009 All Rights Reserved by QOMO HiteVision. www.qomo.
CLASS RESPONSE REPORT The class response report provides a composite analysis of the overall class performance. The class response report list includes: Report Title Question and option content Student response percentages per question Highlighted correct answer per question Copyright © 2009 All Rights Reserved by QOMO HiteVision. www.qomo.
STUDY GUIDE The study guide report provides a list of incorrect answers per student providing the instructor the information necessary to develop a study guide for the individual student. The study guide report includes: Report Title Incorrect Question and option identification per student Correct/Incorrect answer comparison per question for each student Copyright © 2009 All Rights Reserved by QOMO HiteVision. www.qomo.
CLASS STUDY GUIDE The class study guide report lists the percentage of incorrect answers per student in the class as well as no response to the question. The Class study guide report list includes Report Title Student name Incorrect percentage Question number, indicating the correct answer and the incorrect answer per student Copyright © 2009 All Rights Reserved by QOMO HiteVision. www.qomo.
ITEM ANALYSIS The item analysis report provides an analysis of the options available for every question in the session. A table is provided showing the overall response percentage of the class to the individual item. The item analysis report includes: Report Title Question number List of all option items and the percentage of responses to the item. Copyright © 2009 All Rights Reserved by QOMO HiteVision. www.qomo.
ABSENTEE REPORT The absentee report lists the names of student who are absent. The absentee report list includes: Report Title The names of students who are absent for this session and their ID. Copyright © 2009 All Rights Reserved by QOMO HiteVision. www.qomo.
STANDARD ANALYSIS REPORT The standard analysis report provides the code and standard of each question if the question is associated to a standard. This report also provides the percentage of correct responses to the question as well as identifying individual student performance for each standard code. The Standard Analysis report includes: Report Title Code and standard associated to the question Percentage of correct responses to the question Copyright © 2009 All Rights Reserved by QOMO HiteVision. www.
ROLL CALL REPORT The Roll Call report is reserved for the roll call activity session. This report lists those in attendance as well as those students who are absent. The Roll Call Report also provides the comparative percentage of those in attendance and those students who are absent.
RESULTS OF SURVEY The Results of survey provides the result for each survey item. The survey report is reserved for the survey activity session. This report lists the total points for each survey item calculated upon the survey point design. The survey report includes Report Title List of survey title and the survey result Copyright © 2009 All Rights Reserved by QOMO HiteVision. www.qomo.
VOTEING RESULTS The vote report is reserved for the vote activity session. This report lists how the participants voted. The report provides the participants name, how many participants voted, and the percentage of yes and no responses for each participant. The vote report list includes Report Title Participant name and individual responses Percentage of the participants yes or no responses Total abstained vote count Copyright © 2009 All Rights Reserved by QOMO HiteVision. www.qomo.
GROUP RESULT The Group Result report provides overall points of each group performance. This report includes: Report title Group number List of each group’s points, append points and total points. Copyright © 2009 All Rights Reserved by QOMO HiteVision. www.qomo.
GROUP STUDENT REPORT The Group Student Report provides a list of the points for each student in the group. The Group Student Report includes: Report title The student’s name and points of each group Copyright © 2009 All Rights Reserved by QOMO HiteVision. www.qomo.
GENERATE REPORTS To generate a report, follow these steps: 1. Click a session you wish to generate a report from. 2. Click the Report button 3. The Create Report window appears. in the Create Report group. Copyright © 2009 All Rights Reserved by QOMO HiteVision. www.qomo.
4. The session name, class and teacher name for the selected session are displayed on the top of the window. The list of students in the class is displayed in the Student List window and all of the available report formats are displayed in the Report Format window. 5. Select the student(s) by checking the box in front of each student name or by clicking the Select All check box to select all students. 6.
The tool bar on the top of Create Report window provides optional controls for previewing a report. Control of report exporting function Control of report printing function Refresh the report viewing Group Tree Function To turn on/off the group tree. When the group tree is displayed, you can click a specific report to view in the tree.
Adobe Acrobat (*.pdf) Microsoft Excel (*.xls) Microsoft Excel Data Only (*.xls) Microsoft Word (*.doc) Rich Text Format (*.rtf) To export a preview report, follow these steps: 1. From the tool bar on the Create Report preview window, click the Export icon 2. The Export Report file browser window will be displayed. Click the Save as type drop-down list to choose a third party application from the list. 3. Type in the file name of the exporting report in the File name text box. 4.
Data Manager Subject grade set up Create a new subject grade session Edit a subject grade session Import a subject grade session to the system database from a file Export a subject grade session from the system database to a file Create Report Subject grade session data are either stored when a session activities is completed or created by this reporting tool Data Manage New.
Weight Set – Set up in the Subject Grade Setting window; this sets the weight percentage in the subject grade book for a type in the subject grade sessions. Letter Grade – Set up in the Subject Grade Setting window; this associates letters to the final score of the group in the subject grade sessions. 3.4.1.2.1 Subject grade set up The QClick subject grade setup interface provides users a method of defining the setup for generating a grade book.
1. Click the Set Up button in the Data Manager group. 2. Select the Set Period tab; the set period window appears. 3. The text box window on the top shows a summarized help guide providing information on how to add a new period, and how to edit and delete an existing period. 4. To add a new period, right click on the data showing area, then select Add from the popup drop-down menu. 5.
1. Click the Set Up button in the Data Manager group. 2. Click the Set Weight tab; the set weight window appears. 3. The text box window on the upper left corner provides a summarized help guide showing how to add a new weight setup, and how to edit and delete an existing weight setup. 4. To add a new weight setup, click on the system template in Weight List, then select the class name, subject name, and teacher name associated to the weight from the drop-down lists.
1. Click the Set Up button in the Data Manager group. 2. Click the Letter Grade tab; the letter grade window appears. 3. The text box window on the upper left corner provides a summarized help guide showing how to add a new letter grade conversion, and how to edit and delete an existing letter grade conversion. 4.
2. Click the Session Type tab; the session type window will appear. 3. The text box window on the top provides a summarized help guide showing how to add a new session type, and how to edit and delete an existing session type. 4. To add a new session, right click in the session type data and then select Add from the popup, drop-down menu. Enter the session type name. The new added session type will be shown in the weight setup list. Please refer to the Weight setup session. 5.
1. Click the New button in the Data Manager group; the New Subject Grade window appears. 2. Enter the new subject grade session name in the Session text box. 3. Select an associated class name with the session from the Class drop-down list. When a class is selected, a list of student names and student ID’s in the class will be shown in the student list window. 4. Select a type for the new subject grade session from the Type drop-down list. 5.
The following SESSION INFORMATION can be modified: Session title Session type Subject and teacher name Session created date Session total points The SESSION POINTS for students can also be modified MODIFYING SESSION INFORMATION To modify the session information, follow these steps: In the Selection window: 1. Click the Session text box to edit the session title name, if desired. 2. Select a new type from the Type drop-down list, if desired. 3.
import function allows you to merge the subject grade session data from the data file to another computer QClick system database. The file takes the extension “.gat” format. When a file to be imported is selected, the import session previews the subject grade session data in two groups, the Import Information and the student session point list. In the Import Information group; session name, session type, class name, subject name, teacher name and session creation date are shown.
2. Click the Export button to begin the export. 3. The file browser will open allowing you to select a file you wish to save the subject grade session data into. 4. Click the Save button to start saving. If the subject grade session data file already exists, the system will prompt you to replace it or not. By selecting the No button, the exporting is canceled. 3.4.1.2.6 Create Subject Grade Report The QClick Subject Grade system generates a subject grade report using the student class performance data.
1. Under the report window select the Subject Grade window tab. 2. Select a grading period from the Grading Period drop-down list. 3. Select a class name from the Class drop-down list. 4. Select a subject name from the Subject drop-down list. 5. Select a teacher name from the Teacher drop-down list. 6. In the session list window, only those sessions which are satisfied with the parameters set in steps 2 through 5 will be displayed.
the Create Subject Grade Report window. The start time and the end time, the total number of students in the class and the average points for the whole class will be displayed in the Information window as well. The student’s point after weight calculation for each type of session will be listed in the student list window. The total grade points and the final letter grade for each student will also be listed.
4. Click the Preview button and the Progressive Report window for the student will be displayed. To generate the Academic Summary, follow these steps: 1. Follow the above 10 steps to generate a Subject Grade Report then click the Create button under the Create Report group to open the Create Subject Grade Report window. 2. Click the Academic Summary from the four reports listed in the window. 3. Select the student you choose to report by clicking on the student name in the Subject Grade Report list.
4. Click the Preview button and the Academic Summary window for the student will be displayed. To generate the Subject Grade Summary, follow these steps: 1. Follow the above 10 steps to generate a Subject Grade Report then click the Create button under the Create Report group to open the Create Subject Grade Report window. 2. Click Subject Grade Summary from the four reports listed in the window. 3. Select the student you wish to report by clicking on the student name in the Subject Grade Report list. 4.
To generate the Class Grade Report, follow these steps: 1. Follow the above 10 steps to generate a Subject Grade Report then click the Create button under the Create Report group to open the Create Subject Grade Report window. 2. Click Class Grade Report from the four reports listed in the window. 3. Click the Preview button and the Class Grade Report window for the class will be displayed. 3.4.1.3 Grade Book Click the Reports tab on the QClick main window then click the Report button.
main categories; Data Manager and Create Report. Data Manager Import a grade book to the system database from a file Export a grade book from the system database to a file Delete a grade book in the system database Create Report From the Create Report group click the Preview button to preview a student grade book. A grade book for a student integrates the student subject grade for a time period such as a semester or an academic year.
function allows you to retrieve one or more subject grade data from the QClick system database in one computer to save it to a dedicated file name and path. The import function allows you to merge the subject grade data from the data file into another computer QClick system database. This file takes the extension “.gbd” format. 3.4.1.3.2 Export a grade book from system database to a file Select a grading period you choose to export from the Grading Period drop-down list.
2. Click the Delete button to open the subject selection dialog window. 3. Select one or more subjects in the subject selection dialog window and click the OK button. 4. The deletion confirmation message window is open to ask if you want to delete or not. 5. 3.4.1.3.4 Create Grade Book Report Select the grading period you wish to create from the Grading Period drop-down list. Select the students you wish to create in the grade book from the student list window.
3. Select a class name from the Class drop-down list, if you don’t want the class to filter the student list, select “All” from the list. 4. Select a teacher name from the Teacher drop-down list, if you don’t want the teacher to filter the student list, select “All” from the list. 5. Check the boxes by the student names to select the students that you wish to generate the report card for. 6. Click the Preview button to preview the report card. You can print and export the report card.
Crystal Report (*.rpt) Adobe Acrobat (*.pdf) Microsoft Excel (*.xls) Microsoft Excel Data Only (*.xls) Microsoft Word (*.doc) Rich Text Format (*.rtf) To export a preview report card, follow these steps: 1. From the tool bar on the Create Report preview window, click the Export icon 2. The Export Report file browser window will be displayed. Click the Save as type drop-down list and select a third party application from the list. 3.
3.4.2 Receive Session Under the instructor keypad session mode, the instructor keypad plays the role of the main receiver, working as the host to directly receive the student keypad responses in a quiz session. However after the conducting quiz session is completed, the student performance session data are only stored in the instructor keypad. There is need to upload the session data into the QClick system database.
After the uploading is completed, click the Save button to save the uploading button to exit session data into the system database. When you click the Exit the Receive Session window but without saving the uploading session data, the software will prompt you to save the data. If you don’t save the uploading session data, the data will be lost. 3.5 Settings 3.5.1 System: The System settings contain audio settings and the instructor remote control mouse sensitivity settings.
• Select Settings Tab. • Click the System • Click on the sound activity check boxes you desire and the Browse button will be displayed. Click the Browse button; this will display the sound file browser. Select the desired sound file for the activity and then click the Save button to save it into the system. • Repeat step 3, if you desire to set up additional sounds for other activities. icon; this will display the System Settings window.
3. If a main receiver is plugged into a USB port, the channel number of the receiver will be displayed on the Set Channel text box. Click on the text box to enter the channel number you desire for the main receiver. Then click on the Send change to the main receiver. The valid channel number is 0 to 49. button to send the 3.5.3 Hardware Test: The Hardware test is used to check the communication of the main receiver, instructor remote control, and the student keypad.
5. If the word “Teacher” or the Student ID number for the student keypad displays on the student ID list window, the communication between the main receiver and PC and the communication between the main receiver and the instructor remote or the student keypad are successful. If these do not display, the hardware test has failed. The failure could be from the main receiver or from the instructor or the student keypad. 6. Click the OK button to close the hardware testing. 3.5.
2. Click the Database icon; this will display the Data Management window. button, if you desire to backup the current database. The 3. Click the Backup backup file browser will be displayed allowing you to select the desired file to use for the backup. 4. Click the Recover button, if you want to recover the database from a file. The recover file browser will be displayed allowing you to select the file for recovery. 5. Click the Clear Session button; if you want to clear all test data from a session.
To change the login user name and the password, follow these steps: 1. Select the Settings Tab. 2. Click the Login Set icon; this will display the Change Password window. 3. Enter the current user name and the password and then enter the new user name and the new password. The new password needs to be re-entered to confirm the charge. 3.5.
The working frequency of QRF 900 system 1. Adopting the 2402.00-2482.00 MHz ISM/SRD band systems 2. The mentioned channel is divided into 41 working carrier frequency points which can set up the host carrier wave through PC software。The specific point of the student and the instructor at which is through the automated search, the main communication equipment to achieve the carrier point of unity。 3.
Channel Frequency(MHz) Channel Frequency(MHz) 0 2402.00 21 2444.00 1 2404.00 23 2446.00 2 2406.00 24 2448.00 3 2408.00 25 2450.00 4 2410.00 26 2452.00 5 2412.00 27 2454.00 6 2414.00 28 2456.00 7 2416.00 29 2458.00 8 2418.00 30 2460.00 9 2420.00 31 2462.00 10 2422.00 32 2464.00 11 2424.00 33 2466.00 12 2426.00 34 2468.00 13 2428.00 35 2470.00 14 2430.00 36 2472.00 15 2432.00 37 2474.00 16 2434.00 38 2476.00 17 2436.00 39 2478.
WARNING: This device complies with part 15 of the FCC rules. Operation is subject To the following two conditions: (1) This device may not cause harmful Interference, and (2) This device must accept any interference received Including interference that may cause undesired operation. NOTE: The MANUFACTURER IS NOT RESPONSIBLE FOR ANY RADIO OR TV INTERFERENCE CAUSED BY UNAUTHORIZED MODIFICATIONS TO THIS EQUIPMENT. SUCH MODIFICATIONS COULD VOID THE USER’S AUTHORITY TO OPERATE THE EQUIPMENT.
QOMO HiteVision Michigan, USA Information: info@qomo.com Phone: 1-866-990-QOMO (1-866-990-7666) Fax: 1-248-281-1999 (US) or 1-248-281-1998 Web: www.qomo.com Copyright © 2009 All Rights Reserved by QOMO HiteVision. www.qomo.