
Owner's Manual


Install
the
AD-C.SUB
Subwoofer
What's
in
the
AD-C.SUB
Box
C)
(1
x)
(3x)
AD-C
.
SUB
Grille
Euro-
e3
(1x)
style
plug
(4-pole)
(2x)
(1x) (1x)
'
Tile
Rails
[Q]
)
Cutout
~
Terminal
Cover
Template
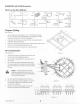
Prepare Ceiling
Refer
to
Figure
1 .
1.
Use
the
supplied
Cut-Out
template
to
cut
a
12
inch
(305
mm)
diameter
hole
(1)
in
the
ceiling
where
the
loudspeaker
is
to
be
installed
.
For
frame-
construction
ceiling,
skip
to
"Wire
the
Loudspeakers".
2.
Install
two
V-rails
(2),
one
on
each
side
of
the
hole,
and
supported
by
the
suspended-ceiling
support
rails
(3).
3.
Install
the
C-ring
(4)
over
the
hole,
using
the
V-rails
as
support.
Make
sure
the
clips
on
the
C-ring
are
properly
fitted
over
the
V-rail.
4.
Use
sheet-metal
screws
(5)
to
secure
the
C-ring
to
the
V-rails.
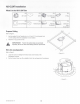
Wire
the
Subwoofer
Refer
to
Figure
2.
1.
Loosen
the
two
screws
(1)
holding
the
wire-terminal
cover
(2)
to
the
body
of
the
loudspeaker
enclosure.
2.
Pull
the
cover
(2)
up
slightly
in
front,
then
pull
away
from
the
enclosure.
3.
Pass
the
wires
through
the
conduiVstress-relief
clamp
(3).
Leave
enough
wire
for
making
connections
.
Carefully
tighten
the
clamp
(3)
over
the
wires,
or
over
the
conduit
if
it
is
used.
NOTE:
The
wire-terminal
cover
has
two
additional
openings
(4)
that
you
can
use
if
the
factory-selected
opening
causes
conflict
between
the
wiring
and
the
structure.
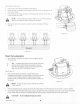
4.
Wire
the
female
Euro-style
plugs
as
shown
in
Figure
3.
5.
The
Euro-style
plugs
are
factory
installed.
If
you
remove
the
connectors,
make
sure
to
re-tighten
the
screws
to
secure
the
connections.
0
(1
X)
£)~
(2x)
C-Ring
Tile
Rail
Screws
(sheet
metal)
~
(1
x)
~
(1
x)
Warranty
Quick
Start
TD-000453
Guide
TD-001556
- Figure
1-
-Figure
2-
6.
Slide
the
cover
(2)
over
the
connector
and
under
the
two
clips,
then
tighten
the
two
Phillips
screws
.
Input
Thru
Sat
1
Sat
2
Sat
3
Sat
4
- Figure
3-
TD-001556
-
01-A
1
2