
Owner's Manual

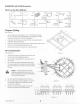


Refer
to
Figure
10
and
Figure
11
3.
Pass
the
wires
(1)
through
the
conduit/stress
-
relief
clamp
(2).
4.
Connect
the
wires
(1)
to
the
female
Euro-style
plug
(3),
as
shown
in
Figure
1 0
and
Figure
11
.
Be
sure
to
observe
polarity.
5.
Leave
enough
wire
for
making
connections.
Carefully
tighten
the
clamp
(2)
over
the
wires
(1
),
or
over
the
conduit
if
it
is
used.
NOTE:
The
Euro-style
plugs
are
factory
installed.
If
you
remove
the
connectors,
make
sure
to
re-tighten
the
screws
to
secure
the
connections
.
6.
Slide
the
cover
(4)
over
the
connector
and
under
the
clip
(5),
then
tighten
the
Phillips
screw
(6).
Satellite 1
SatelliLe 2 Satellite 3 Satellite 4
Sat 1
Sat2 Sat3
Subwoofer
- Figure
11-
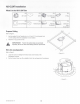
Mount the
Loudspeakers
1.
Use
a
small
flat-tip
screwdriver
(or
similar)
to
pry
up
one
edge
of
the
grille
.
Remove
the
grille.
v
TIP:
The
satellite
grille
is
held
on
by
three
magnets.
Press
down
along
the
edge
of
the
grille
between
two
magnets
to
make
the
other
side
of
the
grille
pop
up.
You
may
have
to
move
around
the
edge
of
the
grille
to
find
a
spot
between
magnets
.
Refer
to
Figure
12
.
2.
Make
sure
both
dog
ears
are
turned
in,
up
against
the
side
of
the
loudspeaker
housing
.
Figure
12
(1)
shows
turned
in,
(2)
shows
the
dog
ears
not
turned
in.
Use
a
Phillips
screwdriver
to
adjust
the
dog
ears
to
the
turned-in
position.
The
Phillips
screws
are
under
the
grille
and
aligned
with
the
dog
ears.
NOTE:
The
dog
ears
can
be
turned
in
when
they
are
at
the
top
of
their
range
only
.
Sat4
2
- Figure
10-
-Figure
12-
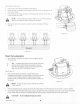
3.
Slide
the
loudspeaker
housing
up
through
the
hole
into
the
ceiling.
Make
sure
that
the
wiring
does
not
get
pinched
or
caught
on
anything
.
4.
Use
a
Phillips
screwdriver
to
tighten
both
dog-ear
screws.
As
you
tighten
the
screws,
the
dog
ears
swing
away
from
the
housing
and
over
the
ceiling
material.
Before
the
dog
ears
are
completely
tightened,
make
sure
they
are
properly
positioned
over
the
ceiling
material.
CAUTION!:
Do
not
overtighten
the
dog-ear
screws!
TD-001556-01-A
1
5