
Owner's Manual


Install the
AD-C.SUB
Subwoofer
What
1
s
in
the
AD-C.SUB
Box
AD-C
.
SUB
C)
(1
x)
(3x)
,
Grille
Euro
-
B
(1X
)
~
style
plug
(4-pole)
(2x)
(1
x)
(1
X)
'
Tile
Rails
□
Cutout
~
Terminal
Cover
.
Template
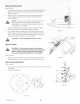
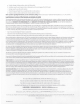
Prepare
Ceiling
Refer
to
Figure
1 .
1.
Use
the
supplied
Cut-Out
template
to
cut
a
12
inch
(305
mm)
diameter
hole
(
1)
in
the
ceiling
where
the
loudspeaker
is
to
be
installed.
For
frame
-
construction
ceiling
,
skip
to
"Wire
the
Loudspeakers".
2.
Install
two
V-rails
(2)
,
one
on
each
side
of
the
hole,
and
supported
by
the
suspended
-
ceiling
support
rails
(3).
3.
Install
the
C-
ring
(4)
over
the
hole,
using
the
V-rails
as
support
.
Make
sure
the
clips
on
the
C-ring
are
properly
fitted
over
the
V-rail.
4.
Use
sheet
-
metal
screws
(5)
to
secure
the
C-
r
ing
to
the
V-rails.
Wire
the
Subwoofer
Refer
to
Figure
2.
1.
Loosen
the
two
screws
(1)
holding
the
wire-terminal
cover
(2)
to
the
body
of
the
loudspeaker
enclosure
.
2.
Pull
the
cover
(2)
up
slightly
in
front
,
then
pull
away
from
the
enclosure
.
3.
Pass
the
wires
through
the
conduiVstress
-
relief
clamp
(
3).
Leave
enough
wire
for
making
connections.
Carefully
tighten
the
clamp
(3)
over
the
wires,
or
over
the
conduit
if
it
is
used
.
A
NOTE:
The
wire-terminal
cover
has
two
additional
openings
(4)
that
you
can
use
if
the
factory
-
selected
opening
causes
conflict
between
the
wiring
and
the
structure
.
4.
Wire
the
female
Euro-style
plugs
as
shown
in
Figure
3.
5.
The
Euro-style
plugs
are
factory
installed
.
If
you
remove
the
connectors
,
make
sure
to
re-tighten
the
screws
to
secure
the
connections.
3
4
-~
0
~
6.
Slide
the
cover
(2)
over
the
connector
and
under
the
two
clips
,
then
tighten
the
two
Phillips
screws.
Input Thru
t t
(1
x)
&)~
(2x)
C-
Ring
Tile
Rail
Screws
(sheet
metal)
(1
x)
ro
(1
x)
Warranty
Quick
Start
TD
-
000453
Guide
TD
-
001556
- Figure
1-
- Figure
2-
Sat
1
Sat
2
Sat
3
Sat
4
- Figure 3 -
TD-001556-01
-A
1
2