
Owner's Manual


Mount the
Subwoofer
Refer
to
Figure
5.
1.
Use
a
small
flat-tip
screwdriver,
or
similar
tool,
to
carefully
pry
the
grille
off
the
loudspeaker
housing
giving
you
access
to
the
dog-ear
screws.
The
grille
is
held
on
by
magnets.
2.
Make
sure
all
four
of
the
dog
ears
are
turned
in,
up
against
the
side
of
the
metal
loudspeaker
housing.
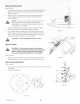
Figure
5
(1)
shows
turned
in,
(2)
shows
the
dog
ear
not
turned
in.
J\,.
NOTE:
The
dog
ears
can
be
turned
in
at
two
places
only.
One
..
accommodates
up
to
2-inch
thick
ceiling
material,
the
other
accommodates
1.25-inch
thick
material.
See
Figure
4.
Use
the
one
most
suitable
to
your
installation.
3.
Slide
the
Loudspeaker
Housing
up
through
the
hole
into
the
ceiling.
Make
sure
that
the
wiring
does
not
get
pinched
or
caught
on
anything.
4.
Use
a
Phillips
screwdriver
to
tighten
all'four
of
the
dog-ear
screws.
As
you
tighten
the
screws,
the
dog
ears
swing
away
from
the
housing
and
over
the
ceiling
material.
Before
the
dog
ears
are
completely
tightened,
make
sure
all
dog
ears
are
properly
positioned
over
the
ceiling
material.
CAUTION!:
Do
not
overtighten
the
dog-ear
screws!
Seismic
Safety
WARNING!:
Be
sure
to
check
and
adhere
to
local
building
codes
for
seismic
requirements.
If
in
doubt,
consult
an
appropriate
engineer.
Regardless
of
local
building
codes,
QSC
recommends
that
you
use
the
appropriate
safety
tethers
for
the
installation.
Refer
to
Figure
6.
1.
Attach
appropriate
safety
tethers
(1)
to
the
tether
tabs
(2),
on
the
back
of
the
loudspeaker
enclosure,
and
to
an
appropriate
part
of
the
building's
structure.
Set the
Operating
Mode
Refer
to
Figure
7
2"(50mm)
Max
1.25"(31 mm)
Max
1 .
Use
a
small
coin
,
or
similar
tool,
to
set
the
transformer
tap
(1)
based
on
the
requirements
of
the
installation
.
2.
Install
the
loudspeaker
grill.
- Figure
7-
TD-001556-01-A1
3
-Figure
4-
- Figure
5-
-Figure
6-