
Owner's Manual

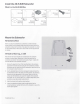


Mono
or
stereo
Low-Z
operation
Mono
and
stereo
The
subwoofer
driver
has
dual
8-ohm
voice
coils.
In
stereo
operation
the
voice
coils
are
separate,
presenting
an
8-ohm
load
on
both
the
left
and
the
right
amplifier
channel.
In
mono,
the
coils
are
parallel,
amounting
to
a
single
4-ohm
load.
In
stereo
operation,
SAT
1
and
SAT
3
are
the
left
satellites,
while
SAT
2
and
SAT
4
are
the
right
ones.
In
mono,
all
the
satellites
are
mono.
Use
the
mono/stereo
switch
for
selecting
mono
or
stereo
operation.
WARNING!:
The
MONO
position
is
only
for
use
with
one
amplifier
output.
Never
connect
separate
amplifier
outputs
to
both
the
L
and
R
inputs
when
the
switch
is
in
the
MONO
position;
doing
so
could
damage
the
amplifier
circuitry.
Mono
input
connection
1 .
Set
the
transformer
to
LOW-Z.
2.
Set
the
Mono/Stereo
switch
to
MONO.
3.
Strip
the
wire
ends
about
6
mm
or
about
1/4
inch.
4.
Connect
the
pair
of
wires
from
the
amplifier
to
the
+
and
-
terminals
of
the
Euro-style
input
connector
as
shown
in
Figure
5.
Tighten
the
clamping
screws
to
hold
the
wires
securely.
5.
Plug
the
input
Euro-style
connector
into
the
Low-Z
mono/stereo
input.
Tighten
the
anchor
screws
on
the
connector.
Continue
to
Satellite
connections
.
Stereo
input
connection
1 .
Set
the
transformer
to
LOW-Z
.
2.
Set
the
Mono/Stereo
switch
to
STEREO.
3.
Strip
the
wire
ends
about
6
mm
or
about
1/4
inch.
4.
Connect
the
pair
of
wires
from
the
amplifier
left
output
to
the
+
and
-
terminals,
and
the
pair
from
the
amplifier
right
output
to
the
other
+
and
-
terminals,
of
the
Euro-style
input
connector
as
shown
in
Figure
6.
Tighten
the
clamping
screws
to
hold
the
wires
securely.
5.
Plug
the
input
Euro-style
connector
into
the
Low-Z
mono/stereo
input.
Tighten
the
anchor
screws
on
the
connector.
Continue
to
Satellite
connections.
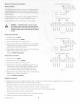
Satellite
connections
Low-Z
mono
/stereo input
\ - + - +
Mono
Amp
(§)(§)(§)(§)
Hi-pass satellite outputs
JI
~
+-+
~~~~~~
y y y y
To
SAT
1
To
SAT
2
To
SAT
3
To
SAT
4
Stereo
Amp
[if
needed)
[if
needed)
-Figure
5-
Le~
Right
Hi-pass satellite outputs
I \
+-+
~@®@®~
y y y y
To
SAT1
To
SAT
2
To
SAT
3
To
SAT
4
[if
needed)
[if
needed}
-Figure
6-
6.
Connect
the
wires
to
the
pair
of
satellite
loudspeakers
(SAT
1
and
SAT
2)
to
a
Euro-style
connector
as
depicted
.
If
you
are
using
a
second
pair
of
satellites
(SAT
3
and
SAT
4),
wire
them
to
a
second
Euro-style
connector.
Be
mindful
of
polarity
when
connecting
multiple
loudspeakers;
always
connect
+
to
+
and
- to-.
Plug
the
SAT
1
and
SAT
2
Euro-style
connector
into
the
SAT
1
and
SAT
2
high-pass
output.
If
you
have
SAT
3
and
SAT
4,
plug
their
Euro-style
connector
into
the
SAT
3
and
SAT
4
high-pass
output.
Tighten
the
anchor
screws
on
each
Euro-style
connector.
7.
To
strain-relieve
the
wires
,
use
tie-wraps
to
lash
them
to
the
cable-tie
anchors.
8.
Snap
the
rear
panel
cover
onto
the
subwoofer
enclosure.
TD-001547-01
-A
5