
Owner's Manual


Wire
the
Subwoofer
We
recommend
using
insulated
twisted
pair
stranded
copper
wire
of
an
adequate
gauge
to
minimize
resistive
losses.
To
facilitate
connection,
the
AD-S.SAT
loudspeakers
have
four-pole
connectors
for
the
inputs
and
two
more
for
the
high-pass
outputs
to
as
many
as
four
16Q
satellite
loudspeakers
(Figure
5).
Each
subwoofer
comes
with
three
Euro-style
four-pole
pluggable
connectors
with
clamping
screws
for
securing
to
the
wire
conductors.
Unsnap
the
end
cover
of
the
subwoofer
enclosure
to
access
the
rear
panel,
where
the
connections
and
configuration
switches
are
(Figure
3).
The
cover
is
reversible
so
the
subwoofer
enclosure
can
be
oriented
in
either
direction.
Mono
70-
or
100-volt system
Use
a
mono
70-
or
100-volt
power
amplifier.
Multiple
subwoofer
and
satellite
systems
may
be
connected
on
the
same
distributed
line,
limited
by
the
amplifier's
power
capacity
and
the
subwoofers'
transformer
settings.
1.
Set
the
transformer
to
the
desired
power
(in
watts);
LOW-Z
is
only
for
mono
4Q
or
stereo
SQ
operation.
2.
Set
the
Mono/Stereo
switch
to
MONO.
3.
Strip
the
wire
ends
about
6
mm
or
about
1/4
inch.
4.
Connect
the
pairs
of
wires
to
the
+
and
-
terminals
of
the
Euro-style
connectors
as
shown
in
Figure
4.
Tighten
the
clamping
screws
to
hold
the
wires
securely.
To
daisy-chain
forward
to
one
or
more
other
subwoofers,
connect
a
second
wire
pair
to
the
THRU
terminals
of
the
input
Euro-
style
connector.
Be
mindful
of
polarity
when
connecting
multiple
loudspeakers;
always
connect+
to
+
and
- to-.
5.
Connect
the
wires
to
the
pair
of
satellite
loudspeakers
(SAT
1
and
SAT
2)
to
a
Euro-style
connector
as
depicted.
If
you
are
using
a
second
pair
of
satellites
(SAT
3
and
SAT
4),
wire
them
to
a
second
Euro-style
connector.
6.
Plug
the
input
Euro-style
connector
into
the
Mono
70/1
00V
input.
Plug
the
SAT
1
and
SAT
2
Euro-style
connector
into
the
SAT
1
and
SAT
2
high-pass
output.
If
you
have
SAT
3
and
SAT
4,
plug
their
Euro-style
connector
into
the
SAT
3
and
SAT
4
high-pass
output.
Tighten
the
anchor
screws
on
each
Euro-style
connector.
7.
To
strain-relieve
the
wires,
use
tie-wraps
to
lash
them
to
the
cable-
tie
anchors.
8.
Snap
the
rear
panel
cover
onto
the
subwoofer
enclosure.
TD-00154
7-01
-A
4
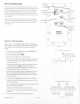
Cable
tie
SUB
WOOFER
TRANSFORMER
SETTINGS
HI-Z
70V/100V
MONO
INPUT
©
tap
selection
~-,..-:,,.
~
~
___
sw_it~cr-'h
@
©
Mono/Stereo
switch
@
MONO.
~
STEREO"'ff:::::J
HI-PASS
FILTERED
(200Hz-2DkHzJ
OUTPUTS
T0
180
SATELLITE SPEAKERS
~m:+
ffli+
@
~
~<::::_
a
-~p;._...;:::!!!,,,,_
CISC
ACOUSTIC
DESIGN
AD-S.SUB
SURFACE
MOUNT
SUBWOOFER
@ @
@ @
© ©
-Figure
3-
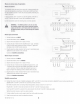
70Vor
10
□
V----+---'
Amp
Low-Z
mono
or
stereo
input
High-pass
outputs
to
satellites
y T
Thru
Hi-pass satellite outputs
I \
~@@@@~~@®@®b
i i i i i i i i
ToSAT1
ToSAT2
ToSAT3
ToSAT4
(if
needed)
(if
needed)
-Figure
4-