
Owner's Manual


EN
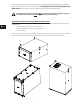
Shear Plates
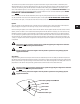
Align the mounting hole of the shear plate with the enclosure attachment point with the rubber pad between the plate and
the cabinet. Place the attachment hardware according to the illustration. Tighten the hex-head bolts enough to hold the shear
plate in place but leave it just loose enough to rotate with minimum force. Check the alignment of the shear plate so that it is
perpendicular to the cabinet. Once positioned, tighten the bolts so that the shear will not rotate with force.
The shear plates must be secured to structure that is capable of supporting the weight of the subwoofer
and must be connected using load rated hardware.
Consult a licensed, professional engineer when any doubt or questions arise regarding a physical
equipment installation.
Remove the screws from the selected attachment points using a #2 phillips-head screw driver or electric driver. Remove
only the screws that will be used for the attachment eyebolts or shear plates. DO NOT REMOVE ANY OTHER SCREWS.
If a screw hole is left open, it will create an airleak which will cause noise and compromise the performance of the cabinet.
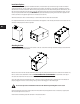
The locations of the eyebolts were designed to suspend the subwoofer using the fewest number of attachment points.
Where possible there are only three attachment points to be used. These points are located so that the triangle they form
“encloses” the center of gravity and the subwoofer will balance with all three points suspended. In some cases, one or
more of the attachment points is not on a cabinet side that is facing up. In these cases DO NOT USE AN EYEBOLT. In this
position, the eyebolt will be in shear and the eyebolt is greatly derated in this use. For these attachment points a SHEAR
PLATE MUST BE USED FOR SUSPENDING the subwoofer.
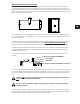
Eyebolts
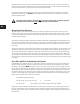
Screw the eyebolt into the attachment point. It should not require significant force to rotate the eyebolt if the threads are
properly engaged. If the eyebolt is not screwing in easily, remove it and engage it in the threads again.
Continue rotating the eyebolt until it makes contact with the cabinet. Once the eyebolt shoulder has made contact with the
cabinet, continue to rotate it until it reaches the desired alignment with the cabinet. If necessary, use a tool such as a long
handheld screwdriver to tighten it. Place the blade of the screwdriver through the eyebolt and use it to rotate the eyebolt.
It is not necessary to tighten the eyebolt to the point that it cannot rotate any further. Once the shoulder has made contact
with the enclosure, any further tightening is actually cutting the shoulder of the eyebolt in to the wood of the cabinet. This
“cutting in” coupled with the tension of suspension on the eyebolt will prevent the eyebolt from loosening once the cabinet
is suspended.
The eyebolts must be secured to structure that is capable of supporting the weight of the subwoofer
and must be connected using load rated hardware.
Consult a licensed, professional engineer when any doubt or questions arise regarding a physical
equipment installation.
Hex-head / phillips-head M6 Bolt
Lock washer
Flat washer
Shear plate
Attached rubber pad
7