
User's Manual


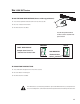

15
The DSP-30 must be loaded with your desired presets using the Signal
Manager program before use. Test all new presets for expected behavior at
low power levels to avoid inadvertently damaging speaker systems.
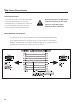
The DSP-30 has eight Preset memories numbered 1 through 8. Presets are DSP configurations
saved to memory in the DSP. Only one preset may be active at one time. The possible configurations of
the presets are essentially limitless. You will need to configure the preset memories with signal
chains that meet the precise requirements of your sound system using QSC’s Signal Man-
ager software. For help creating configurations, refer to the software’s on-line Help system
for detailed information.
Presets
Use: Saving Presets Using QSC’s Signal Manager software
Configuring the DSP-30’s Presets
How to Save Presets into the DSP-30
NOTE! When programming presets into the DSP-30, be sure
that the preset selected is the one you wish to overwrite.
Once the configuration is applied to the DSP-30, the selected
preset’s previous information is overwritten.
The DSP configurations created with the Signal Manager software are not usable until they are saved
into the DSP. The software includes a collection of various sample configurations for your use. Modify
and save them as your own configurations if they prove useful in your applications. You may also create
your own to precisely fit your audio system. Once a configuration has been created and saved, it may be
loaded into the DSP.
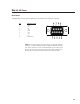
1- Connect the DSP-30 to the PC using a 9-pin serial cable. Run the Signal Manager program.
The preset configuration that is running in the DSP will be displayed on the Signal Manager
workspace. It should match the front panel LED display of the DSP-30.
2- You may now create a new configuration (or modify the existing one) to be saved as a DSP
preset. To create a new configuration, select
Configuration/New
from the menu bar. This will
clear the workspace and activate the DSP tools and filter icons. If a configuration already
exists in the computer, choose the
Configuration/Open
menu item and select the desired con-
figuration from the
Open
window. Note that in each of these cases, the Configuration Pane at
the bottom of the workspace changes from reading ‘ACTIVE’ to ‘EDIT.’
3- After creating (or editing) your configuration and making the necessary parameter changes,
select
Configuration/Save DSP Preset
from the menu bar. Then choose the Preset Identifica-
tion Number that you wish to program. Press the OK button.
4- Once the DSP is programmed with the configuration, the text banner at the top of the
workspace will reflect the selected Preset Identification Number, as should the front panel
LED of the DSP-30.