
Owner`s manual


4
5. Next, unsolder and remove the wire jumper pairs (W305/W306 and W405/W406 on EX Series amplifiers; W303/W304
and W403/W404 on MXa and legacy CX Series amplifiers). Under or next to where the jumpers were is arow of solder
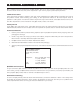
holes, with one section of 10 holes and another with 12. This is the Mini Slot in which the SEQ-2 will be installed. See
Figures 6 and 7.
6. Continue preparing the PC board by removing solder from all 22 in-line socket holes. Once this is done, you are ready
to install the SEQ-2. Proceed to the section below on mounting the SEQ-2 to the input card.
Mounting the SEQ-2 to the input card or BusCard
1. Carefully insert the header pins of the SEQ-2 accessory card fully into the socket holes of the input card or BusCard. Make
sure the accessory is correctly oriented and inserted into the correct side of the input card or BusCard. Turn the assembly
over and solder the SEQ-2 in place. Make sure all the header pins are well soldered. Visually inspect for cold solder joints.
Verify that you have sufficient clearance to re-install any ribbon connectors onto the assembly. Finish by trimming the
SEQ-2 header pins as required.
2. EX, MXa, or legacy CX models only: Reconnect the ribbon cable to the input board connector. Press the locking clamp
wings of the connector closed. You will feel them snap onto place.
3. PowerLight, PLX, DCA, or current CX models only: On PowerLight PL 3.4, PL 3.8
X
, and PL 4.0 models, as well as 2 RU
PowerLight models using the BSC-2 BusCard, adjust the SEQ-2 trimpots as needed before you finish mounting the
BusCard; the trimpots will be difficult to reach and adjust afterward.
Connect the appropriate ribbon cables to the BusCard and mount it inside the amplifier, as described in the BusCard
instructions.
PowerLight (original series), PLX (original series), CX, and DCA models
These models require an appropriate BusCard. The SEQ-2 should be installed on the BusCard before the BusCard itself is
installed in the amplifier. If the SEQ-2 is to be installed on a BusCard that is already installed in the amplifier, temporarily remove
the BusCard for the installation procedure. NOTE: The PLX2, PowerLight 2, and PowerLight 3 series amplifiers are not
compatible with BusCards.
Preparing the BusCard (PowerLight, PLX, DCA, and current CX models only)
Some BusCard models accommodate more than one accessory card. If you are installing more than one accessory, you
should decide on the proper order of signal flow through them. For example, if one of the accessories is an SPL-1 Stereo
Power Limiter, it should generally go last. A UF-2 or UF-3 Universal Filter would usually work best if it is first in the signal
flow, especially if it is used as a crossover.
Figure 6. Input card of a legacy CX Series amplifier
Figure 7. Input card of an EX Series amplifier. MXa Series input
cards are fairly similar.
“Mini Slot”
wire
jumpers