
User's Manual


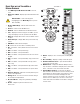
Table Of Contents
- Maintenance and Repair
- TouchMix™ How To
- Register and Update
- TouchMix-30 Pro Package Contents
- TouchMix-8 / TouchMix-16 Package Contents
- About This Manual
- Getting Started
- Effects
- Mute Groups
- DCA Groups
- Sub Groups (TouchMix-30 Pro only)
- Using Auxiliaries as Sub Groups (TouchMix-8 and 16 only)
- Matrix Mixing
- Save Your Work as a Scene
- Sound Check
- Anti-Feedback System
- Real Time Analyzer (RTA)
- Mutes
- Copy & Paste
- Patch Matrix (TouchMix-30 Pro only)
- Room Tuning Wizard
- User Buttons
- MIDI Control
- Security
- Monitor (TouchMix-30 Pro only)
- Monitor (TouchMix-16 only)
- Solo In Place (SIP) (TouchMix-30 Pro only)
- TouchMix Reference
- Getting Started
- Top Panel and Remote-Device Controls (TouchMix-30 Pro)
- Rear Panel (TouchMix-30 Pro)
- Right Side of the TouchMix-16 Mixing Surface
- Right Side of the TouchMix-8 Mixing Surface
- Rear Panel (TouchMix-16)
- Rear Panel (TouchMix-8)
- TouchMix-30 Pro Specifications
- TouchMix-8 and TouchMix-16 Specifications
- TouchMix™ Feature List
- Nav Strip
- Input Channels
- Output Channels
- Sub Groups (TouchMix-30 Pro only)
- 2‑Trk Playback
- FX Masters
- Wizards
- FX Processor
- Security
- Miscellaneous Features
- Mute Groups
- About Mute Groups
- Mute Groups Screen
- Mute Group Edit Screen
- Record / Playback (Multitrack USB Drive)
- 2‑Trk − Recording
- DAW – Record / Playback (TouchMix-30 Pro only)
- Real-time Analyzer (RTA)
- Scenes
- Channel Safe
- Auto Mixer TouchMix-30 Pro
- External Control Surfaces - TouchMix-30 Pro
- Custom Fader Banks - TouchMix-30 Pro
- DCA Group Assignments
- MIDI
- Talkback / Noise
- TouchMix Wi-Fi Control
- Getting Started
- TouchMix Dimensions
- TouchMix Block Diagram
- Contact QSC

22
1001108-01-F
Room Tuning Wizard
The Tuning Wizard assists the operator in adjusting an output equalizer to compensate for variations in room acoustics and loudspeaker response.
The three TouchMix models handle measurement microphone connection in slightly differing ways.
TouchMix-30 Pro
The measurement microphone is connected to the Talkback input and is controlled entirely from within the Room Tuning Wizard.
TouchMix-8 or TouchMix-16
For these mixers the microphone is connected to input 8 (TouchMix-8) or input 16 (TouchMix-16). When the Room Tuning Wizard is opened,
channel 8 (or 16) is automatically muted and its input signal is routed to the Room Tuning Wizard. The measurement microphone may then be
connected to input 8 (or 16) and the Room Tuning process may be run. Upon completion, the input channel is muted to allow disconnection of the
measurement microphone and re-connection of the instrument previously connected. The input 8 (or 16) channel mute can then be lifted by the
operator. The Room Tuning Wizard has no effect on the input channel settings.
Before proceeding with the Tuning Wizard, listen to your system in the room using material with which you are familiar. Many contemporary
loudspeaker systems – especially powered loudspeakers such as the QSC K.2, K, KW and KLA series – have been carefully tuned by design and
will sound very good with little or no additional equalization.
That said, here’s how to use the Room Tuning Wizard. Before you begin, you will need a measurement microphone with flat response, a microphone
stand and a microphone cable that’s long enough to reach from the mixer to the coverage area of the speakers being measured.
When using the Room Tuning Wizard, it’s best to do so before applying any of the output channel’s parametric EQ or Anti-Feedback filters.
To access the Room Tuning Wizard:
Wizard
Tuning Wizard
OR
Aux Masters
Aux 1
GEQ
Tuning Wizard
3. Select an output to tune
Aux 2
4. Select a measurement method.
Low Precision
(Fast)
OR
Medium Precision
OR
High Precision
OR
Skip Measurement
(Use Previous)
NOTE:
The Low Precision method uses just a single measurement while the Medium and High Precision methods require
multiple measurements and repositioning of the microphone. The Skip Measurement method will retain the results of the last
measurement but allow selection of one of the other target tuning curves that we’ll discuss in a moment.
5. Touch
Next
. The wizard displays instructions and a guide to microphone placement.
NOTE:
Most measurement microphones are condenser microphones and require phantom power which may be switched on from
the Room Tuning Wizard screen.
6. Enable
Talkback Mic Phantom On
O
if needed.
7. Touch
Begin
.