
User's Manual


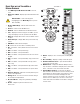
Table Of Contents
- Maintenance and Repair
- TouchMix™ How To
- Register and Update
- TouchMix-30 Pro Package Contents
- TouchMix-8 / TouchMix-16 Package Contents
- About This Manual
- Getting Started
- Effects
- Mute Groups
- DCA Groups
- Sub Groups (TouchMix-30 Pro only)
- Using Auxiliaries as Sub Groups (TouchMix-8 and 16 only)
- Matrix Mixing
- Save Your Work as a Scene
- Sound Check
- Anti-Feedback System
- Real Time Analyzer (RTA)
- Mutes
- Copy & Paste
- Patch Matrix (TouchMix-30 Pro only)
- Room Tuning Wizard
- User Buttons
- MIDI Control
- Security
- Monitor (TouchMix-30 Pro only)
- Monitor (TouchMix-16 only)
- Solo In Place (SIP) (TouchMix-30 Pro only)
- TouchMix Reference
- Getting Started
- Top Panel and Remote-Device Controls (TouchMix-30 Pro)
- Rear Panel (TouchMix-30 Pro)
- Right Side of the TouchMix-16 Mixing Surface
- Right Side of the TouchMix-8 Mixing Surface
- Rear Panel (TouchMix-16)
- Rear Panel (TouchMix-8)
- TouchMix-30 Pro Specifications
- TouchMix-8 and TouchMix-16 Specifications
- TouchMix™ Feature List
- Nav Strip
- Input Channels
- Output Channels
- Sub Groups (TouchMix-30 Pro only)
- 2‑Trk Playback
- FX Masters
- Wizards
- FX Processor
- Security
- Miscellaneous Features
- Mute Groups
- About Mute Groups
- Mute Groups Screen
- Mute Group Edit Screen
- Record / Playback (Multitrack USB Drive)
- 2‑Trk − Recording
- DAW – Record / Playback (TouchMix-30 Pro only)
- Real-time Analyzer (RTA)
- Scenes
- Channel Safe
- Auto Mixer TouchMix-30 Pro
- External Control Surfaces - TouchMix-30 Pro
- Custom Fader Banks - TouchMix-30 Pro
- DCA Group Assignments
- MIDI
- Talkback / Noise
- TouchMix Wi-Fi Control
- Getting Started
- TouchMix Dimensions
- TouchMix Block Diagram
- Contact QSC

28
1001108-01-F
R P (TM- P)
1.
Standby
– Press to enter or exit Standby. A confirmation screen displays when entering Standby.
2.
USB
– 3.0, Type A For attaching USB storage devices
1
, MIDI
2
foot switch, Wi-Fi adapter, External Control Surfaces or upgrading the
mixer firmware.
3.
USB
– Type B For attaching a Mac-based DAW. The Mac must be running OS Yosemite or later.
4.
Ethernet
– RJ45 For connecting to a network with wirelesscapability.
5.
AC Mains
– power connection, 100-240 V, ~85 W, 50/60 Hz
CAUTION!: If AC power is removed, wait for 5 seconds before reapplying the AC power.
6.
Analog Inputs
1 through
20 – Balanced XLR female
connectors
7.
Analog Inputs
21 through
24 – Balanced XLR / 1/4” TRS
female combination connectors
8.
Stereo Inputs
25 - 30
TRS – Two female balanced
linked inputs per stereo pair. Odd
number is left side, even number
is right side. Stereo pair 29/30
shared with 3.5 mm TRS on top
panel.
9.
Cue Phones
,
Aux 13/14,
and Aux 11/12 –
Stereo
female TRS 1/4” outputs
10.
K Lock® Security Slot
– Compatible with the MicroSaver Security Cable
11.
Talkback
microphone – Balanced female XLR, 48 V phantom power available
12.
Monitor Left and Right
– Balanced male XLR outputs
13.
Main Left and Right
– Balanced male XLR outputs
14.
Auxiliary outputs 1 through 14
– Balanced male XLRs
1 Drives must be formatted using the FAT32 file system. A FAT32 format utility is accessible from the Recording Setup screen. For best results use 7200
RPM, USB 3 hard drives or high-speed SSD. Drive performance is critical for recording. For more information and to see a list of qualified drives, visit qsc.
com. At this time, the TouchMix-30 Pro-30 supports playback of MP3 digital audio files from the USB port, and exporting the recorded 2-Track files to the
MP3 format.
2 The TouchMix supports “class compliant” USB MIDI devices. QSC has verified proper operation with these USB MIDI footswitches: iCON G-BOARD and
Logidy UMI3
Stereo Inputs
25/26
Aux Outputs
Analog Inputs
Right
Left
Monitor
L R
27/28
L R
29/30
L
Talkback
(48V Selectable)
Aux
11/12
Aux
13/14
Cue
Phones
12 11 10 9 8 7 6 5 4 3 2 1
20
212223
24
19 18 17 16 15 14 13
9
2
10
3
11
4
12
5
13
6
14
7
8
1
100-240V ~85W 50/60H z
Mains
USB
Ethernet
USB DAW
Standby
www.qsc.com
Right
Left
Main Mix
R
13 1412
5
7
8
6
10
11
9
2
1
4
3