
User's Manual


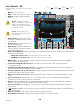


Table Of Contents
- Maintenance and Repair
- TouchMix™ How To
- Register and Update
- TouchMix-30 Pro Package Contents
- TouchMix-8 / TouchMix-16 Package Contents
- About This Manual
- Getting Started
- Effects
- Mute Groups
- DCA Groups
- Sub Groups (TouchMix-30 Pro only)
- Using Auxiliaries as Sub Groups (TouchMix-8 and 16 only)
- Matrix Mixing
- Save Your Work as a Scene
- Sound Check
- Anti-Feedback System
- Real Time Analyzer (RTA)
- Mutes
- Copy & Paste
- Patch Matrix (TouchMix-30 Pro only)
- Room Tuning Wizard
- User Buttons
- MIDI Control
- Security
- Monitor (TouchMix-30 Pro only)
- Monitor (TouchMix-16 only)
- Solo In Place (SIP) (TouchMix-30 Pro only)
- TouchMix Reference
- Getting Started
- Top Panel and Remote-Device Controls (TouchMix-30 Pro)
- Rear Panel (TouchMix-30 Pro)
- Right Side of the TouchMix-16 Mixing Surface
- Right Side of the TouchMix-8 Mixing Surface
- Rear Panel (TouchMix-16)
- Rear Panel (TouchMix-8)
- TouchMix-30 Pro Specifications
- TouchMix-8 and TouchMix-16 Specifications
- TouchMix™ Feature List
- Nav Strip
- Input Channels
- Output Channels
- Sub Groups (TouchMix-30 Pro only)
- 2‑Trk Playback
- FX Masters
- Wizards
- FX Processor
- Security
- Miscellaneous Features
- Mute Groups
- About Mute Groups
- Mute Groups Screen
- Mute Group Edit Screen
- Record / Playback (Multitrack USB Drive)
- 2‑Trk − Recording
- DAW – Record / Playback (TouchMix-30 Pro only)
- Real-time Analyzer (RTA)
- Scenes
- Channel Safe
- Auto Mixer TouchMix-30 Pro
- External Control Surfaces - TouchMix-30 Pro
- Custom Fader Banks - TouchMix-30 Pro
- DCA Group Assignments
- MIDI
- Talkback / Noise
- TouchMix Wi-Fi Control
- Getting Started
- TouchMix Dimensions
- TouchMix Block Diagram
- Contact QSC

43
1001108-01-F
I C – A T
The Trim (gain) control sets the level of the analog input
signal just before conversion to digital. The Trim controls
are not available on the remote devices. Only Mic/Line
Input Channels have Trim controls.
NOTE: Proper gain trim adjustment
prevents clipping, improves signal-to-noise
performance, and allows preset
compression and gate dynamics to
function asintended.
NOTE: The mixer also has digital gain
trim. Its settings are stored and recalled
with scenes and presets. See “Input
Channel Setup” for more detail.
The following controls and indicators are used to set the
input gain Trim:
1.
Trim Controls
– Located above the
touchscreen, adjusts sensitivity of mic/line inputs
(TouchMix-30 Pro shown).
2.
Nav Strip
– Touch to select a fader bank.
• The red line in Inputs 1-8 fader bank is a clip
indication that is persistent (sticky). It is cleared
using the “Clear Clip” function (User Button 2) or
from the Menu screen. Clearing the indication
affects only the device (tablet or mixer) on which
it was cleared.
3.
Level Meter (Mic 1)
– Indicating that the
signal level in the channel is below unity. If input
gain trim is properly adjusted, this will be seen when the source is playing somewhat below its average level
4.
Level Meter (Mic 2)
– Indicating that the signal level in the channel is slightly above unity. If input gain trim is properly adjusted,
this will be seen when the source is playing at its average level.
5.
Level Meter (Mic 3)
– Indicating that the signal level in the channel is above unity. If input gain trim is properly adjusted, this
will seen when the source is playing somewhat above its average level.
6. Level Meter – Indicating the channel is clipping. Reduce the source output level or mixer input gain and clear the clip indication (User
Button 2).
7.
Input Channel Fader
– Adjusts the output of the channel to the Main L/R outputs, post-fader aux. sends, and Sub-Groups
(TouchMix-30 Proonly)
Home
Select an
Input Bank
Trim
Trim Trim Trim Trim Trim Trim Trim Trim Trim Trim Trim Trim
13 2423222120191817161514
Trim Trim Trim Trim Trim Trim Trim Trim Trim Trim Trim Trim
1 2 3 4 5 6 7 8 9 10 11 12
Trim
1
Main Mix
L/R
Inputs 9-16Inputs 1-8 Inputs 17-24
FX Masters
Stereo In/2-Trk
Aux Out 1-8
Sub Groups
Aux Out 9-14
DCA Groups
Joe’s Ears
Aux 1
Aux 2
Aux 2
Aux 3
Aux 3
Aux 4
Aux 4
Aux 5
Aux 5
Aux 6
Aux 6
Aux 7
Aux 7
Aux 8
Aux 8
Aux 9
Aux 9
Aux 10
Aux 10
Aux 11
Aux 11
Aux 12
Aux 12
Aux 13
Aux 13
Aux 14
Aux 14
Joe In 2 In 3 In 4 In 5 In 6 In 7 In 8
Cue
CueCueCueCueCueCueCue
L
C
R L
C
RL
C
RL
C
RL
C
RL
C
RL
C
RL
C
R
Mic MicMicMicMicMicMicMic
1 2 876543
10
5
u
5
10
20
0
40
10 10
5
u
5
10
20
0
40
10 10
5
u
5
10
20
0
40
10 10
5
u
5
10
20
0
40
10 10
5
u
5
10
20
0
40
10 10
5
u
5
10
20
0
40
10 10
5
u
5
10
20
0
40
10 10
5
u
5
10
20
0
40
10
LR
1 2
3 4
5 6
7 8
LR
1 2
3 4
5 6
7 8
LR
1 2
3 4
5 6
7 8
LR
1 2
3 4
5 6
7 8
LR
1 2
3 4
5 6
7 8
LR
1 2
3 4
5 6
7 8
LR
1 2
3 4
5 6
7 8
LR
1 2
3 4
5 6
7 8
Main
Cue
Main
L/R
10
5
u
5
10
20
0
40
10
Scene:
Default
Mute MuteMuteMuteMuteMuteMuteMute Mute
L
G
48
L
G
48
L
G
48
L
G
48
L
G
48
L
G
48
L
G
48
L
G
48
L
F
2
3 4
1
5 6
7