TouchMix™ User Guide TouchMix-8 TouchMix-16 TD-000472-00-A *TD-000472-00*
EXPLANATION OF SYMBOLS The term “WARNING!” indicates instructions regarding personal safety. If the instructions are not followed the result may be bodily injury or death. The term “CAUTION!” indicates instructions regarding possible damage to physical equipment. If these instructions are not followed, it may result in damage to the equipment that may not be covered under the warranty. The term “IMPORTANT!” indicates instructions or information that are vital to the successful completion of the procedure.
Maintenance and Repair Advance technology, e.g., the use of modern materials and powerful electronics, requires specially adapted maintenance and repair methods. To avoid a danger of subsequent damage to the apparatus, injuries to persons and/or the creation of additional safety hazards, all maintenance or repair work on the apparatus should be performed only by a QSC authorized service station or an authorized QSC International Distributor.
Table of Contents Maintenance and Repair . . . . . . . . . . . . . . . . . . . . . . . . . . . . . . . . . . . . . . . . . . . . . . . . . . . . . . . . . . . . . . . . . . . .iii FCC Statement . . . . . . . . . . . . . . . . . . . . . . . . . . . . . . . . . . . . . . . . . . . . . . . . . . . . . . . . . . . . . . . . . . . . . . . . . . . . .iii RoHS STATEMENT . . . . . . . . . . . . . . . . . . . . . . . . . . . . . . . . . . . . . . . . . . . . . . . . . . . . . . . . . . . . . . . . . . . . . . . . .
Auxiliary (Stage Monitor) Mixes . . . . . . . . . . . . . . . . . . . . . . . . . . . . . . . . . . . . . . . . . . . . . . . . . . . . . . . . . . . . . . . . . . 12 Input by Input . . . . . . . . . . . . . . . . . . . . . . . . . . . . . . . . . . . . . . . . . . . . . . . . . . . . . . . . . . . . . . . . . . . . . . . . . . . . . . . . . . . . . . 12 Mix by Mix . . . . . . . . . . . . . . . . . . . . . . . . . . . . . . . . . . . . . . . . . . . . . . . . . . . . . . . . . . . . . . . . . . . . . . . .
Pitch Correct . . . . . . . . . . . . . . . . . . . . . . . . . . . . . . . . . . . . . . . . . . . . . . . . . . . . . . . . . . . . . . . . . . . . . . . . . . . . . . . . . . 31 Auxes . . . . . . . . . . . . . . . . . . . . . . . . . . . . . . . . . . . . . . . . . . . . . . . . . . . . . . . . . . . . . . . . . . . . . . . . . . . . . . . . . . . 32 Presets . . . . . . . . . . . . . . . . . . . . . . . . . . . . . . . . . . . . . . . . . . . . . . . . . . . . . . . . . . . . . . . . . . . . . . . . . .
DCA Groups . . . . . . . . . . . . . . . . . . . . . . . . . . . . . . . . . . . . . . . . . . . . . . . . . . . . . . . . . . . . . . . . . . . . . . . . . . . . . . 53 About DCA Groups . . . . . . . . . . . . . . . . . . . . . . . . . . . . . . . . . . . . . . . . . . . . . . . . . . . . . . . . . . . . . . . . . . . . . . . . . . . . . 53 Mute Groups . . . . . . . . . . . . . . . . . . . . . . . . . . . . . . . . . . . . . . . . . . . . . . . . . . . . . . . . . . . . . . . . . . . . . . . . . . . . .
TouchMix™ How To Register and Update STOP We know you want to get right to using your TouchMix, but before you do please stop and take a moment to visit www.qsc.com and register your TouchMix. By registering you can… • Download TouchMix firmware so that your mixer has all the latest features, refinements and performance enhancements. • Sign up to be notified of future updates. • Check to see if you are eligible for free extended warranty coverage.
The factory scenes list includes a scene named Default. This scene will “zero” the mixer by returning all controls to their factory settings. To Zero the TouchMix: Menu Scenes Recall Default Yes If you'd like to navigate around the mix and see what the recalled settings are, return to the Home screen.
Name Your Auxiliary Outputs What is an Auxiliary? In addition to the Main L/R (left/right) output mix, TouchMix is also capable of controlling eight additional output mixes (six mono and two stereo). These additional mixes are known as Auxiliaries, or “Auxes” for short. The auxiliary outputs are typically used to drive stage monitor speaker systems or in-ear monitors (IEM) for performers. In some instances they may be used for a recording mix, audio feed to video or a send to an overflow area.
• Other instruments either don’t need any effects or have their own effects (guitar pedals, internal effects on keyboards).
Using the FX Wizard The FX Wizard is the easiest and fastest way to set up your effects. Only effects that work for the Source and Type of input you have selected will be shown. So any effect you select using the wizard will be a valid one although it may or may not work in the context of your mix. Here’s how to use it. To Select and Assign Effects (FX) Using the Wizard: Wizard FX Wizard FX1 You’re now looking at the Wizard for FX1. Select a Preset: Type Source FX Style 1.
Using the Input Channel FX Tab You can also operate your effects from the input channel area of your mixer. In 1 To Run Effects from the Input Channel: FX Inputs 1-8 Welcome to the channel FX screen. From here you can… Select an FX Processor: 1 Select a Different Processor: 2 3 4 FX Lush Reverb None 1 Select a Preset: Send to the Effect: -40 2 3 Presets 4 -20 -10 -5 U 5 10 Cancel See "Select a Preset:" on page 5. Press Home to come back.
Using the FX Channel Effect Tab 1 2 Go to the FX Channel Effect Tab (From the Input Channel FX tab): 3 4 The FX Master Effect tab offers control over advanced Effects functionality. FX 1 To Access the FX Master Effect Tab: Effect FX Masters This is where you can select which processor is associated with the selected FX mix or channel. Select an FX Processor: To Select a Processor: FX Touch the FX Processor you wish to assign to this FX Channel.
Using the FX Overview If you would prefer to see the send and return levels for all your effects at once, the FX overview is where you want to go. To use the FX Overview: Menu FX Overview 1 2 3 1. The columns are the Input channels. Use the Nav Strip to change the group of Input channels. Each Input channel has its own FX Sends 1 – 4. 4 2. The rows are the FX Mixes. Each FX Mix has one FX Send from each Input Channel, an FX Master fader, and an Effect assignment ("none" can also be assigned). 3.
DCA Groups TIP: See "Tips & TricksLow-Cut Filters (AKA High Pass Filters)" on page 17 for more on DCA’s. A DCA groups faders together so the overall level of all the channels in the group can be controlled by a single DCA fader. A DCA fader does not change the position of any of the faders in the group. IMPORTANT: Here is an important thing to know – if the DCA master fader is at 0.0 (the unity (U) mark), it does nothing to the level of an assigned channel. The DCA adds or subtracts level.
Using Wi-Fi Make sure that the included USB Wi-Fi adapter is installed in one of the mixer’s USB ports. IMPORTANT: QSC does not support the use of Wi-Fi adapters other than those included with the mixer or that have been specifically approved by QSC. The TouchMix App requires iPad iOS version 6.0 or later. On the TouchMix: You can leave the Mixer Name and Password as is but it’s probably a good idea to change them.
Homework Completed That’s it. You’ve done your homework. Of course you’ll need to adjust the input gain and get your mix levels at the gig but you’re way more than halfway to a great, professional-sounding mix. Sound Check Before connecting anything, plug in your TouchMix and make sure that all the inputs and Auxiliary Outputs are muted. This will prevent uncontrolled feedback if a microphone is patched into a hot channel.
Work on Your Inputs Ask the performers in turn to do what they do to make their audio contribution to the performance. Without un-muting their channels, bring the channel’s input gain Trim up while watching the channel meter on the Home screen. What you are looking for is a meter that is bouncing around the 0 mark when the performer is producing a normal output level.
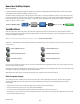
Mix by Mix In this approach, you'll dial in a complete monitor mix for one performer at a time. There are two ways of doing this. Overview Screen (TouchMix and TouchMix App) One way is from the Aux Overview screen. The Aux Overview screen, as the name implies, provides a view of all the aux mixes for a bank of channels at once, in matrix format. To Set Up Monitor Mixes: Aux OR Inputs 1-8 OR Inputs 9-16 Stereo In / 2 Trk Each horizontal row of sliders represents one of your monitor mixes.
Filters Tab There are multiple types of filters presented here. • Low-Cut / High-Cut filters – These filters are used to roll off high or low frequency content. There are a number of possible applications. See Tips & Tricks for more on Low and High-Cut filters. ◦ For stage monitors, it is common to roll off low frequencies at 80 – 100 Hz. There is usually ample low frequency energy on stage without any help from the monitors. Keeping it out of the monitors can reduce “rumble” on stage and in the house.
Recording TouchMix makes it easier than ever to capture a live performance in a stereo or a multi-track recording. All you need is a USB hard-drive. NOTE: Hard-drive requirements – A list of hard-drives that QSC has qualified may be found at qsc.com. There are far too many hard-drives available for us to test them all so there are certainly many unlisted drives that will work well with TouchMix. Higher speed drives (>7200 RPM) tend to work best.
Recording Directory Structure When you create a new Session, TouchMix creates a new folder on the USB drive named for the Session. Within the folder there is a folder for each channel. When you begin recording, the .wav files are written from the channels to their folders. If you start, stop and resume recording, additional .wav files are written in the folders each time you resume recording. If you don't arm a channel for recording, nothing is placed in that folder.
Tips & TricksLow-Cut Filters (AKA High Pass Filters) Most small mixers lack this really useful feature. But once you learn how to use it, you’ll never want to mix a show without it. There really are only a few instruments on stage like kick drum, larger toms, bass and keyboards that are even capable of producing low frequencies. For most everything else, low frequencies just cause problems. Even a low male voice doesn’t produce frequencies much below 100 Hz.
About Effects Routing We have effects on a mixer because we want to apply them to one or more inputs in order to enhance the sound. This means that somehow the mixer has to be able to take the sound from selected input channels and "send" the sound to the effects processor. Back in the day, before mixers had effects processors built in, the audio was "sent" from an output (usually an Aux channel) to another box, the effects processor.
— Figure 9 is a diagram of a single channel and one effects send and return. Lets walk through the diagram. Audio Input Input Channels Channel Fader EQ Channel Pan Dynamics L FX Sends -40 -20 -10 -5 U 5 C Main L/R R Main Left 10 FX Main Right FX — Figure 9 — 1. Audio (1) is input via one of the TouchMix inputs (2). 2. The audio is then sent through the EQ processor (3). 3. After the EQ, it goes through the Dynamics (4) – Compressor and Gate. 4. Then the Channel Fader (5) does its thing.
About DCA Groups What is a DCA? DCA stands for Digitally Controlled Amplifier. What this function does is allow a single fader to control the level of a group of channels. Let’s say that you have your drum mix set up and it’s perfect but the drums are just a bit hot relative to the rest of the mix. When you assign a DCA to all the drum microphones, you can pull down a single fader and bring down the level of all the drums at once without changing their mix.
TouchMix™ Reference The information provided in this section gives you a detailed description of the screens and controls for the TouchMix and the TouchMix iPad App. The screen shots provided are taken from the TouchMix iPad App, and because of a different screen size, may appear slightly different than the TouchMix screens. Getting to Know Your TouchMix Left Side of the Mixing Surface 1 Aux 1 Aux 2 Aux 3 Aux 4 Aux 5 Aux 6 Main Left Main Right Talkback 1. Rear Panel labels. 2.
Right Side of the TouchMix Surface 1. ¼” TRS inputs (17/18 and 19/20) – Line level, stereo. 2. ¼” TRS outputs Aux (7/8 & 9/10) – For line-level / in-ear monitors. 3. ¼” TRS output Cue – For stereo Cue headphones. 4. Phantom +48V – Displays input channel Phantom Power buttons. TouchMix-16 Hardware TouchMix-16 App 1 Stereo In 17/18 Stereo In 19/20 2 Aux Out 7/8 Aux Out 9/10 3 Cue Monitor 23 24 25 7 5. Wizard – Links to wizards that assist with various tasks. 6.
Backside of the TouchMix-16 USB Accessory Only 1 2 Power Talkback 3 4 Main Right Main Left Aux 6 Aux 5 5 Aux 4 Aux 3 Aux 2 Aux 1 6 — Figure 13 — 1. USB 3.0, Type A – For attaching USB storage devices* and Wi-Fi adapter. 2. RJ45 – Future use, accommodates accessory devices, not for use with Ethernet devices 3. Power Supply – Use the power supply delivered with the mixer, do not substitute. 4. Talkback microphone – Balanced female XLR 5. Main Right and Left output – Balanced male XLRs 6.
Where and What Things Are on the Home Screen Channels Scene: 1. Select button – Displays the channel name. Touch to access Master Channel controls. Gigmaster 7 15 2. Pan Indicator – Adjust in Master Channel. 3. Channel Cue – Routes the channel signal to the Phones and Monitor outputs. 4. “1” – Represents physical XLR. Channel type (In, Aux, FX, etc.) is hidden by Record/Arm indicator. 5. Record/Arm – Indicates channel is armed for multi-track recording.
The Nav (Navigation) Strip Inputs 1-8 Inputs 9-16 Stereo In / 2 Track FX Masters Aux Outputs DCA Groups — Figure 15 — To access the Nav Strip – From any screen, press Home once or twice to display Home page. Blue Nav Strip Bank – Indicates the currently selected bank. Nav Strip Titles – Indicates the type and range of the channels. Faders – The faders represent the current position of all the mixer’s faders.
Input Channel Trim The Trim (gain) control sets the level of the analog input signal just before conversion to digital. The Trim controls are not available on the iPad App. Home Select an Input Bank Trim 1 Inputs 1-8 IMPORTANT: Proper gain trim adjustment prevents clipping, improves signal-to-noise performance, and allows preset compression and gate dynamics to function as intended. The following controls and indicators are used to set the input gain Trim. Refer to — Figure 16.
EQ Controls and displays the settings for Input-Channel equalization. Home Select an Input Bank Touch Select Button Select EQ Tab In 2 EQ Inputs 1-8 1. EQ Tab – Selects the EQ screen. 2. Parametric EQ Graph – A graphic representation of the equalization curve based on the EQ settings. When the EQ is engaged, the trace changes from black to white. • EQ Graph Vertical Scale – Represents audio level from 20 dB to +20 dB. 1 2 • EQ Graph Horizontal Scale – Represents frequency from 20 Hz to 20 kHz. 3.
Compressor The Compressor controls the dynamic range of a signal above a set Threshold. Home Select an Input Bank Touch Select Button Select Comp Tab In 2 Comp Inputs 1-8 1. Comp Tab – Selects the Compressor screen. 2. Meter, In – RMS input level 3. Meter, Out – Output level after any applied compression 4. Meter, GR – Gain Reduction – (red) indicates how much the signal is being reduced by the compressor. 1 2 3 4 5 5.
Gate The Gate passes audio above a set Threshold, and attenuates or silences audio below the Threshold. Home Select an Input Bank Touch Select Button Select Gate Tab In 2 Gate Inputs 1-8 1. Gate Tab – Selects the Gate Screen. 2. Meter, In – RMS input level 3. Meter, Out – Output level 4. Meter, GR – Gain Reduction – indicates how much the signal is being reduced by the Gate. 1 2 3 4 C 5 5. Threshold Slider – Sets the point at which the Gate allows audio to pass. 6.
FX Sends Controls how much of the Input channel’s audio is sent to the FX devices. In addition, you can adjust the FX Sends at Menu > FX Overview. Home Select an Input Bank Touch Select Button Select FX Tab In 2 FX Inputs 1-8 1. FX Tab – Selects the FX Sends screen. 1 2 2. FX Send Sliders – Sets the level of audio “sent” from the channel to the FX mix; -40 dB is off. 3 3.
Pitch Correct Refer to — Figure 22. Pitch Correct (available on Input channels 1 through 16) shifts the frequency of an input signal to match the nearest “correct” musical pitch. The mixer has only one Pitch Corrector and it can be assigned to only one channel at a time. Home FX Masters Select FX Channel Select Effect In 2 FX Select Pitch Shift Inputs 1-8 1. Pitch Correct Enable Button – Assigns and enables/disables Pitch Correct to the currently selected channel. 2.
Auxes Auxiliary outputs are used to create a mix for stage monitors, in ear monitors, remote speakers or video / broadcast. There are six (1-6) mono and two (7/8 – 9/10) stereo Aux mixes. Home Select an Input Bank Touch Select Button Select Auxes Tab In 2 Auxes Inputs 1-8 1. Auxes Tab – Selects the Aux Sends screen 1 2. Overview Button – Navigates to the Aux Overview where you can see and adjust all Aux Sends at one time 2 3 3.
Presets Select, recall and store channel settings. Home Select an Input Bank Touch Select Button Select Presets Tab In 2 Presets Inputs 1-8 1. Presets Tab – Selects Presets screen. 1 2. Current Preset – The current preset. 3. Preset Info Button (Factory only) – After selecting the Instrument, Type, and Preset, press this button to see more information about the preset.
18. Save Button – After pressing Save/Save As, the Save Preset As screen displays. The save button saves the currently active preset to the location selected, and with the name displayed on this screen. 18 19. Enter Name Field – You can do one of the following: IMPORTANT: Presets and Scenes are saved as files, so naming restrictions are more strict than other names such as a channel name. When saving a preset using the keyboard displayed on the TouchMix, the restricted characters are not available.
Output Channel EQ The Main LR and Aux 1 – 6 outputs have a 1/3 octave graphic EQ. Stereo auxes 7/8 and 9/10 use a parametric EQ similar to the input channel’s EQ. Home Select the Aux Bank Touch a Select Button Select EQ Tab Aux 1 or Main EQ Aux Outputs 1. EQ Tab – Selects the EQ screen 1 For Aux 1-6 and Main L/R 2 2. Band Selector Buttons – Touch a band to access faders. 3 3. GEQ Graph – Graphic representation of the equalizer settings.
Limiter The Limiter keeps the audio level from going above the set Threshold. Home Select the Aux Bank Touch a Select Button Select Limiter Tab Aux 1 or Main Limiter Aux Outputs 1. Limiter Tab – Selects the Limiter screen 1 2 3 4 5 2. Meter In – RMS input level 3. Meter Out – Output level 4. Meter GR – Gain Reduction – indicates how much the signal is being reduced by the Limiter. 6 A 5. Limiter Graph – When the Limiter is engaged, the trace is blue.
Filters Available on the Main L/R and Aux 1 – 6 outputs, these narrow, cut-only filters are useful for dealing with feedback. Home Select the Aux Bank Touch a Select Button Select Filters Tab Aux 1 or Main Filter Aux Outputs 1. Filters Tab – Selects the Filters screen 1 2. Filter In Buttons – Engages a single Filter. 3. Lo Cut – Attenuates, or “cuts” frequencies below this frequency setting. Range is 20 Hz to 2 kHz. The slope of this filter is 18 dB/octave. 2 4.
Presets Store, recall and copy the settings associated with an output channel. Home Select the Aux Bank Touch a Select Button Select Presets Tab Aux 1 or Main Preset Aux Outputs 1. Presets Tab – Selects the Presets screen 1 2. Current Preset Label – Displays the name of the current active preset. 3. Save / Save As Buttons – Displays a page with options for naming a preset and selecting internal or USB storage destination. 4.
Setup Output Channel Setup provides control of various functions that apply specifically to a single output channel. Home Select the Aux Bank Touch a Select Button Select Setup Tab Aux 1 or Main Setup Aux Outputs 1. Setup Tab – Selects the Setup screen 2. Link Button (For Aux Channels 1-6 Only) – Links adjacent channels. The odd numbered channel settings are copied to the even numbered channel. Pan settings are mirrored. Only odd > even linking is supported – even > odd linking is not. 3.
QSC Speaker Settings Provides help in properly adjusting QSC K, KW and KLA powered loudspeakers when used with the TouchMix. Home Select the Aux Bank Touch a Select Button Select Setup Tab Touch View Settings Aux 1 or Main Setup View Settings Aux Outputs 1. Select Speaker Button – Touch the button that corresponds with the QSC K, KW or KLA speaker connected to the output. 2. Set the Gain – Adjust the Gain knob on your loudspeaker to the position indicated by the illustration and the text below it.
Aux Overview Provides an overview of Aux Sends for all Input channels and FX Mixes, along with the Aux Master faders for each Aux mix. All aux sends, pan controls, and master fader levels may be adjusted by touching to select and using the Master Encoder. Menu Press Aux Overview Aux Overview Menu Select an Input Bank Inputs 1-8 1. Only Input and FX Master banks are selectable on the Nav Strip while in the Aux Overview. 2.
Aux Mix-on-Faders (iPad Only) Presents Aux mixes one at a time using a large-fader view. Menu Menu Press the Aux Overview Twice Aux Overview Aux Overview Select an Input Bank Inputs 1-8 1. Input and FX Bank Selectors – The Nav Strip functions as it does for the Main L/R mix. Touch a block of mini-faders to navigate to a group of inputs or effects. 2. Channel Select and Friendly Name – touch a channel selector to go to the details for that channel. 1 2 3 4 5 3.
FX Masters Effect FX controls common to all Effects. Refer to the individual FX Processor topics for details. Home Select the FX Masters Bank Touch a Select Button FX 1 FX Masters Select Effect Tab Effect 1. Effect Tab – Selects the FX Master Effect screen 2. Aux Send Knobs 1 through 10 – Adjust level of processed audio going to the Aux mixes. 3. Reset Button – Returns processor and Aux Send controls to their default settings. 4. Preset Label – Name of the current preset.
Preset Recall presets for the selected FX channel based on the current FX device. All Presets are available for all FX channels. Home Select the FX Masters Bank Touch a Select Button Select Presets Tab FX 2 Preset FX Masters 1. Presets Tab – Selects the Presets screen. 2. Current Preset Label – Displays the name of the currently active preset (if any). 3. Save / Save As Button – Displays a page with options for naming a scene and selecting internal or USB storage destination. 4.
Setup Setup allows you to rename the FX Master channel, and assign the channel to Mute and DCA Groups Home Select the FX Masters Bank Touch a Select Button Select Setup Tab FX 2 Setup FX Masters 1. Setup Tab – Selects the Setup screen. 1 2. Channel Label – System name for the FX channel (mix). Does not change. 2 3. Name Field – Touch the Name to display a keyboard that may be used to enter a name for the channel. 3 4.
Basic Chorus The Chorus FX Varies the pitch of a signal at a steady rate to “thicken” a sound. Home FX Masters Select FX Channel Select Effect FX 1 Effect Select Chorus Chorus FX + FX Masters 1. LFO Type Switch – Selects how the pitch will be varied. Sine will vary the pitch smoothly. Saw will cause the pitch to change abruptly and then ramp back. 1 2. LFO Rate Knob – Determines the rate at which the pitch will be varied. 3.
Dense Reverb The Dense Reverb (presets with a “D” suffix) is a model of a DSP reverb with more dense reflections that some may find more representative of actual acoustic spaces. Home FX Masters Select FX Channel Select Effect FX 1 Effect Select Dense Reverb Dense Reverb FX + FX Masters 1. Lo Cut Knob – Attenuates, or “cuts” frequencies below this frequency setting. Range is to 20 Hz to 2 kHz. 2. Hi Cut Knob – Attenuates, or “cuts” frequencies above this frequency setting.
Mono and Stereo Delay These effects delay the audio signal to create echo and similar effects. Controls for the stereo delay may be linked or operated independently. Home FX Masters Select FX Channel Select Effect FX 1 Effect Select Pitch Shift FX Stereo Delay + FX Masters 1. Lo Cut Knob – Attenuates, or “cuts” frequencies below this frequency setting. Range is 20 Hz to 2 kHz. 2. Hi Cut Knob – Attenuates, or “cuts” frequencies above this frequency setting. Range is 200 Hz to 20 kHz. 1 2 3.
Phantom Power Supplies +48 VDC output to Inputs 1-16. Phantom power is not available on the 1/4” phone jack connectors of channels 13 – 16. Phantom power may be switched on and off independently for each Press Touch Mic Menu Phantom Menu Mic Phantom hcan.el 1. Input Selection On – Touch the Input channel name button, or the corresponding XLR icon to turn +48V on or off. Red indicates on. 2. Input Selection Off – Touch the Input channel name button, or the corresponding XLR icon to turn +48V off.
Mixer Setup Global and Utility Functions Press Menu Press Mixer Setup Mixer Setup Menu NOTE: — Figure 51 refers to the TouchMix, — Figure 52 refers to the iPad App. 1. Display Brightness Knob – Controls the brightness of the LCD screen and the illuminated buttons on the TouchMix. 2. Solo Mode Switch – Changes the Cue pick-off point to pre-fader listen (PFL), or after-fader listen (AFL). 3. Sample Rate Switch – Selects the sample frequency (bit rate) for the mixer. Most relevant for recording.
Connecting Your iPad In order to connect an iPad to the QSC TouchMix, you must first install the supplied Wireless USB Adapter into one of the USB ports on the mixer’s rear panel. Use only the adapter supplied with the Mixer. Connect the iPad On the TouchMix, go to Menu > Mixer Setup. Make sure the Mixer Name and Password are what you want. NOTE: Review items 10 through 12 above for a list of controls not available on your iPad. On your iPad 1. 2. 3. 4. 5. 6. 7. 8.
Scenes Scenes provide the ability to store and recall all mix parameters. Press Menu Touch Scenes Menu Scenes 1. Current Scene Label – Displays the name of the most recently recalled scene. 2. Save / Save As Button – Displays a page with options for naming a scene and selecting internal or USB storage. 1 2 3 4 5 3. External (USB) List – Saves scene data to the a USB storage device. 4. User Scenes List – Saves scene data to the mixers internal storage. 5.
DCA Groups DCA Groups allow you to mute and control the signal level of channels assigned to it. The DCA does not move the faders or change the mute state of channels assigned to it. Press Touch the Home DCA Bank DCA 2 DCA Groups You can also access the DCA Groups screen by touching Menu > DCA Groups, or assign a DCA Group from the channel Setup screens.
Mute Group Edit Screen 1. Close Edit Button – Returns to the Mute Group Mute screen. 1 2 2. Mute Group Select Buttons – Selects the Mute Group for editing. 3. Mute Buttons – Mutes / unmutes the channels assigned to the Mute Group. NOTE: Channel Mute (on Home screen) – When a channel is muted by a Mute Group only, the channel Mute button is a lighter shade of red. (not gray) 4. User-Defined Name – Touch the name to display a keyboard that may be used to enter a name for the Mute Group. 3 4 5 6 7 5.
FX Wizard The FX Wizard aids in adding FX to channels and routing those FX to monitors so your mixes have depth and sound fantastic! Press Wizard Touch FX Wizard Wizard FX Wizard 1. FX1, 2, 3, 4 Buttons – Selects which of the four FX mixes you want to work with. 1 2 NOTE: The Source, Type, and FX Preset windows provide a means of selecting an Effect based on what the source is. 3 4 5 6 7 8 If any of the lists fill the window, flick up on the list to show more selections. 2.
Gain Wizard The Gain Wizard aids in adjusting analog input gains to avoid clipping and distortion so your mixes sound great!. Press Wizard Touch Gain Wizard Wizard Gain Wizard NOTE: The Gain Wizard is designed to assist after setting the Input Trim knobs, and during a performance. If a clip indication displays on the Nav Strip, use the Gain Wizard to determine how much you need to reduce the Trim. This is especially helpful when the clip was caused by a momentary spike. 1 2 3 1.
Record / Playback Main Screen IMPORTANT: All USB memory devices must be formatted as FAT32 to work with TouchMix. Drive performance is critical for recording. For more information and to see a list of qualified drives, visit qsc.com. At this time, the TouchMix does not support importing or re-importing digital audio files that have been created or edited on another device. Press Record / Play Record/ Play NOTE: All the standard channel controls act as they do regardless of record / playback status.
Recording Setup Recall, initiate, and manage recording sessions. Press Record / Play Touch New / Recall New / Recall Record/ Play Session: Session Naming here 1. New Session Button – Displays a keyboard used to enter a name and initiate a new session. 1 2 3 2. Current Session Label – Displays the name of the currently active recording/playback session. 4 NOTE: All session names must be in upper-case letters. The session you want to rename must be the current session. 3.
2-Channel − Playback and Record The Main L/R, Aux 7/8, or 9/10 can be recorded then played back over the Main L/R Outputs. Press Home Select the 2-Trk Bank Touch the Select Button 2-Trk PB or 2-Trk Rec Stereo In/2-Trk 2-Track Recording Setup Refer to — Figure 62 1. Source Select Buttons – Select the source for 2-Track recording. Main L/R, Aux 7/8 or Aux 9/10. 1 2.
Dimensions TouchMix-8 13.1 in (333 mm) Accessory Only Power Phones Cue / Monitor Aux 3/4 Right Aux 1 Aux 2 2.2 in (56 mm) USB Aux 3 Aux 4 4 Left Main Left Main Right 3 2 1 Phones TouchMix-8 2 1 3 4 5 6 7 8 Stereo In Stereo In 9/10 11/12 Instrument +48V Phantom 1 2 Trim 3 Trim 4 Trim 5 Trim 6 Trim 7 Trim Standby 8 Trim Trim Info Mute Groups Cue/ Monitor Wizard Aux 3/4 U2 User Menu U3 0 U4 U1 Record/ Play Press for f ine TD-000472-00-A 60 User 9.
TouchMix-16 14.2 in (360 mm) Main Right Main Left Aux 6 Aux 5 Aux 4 Aux 3 Aux 2 2.3 in (58 mm) Talkback Power Aux 1 Accessory Only USB Aux 1 Aux 2 Aux 3 Aux 4 Aux 5 Aux 6 Main Left Main Right Talkback TouchMix-16 1 2 9 3 10 4 11 5 12 6 13 7 14 8 15 16 Stereo In Stereo In 17/18 19/20 Aux Out Aux Out 7/8 9/10 Cue 2 3 4 5 6 7 8 9 10 11 12 13 14 15 16 Trim Trim Trim Trim Trim Trim Trim Phantom +48V Standby Wizard Trim Aux 11.
Specifications TouchMix-8 TouchMix-16 DIsplay (both models) 6.1” x 3.5” (156mm x 90mm) color TFT, touch sensing. Inputs (Mic/Line) 12 Total: 4, XLR/TRS combo 4, XLR 2 Stereo, 1/4” TRS 20 Total: 4, XLR/TRS combo 12, XLR 2 Stereo, 1/4” TRS Input (Talkback) N/A 1, XLR Outputs 2 Main, XLR, line-level 4 Auxes, XLR, line-level 1 Stereo TRS, (Line or In Ear Monitor, 16 ohm min. impedance) 1 Stereo Cue, TRS, (Line or headphone, 16 ohm min.
R Cue L R Control Line L FX © 2014 QSC Audio, Ltd Revised 9/30/2014 Aux (odd) Aux (even) Main Outputs TouchMix Block Diagram Main L/R Output Mic/Line Main Left Ch Fader Over Trim Meter Digital Gain +48V TM-8: Ch 1 - 2 Mic Pre A/D 1/3 Oct GEQ Low Cut 24dB/Oct Channel High Cut 12dB/Oct 4-Band PEQ DCA Comp Gate Inst Pre TM-16 Auxiliary 1 - 6 Shown in mono mode Pre Post Low Cut DCA Delay D/A Ch Fader CUE TM-16 Auxiliary 7/8 & 9/10 Post (Global) Shown in stereo mode, may be
Mailing Address: QSC Audio Products, LLC 1675 MacArthur Boulevard Costa Mesa, CA 92626-1468 USA Telephone Numbers: Main Number: (714) 754-6175 Sales & Marketing: (714) 957-7100 or toll free (USA only) (800) 854-4079 Customer Service: (714) 957-7150 or toll free (USA only) (800) 772-2834 Facsimile Numbers: Sales & Marketing FAX: (714) 754-6174 Customer Service FAX: (714) 754-6173 World Wide Web: www.qsc.com E-mail: info@qsc.com service@qsc.com © 2014 QSC Audio Products, LLC. All rights reserved.