
User manual


Connection
The unIFY Control Panel software comes with the necessary drivers required by the operating system for compatibility with the BT1 so this
should be installed first before connecting the BT1. Once unIFY is installed, connect the supplied mini-USB cable between a PC and the BT1
wall plate. This should power up the wall plate and the Power LED should turn green once the wall plate is ready.
*Note: Power supplied via the USB connection is enough to power the BT1 wall plate for initial configuration. While the device will operate
normally including allowing pairing, the audio outputs of the BT1 will not operate while it is powered only via USB. If it is necessary to test
the audio output while connected via USB, connect an appropriate Axiom enabled device to the wall plate via a Cat-5 Cable in order to fully
power the device.
As unIFY is predominantly for networked devices, on running the first time it will ask you to choose a network card. The BT1 is not a
networked device so its settings parameters can be configured regardless if a network card is selected or not while a network card could be
selected, the "None" option can also be used too.
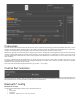
Once at the unIFY Control Panel application main form, go to "Tools" -> “BT1 Config”.
Control Port Selection
To locate the correct COM port, open the Device Manager in Windows, navigate to the Ports entry in the device list. Expand the Ports entry
and look for the Attero Tech BT1. Note the COM port listed for this device and select the appropriate COM port from the drop down list in
unIFY Control Panel. Press Connect to initiate a connection to the selected device.
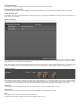
Bluetooth® Config
Bluetooth® Status
This field reports the Bluetooth® interface status. Available statuses are:
Idle
Discoverable
Connected
Connected – AVRCP (for devices with control capability)