
User Guide


Page 38
7022-122
January 19, 2011
R
Castile Pellet Insert
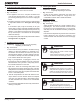
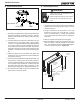
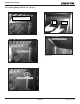
G. Igniter Replacement
1. Shut down the appliance by turning down the thermostat
and let the appliance completely cool down. After the
appliance has cooled down, unplug it and remove the
ash drawer.
2. The wire leads to the igniter are connected to the wire
harness with 1/4 inch (6mm) male / female spade
connectors. These wires will pull forward approximately
4 to 5 inches (102mm to 127mm) through the grommet
at the back of the ash drawer chamber. Disconnect
the spade connections and remove the igniter from the
chamber. LooseN the thumb screw and slide igniter
out.
3. Install new igniter into the chamber and tighten the
thumb screw. Re-connect the wires to the 2 leads with
the spade connectors.
4. Push excess wire leads back through the grommet, one
wire at a time, to take-up the 4 to 5 inches (102mm to
127mm) previously pulled out. This will keep the wires
out of the way of the ash drawer. Double check that
the igniter wires are clear of any movement, i.e. ash
drawer, fi repot cleaning rod, cleaning slide plates, etc.
5. Re-install the ash drawer and then re-install the side
panel and re-connect the power.
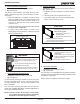
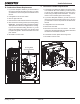
1. Open the face and remove door from the appliance
by lifting door off of hinge pin and and lay on a fl at
surface face down.
2. Using a screwdriver, tap the bottom of the rope
retainer rod to push it up out of the hole. The top
end of the rod will slide up. Swing the rod toward
you from the bottom and remove the rod. Repeat for
other side.
3. Remove old glass and replace with new glass.
4. Slide the retainer rod into the top hole fi rst, and then
line up the bottom crimped end with the hole in the
door. The crimped end must be parallel with the glass
in order to insert it into place. Figure 38.2.
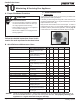
H. Glass Replacement
• Glass is 5mm thick high temperature heat-
resistant ceramic glass.
• DO NOT REPLACE with any other material.
• Alternate material may shatter and cause
injury
WARNING
Figure 38.1
Slide this
end in first
Rope Retainer Rods
Glass ships
with Gasket
Installed
Crimped end must
be paralle with the
glass
Gasket
Figure 38.2
Igniter
Igniter Bracket
Thumb Screw