CASTILE-B PELLET STOVE Owner’s Manual Tested and Listed by Installation and Operation C Models: Portland Oregon USA O-T L US OMNI-Test Laboratories, Inc. CASTILE-MBK-B CASTILE-CWL-B Service parts list has been removed from this manual. CASTILE-CSB-B Refer to Owner’s Manual or individual service parts list. CASTILE-PMH-B CAUTION SAVE THESE INSTRUCTIONS • Important operating and • Read, understand and follow these instrucmaintenance instructions for safe installations included. tion and operation.
Castile-B FS Pellet Stove and Welcome to the Quadra-Fire Family! and fireplaces. And yet we are old-fashioned when it comes to craftsmanship. Each unit is meticulously fabricated and surfaces are hand-finished for lasting beauty and enjoyment. Our pledge to quality is completed as each model undergoes a quality control inspection.
Castile-B FS Pellet Stove Safety Alert Key: • DANGER! Indicates a hazardous situation which, if not avoided will result in death or serious injury. • WARNING! Indicates a hazardous situation which, if not avoided could result in death or serious injury. • CAUTION! Indicates a hazardous situation which, if not avoided, could result in minor or moderate injury. • NOTICE: Indicates practices which may cause damage to the fireplace or to property.
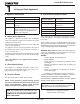
Castile-B FS Pellet Stove 1 Listing and Code Approvals E. BTU & Efficiency Specifications A. Appliance Certification Model: Castile Pellet Stove Laboratory: OMNI Test Laboratories, Inc. Particulate Emissions Rating: 1.8 grams/hr Report No. 061-S-77d-6.2 *BTU Output: 8,500 - 28,200 / hr Type: Solid Fuel Room Heater/Pellet Fuel Burning Type Heating Capacity: up to 1,500 sq. ft.
Castile-B FS Pellet Stove 2 Getting Started Since pellet exhaust can contain ash, soot or sparks, you must consider the location of: A. Design, Installation & Location Considerations • Windows 1. Appliance Location • Air Intakes NOTICE: Check building codes prior to installation. • Installation MUST comply with local, regional, state and national codes and regulations.
Castile-B FS Pellet Stove B. Locating Your Appliance & Chimney E. Negative Pressure Location of the appliance and chimney will affect performance. WARNING! Risk of Asphyxiation! Negative pressure can cause spillage of combustion fumes and soot. • • Install through the warm airspace enclosed by the building envelope. This helps to produce more draft, especially during lighting and die-down of the fire. Penetrate the highest part of the roof. This minimizes the effects of wind loading.
Castile-B FS Pellet Stove F. Fire Safety G. Tools And Supplies Needed To provide reasonable fire safety, the following should be given serious consideration: • Install at least one smoke detector on each floor of your home. • Locate smoke detector away from the heating appliance and close to the sleeping areas. • Follow the smoke detector manufacturer’s placement and installation instructions and maintain regularly. • Conveniently locate a Class A fire extinguisher to contend with small fires.
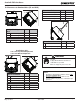
Castile-B FS Pellet Stove 3 Dimensions and Clearances A. Appliance Dimensions 24 in. (609mm) 12 in. (305mm) 28-9/16 in. (725mm) 24-5/8 in. (626mm) 24 in. (609mm) Figure 8.1 - Top View Figure 8.2- Front View 27-7/8 in. (708mm) 3 in. (76mm) 22-7/8 in. (582mm) 5 in. (126mm) 28-3/4 in. (730mm) 17 in. (431mm) 16-5/16 in. (414mm) 15-15/16 in. (405mm) Figure 8.3 -Side View Page 8 Figure 8.
Castile-B FS Pellet Stove B.
Castile-B FS Pellet Stove C. Hearth Pad Requirements (UL and ULC) Use a non-combustible floor protector, extending beneath appliance and to the front, sides and rear as indicated. Measure front distance “M” from the surface of the glass door. L* K K Must extend 2 inches (51mm) beyond each side of pipe (shaded area) Figure 10.2 M Figure 10.
Castile-B FS Pellet Stove 4 Vent Information B. Venting Termination Requirements A. Chimney and Exhaust Connection CAUTION 1. Chimney & Connector: Use 3 or 4 inch (76-102mm) diameter type "L" or "PL" venting system. It can be vented vertically or horizontally. 2. Mobile Home: Approved for all Listed pellet vent. If using the 3 inch (76mm) vertical Top Vent Adapter Kit or the 3 to 6 inch (76-152mm) Top Vent Offset Adapter, use Listed double wall flue connector.
Castile-B FS Pellet Stove WARNING C. Equivalent Feet of Pipe Improper installation, adjustment, alteration, service or maintenance can cause injury or property damage. Refer to the owner’s information manual provided with this appliance. For assistance or additional information consult a qualified installer, service agency or your dealer. The table below can help you calculate the equivalent feet of pipe which is a method used to determine pellet vent size. Figure 12.
Castile-B FS Pellet Stove 5 Venting Systems A. Alcove A C B Figure 13.1 Minimum Inches A B C D Maximum Millimeters Inches Millimeters Height 43 1092 n/a n/a Width 38 965 n/a n/a Depth n/a n/a 36 914 6 152 n/a n/a To Side Wall All minimums listed are to a combustible surface. NOTE: • Illustrations reflect typical installations and are FOR DESIGN PURPOSES ONLY. • Illustrations/diagrams are not drawn to scale. • Actual installation may vary due to individual design preference.
Castile-B FS Pellet Stove B. Through The Wall NOTE: In Canada, where passage through a wall or partition of combustible construction is desired, the installation shall conform to CAN/CSA-B365 Horizontal termination cap must be a minimum of 6 inches. (152mm) from the wall. Approved for mobile home installations. Must use 3 or 4 inch (76-102mm) “L” or “PL” listed pellet venting or listed double wall pipe and a Quadra-Fire Outside Air Kit in mobile homes. Straight Out 2 in. (51mm) Minimum 6 in.
Castile-B FS Pellet Stove C. Vertical Rain Cap We recommend a minimum of 60 in. (1.5m) vertical, however above the eave is preferred. Flashing 24 in. (610mm) Minimum Firestop Ceiling Support 6 in. (152mm) Min. 6 in. (152mm) Class A Chimney Connector Adapter 3 in. (76mm) Min. 6 in. (152mm) Flue Connector 3 in. to 6 in. (76-152mm) Top Vent Kit Both installations are approved for mobile home installations.
Castile-B FS Pellet Stove WARNING Fire Hazard Inspection of Chimney: • Masonry chimney must be in good condition. • Meets minimum standard of NFPA 211 • Factory-built chimney must be minimum 6 in. (152mm) UL103 HT. E. Masonry Concrete Cap Fireclay flue liner with airspace Flashing 1 in. (25mm) clearance with firestop 6 in. (152mm) minimum 1 in. (25mm) clearance 3 in. (76mm) minimum Sheathing Clean-out cover Airtight Clean-out Door Non-combustible Hearth Pad Figure 16.1 F.
Castile-B FS Pellet Stove 6 Mobile Home A. Mobile Home Installation CAUTION You must use a Quadra-Fire Outside Air Kit for installation in a mobile home. 1. THE STRUCTURAL INTEGRITY OF THE MOBILE HOME FLOOR, WALL AND CEILING/ROOF MUST BE MAINTAINED Do NOT cut through: • Floor joist, wall, studs or ceiling trusses. • Any supporting material that would affect the structural integrity. An outside air inlet must be provided for the combustion air and must remain clear of leaves, debris, ice and/or snow.
Castile-B FS Pellet Stove 7 Appliance Set-Up A. Outside Air Kit Instructions CAUTION Parts Included in Kit: 1 piece of 2 inch x 3 foot flex hose, 2 hose clamps, 1 collar assembly,1 termination cap assembly, 1 trim ring, 12 screws. Never draw outside combustion air from: • Wall, floor or ceiling cavity • Enclosed space such as an attic or garage Tools Needed: Phillips headscrewdriver; wire cutters; hole saw or jig saw. 1. Figure 18.
Castile-B FS Pellet Stove B. Leg Leveling System Offset Collar 3 to 6 inch Rear Exhaust Outlet 1. Thread Allen bolts through nuts until flush. Figure 19.1. The Allen bolts and nuts are included in the component pack inside the stove firebox. 2. Slide assembled nuts and bolts into slots on legs with the nuts on the bottom. Figure 19.2. Use a 5/32 in. (3.96mm) Allen wrench to adjust legs up and down to desired level. Figure 19.
Castile-B FS Pellet Stove E. Optional Log Set Placement Instructions CAUTION Logs are FRAGILE. Use extreme care when handling or cleaning logs. 2 PIECE LOG SET INSTALLATION 1. Open door to expose the firebox. 2. Install the left log first and then the right log. Figure 20.1 3. Lean the logs against the cast iron brick in the back of the firebox. 4. Push the logs to the far left and far right against the sides of the firebox. Figure 20.2. 5.
Castile-B FS Pellet Stove F. Thermostat Installation 1. 2. A 12 volt AC thermostat is required to operate this pellet appliance. You may use the included wall mount thermostat or purchase an optional programmable thermostat or remote control. It is equipped with an adjustable heat anticipator. The current rating is .05 amps. The anticipator needs to be adjusted to the lowest setting available. CAUTION Shock hazard. • Do NOT remove grounding prong from plug.
Castile-B FS Pellet Stove 8 Operating Instructions A. Fuel Size, Material and Storage Shelled Field Corn (Cont’d) 1. Wood Pellets Fuel pellets are made from sawdust or wood by-products. If the source material is hardwood, they can have a higher mineral content, creating more ash. Fuels containing bark will also have higher ash content.
Castile-B FS Pellet Stove C. Before Your First Fire B. General Operating Information 1. Thermostat Calls For Heat The appliance is like most modern furnaces; when the thermostat calls for heat, your appliance will automatically light and deliver heat. When the room is up to temperature and the thermostat is satisfied, the red call light will go off and the appliance will shut down. 2.
Castile-B FS Pellet Stove E. Fire Characteristics G. Feed Rate Adjustment Instructions A properly adjusted fire with the heat output control switch set on “high” has a short active flame pattern that extends out of the firepot approximately 4 inches (102mm). If the fire has tall flames with black tails and seems somewhat lazy, the feed rate will need to be reduced. This is done by sliding the fuel adjustment control rod down, which will reduce the feed.
Castile-B FS Pellet Stove H. Frequently Asked Questions ISSUES SOLUTIONS 1. Metallic noise. 1. Noise is caused by metal expanding and contracting as it heats up and cools down, similar to the sound produced by a furnace or heating duct. This noise does not affect the operation or longevity of your appliance. 2. Ash buildup on glass. 2. This is normal. Clean the glass. 3. Glass has turned dirty. 3. Excessive build up of ash.
Castile-B FS Pellet Stove 9 With proper installation, operation, and maintenance your appliance will provide years of trouble-free service. If you do experience a problem, this troubleshooting guide will assist a qualified service person in the diagnosis of a problem and the corrective action to be taken. This troubleshooting guide can only be used by a qualified service technician. Troubleshooting Possible Cause Symption Plug in appliance - No response. Call light on. No fire. No fuel in firepot.
Castile-B FS Pellet Stove Symptom Possible Cause Corrective Action Slow or smoky start-up (Cont’d) Dirty exhaust and/or venting system. Check for ash build up in unit, including behind rear panels, firebox, heat exchanger, exhaust blower and venting. Feed system fails to start. Out of fuel. Check hopper, fill with fuel. #2 snap disc may be defective. Replace snap disc. Firebox door must be closed securely. Vacuum switch not closing. No vacuum. Check exhaust blower is plugged in and operating.
Castile-B FS Pellet Stove Symptoms Convection blower fails to start. Exhaust blower fails to start or does not shut off. Large, lazy flame, orange color. Black ash on glass. Nuisance shutdowns. Appliance calls for heat. Call light illuminates. Exhaust blower starts. No feed or igniter. Page 28 Possible Cause Corrective Action #1 snap disc defective. Replace snap disc. Blower not plugged in. Check that blower is plugged into wire harness. Blower is defective. Replace blower.
Castile-B FS Pellet Stove 10 Maintaining & Servicing Your Appliance C. General Maintenance A. Proper Shutdown Procedure 1. Types of Fuel Depending on the type of fuel you are burning will dictate how often you have to clean your firepot. CAUTION If the fuel you are burning has a high dirt or ash content or you are burning shelled field corn, it may be necessary to clean the firepot more than once a day.
Castile-B FS Pellet Stove 2. Cleaning Firepot with Cleaning Rod & Firepot Scraper • • Ash Removal from Firebox (Cont’d) Frequency: Daily or more often as needed By: Homeowner e. The 2 cleaning slide plates must be fully closed when cleaning is complete. See Disposal of Ashes. a. The appliance must be in complete shutdown and cool and the exhaust blower off. If you are just cleaning the firepot, there is no need to unplug the appliance. WARNING b.
Castile-B FS Pellet Stove 7. Cleaning Heat Exchanger Chambers & Drop Tube • • Heat Exchanger Tubes Frequency: Monthly or every 1 ton of fuel By: Homeowner WARNING Heat exchanger cleaning rods may be warm to the touch. For safety purposes wear gloves. Cleaning Rods Do not pull heat exchanger cleaning rods while appliance is operating. Figure 31.1 Push cleaning rods IN when done, DO NOT leave cleaning rods OUT. Injury can occur. 9.
Castile-B FS Pellet Stove 15. Cleaning the Glass 11. Cleaning Convection Blower - Requires No Lubrication • • • Frequency: Yearly or as needed By: Qualified Service Technician / Homeowner • Frequency: When clear view of the firepot becomes obscure By: Homeowner a. Appliance must be completely cool before cleaning glass. The convection blower is located at the bottom rear of the stove. It is housed inside the screen box. See page 34-35 for detailed instructions on removing the blower. b.
Castile-B FS Pellet Stove D. High Ash Fuel Content Maintenance • • Frequency: When the ash build-up exceeds more than half way up the firepot. By: Homeowner Poor quality pellet fuel, or lack of maintenance, can create conditions that make the firepot fill quickly with ashes and clinkers. This condition makes the appliance susceptible to overfilling the firepot with pellets which may result in smoking, sooting and possible hopper fires. Figure 33.
Castile-B FS Pellet Stove F. Blower Replacement 1. Combustion Blower Replacement NOTE: The convection blower must be removed before the exhaust blower can be removed. a. Turn down thermostat, let appliance completely cool and then unplug appliance before servicing. b Remove both side curtains by loosening 2 screws (do not remove) and pull side panels away. c. Remove 4 screws from the back screen and pivot the top of the screen toward you leaving the bottom attached to stove. Figure 34.1.
Castile-B FS Pellet Stove G. Baffle & Brick Set Removal F. Blower Replacement (Cont’d) 2. Convection Blower Replacement 1. Follow proper shutdown procedures in Section 10. a. Turn down thermostat, let appliance completely cool and then unplug appliance before servicing. b. The convection blower is located at the bottom rear of the appliance and is housed inside a screen box. Remove the 2 screws facing forward in the center of the blower chamber at the very back of the appliance. c.
Castile-B FS Pellet Stove 4. Slide the retainer rod into the top hole first, and then line up the bottom crimped end with the hole in the door. The crimped end must be parallel with the glass in order to insert it into place. Figure 36.2. H. Igniter Replacement Rope Retainer Rods Igniter Slide top end in first Glass Igniter Bracket Thumb Screw Crimped end at the bottom Figure 36.1 1. Turn down thermostat, let the appliance completely cool and then unplug appliance before servicing. 2.
Castile-B FS Pellet Stove 11 Reference Materials When describing the location of a component, it is always AS YOU FACE THE FRONT OF THE APPLIANCE. 7. Heat Exchangers The heat exchangers transfer hot air from the exhaust system into convecton air. Remove the stainless steel top baffle to access the heat exchangers. There are 2 clean out rods located under the heat exchangers. A. Component Function 1. Control Box 8. Heat Output Switch a.
Castile-B FS Pellet Stove 19. Snap Disc #3 (Back Burn Protector) 250°F 16. Thermostat The appliance is designed to run on a 12 volt AC thermostat. Snap disc #3 is mounted on the back of the auger tube in The heat anticipator should be set on the lowest setting the center of the appliance and has a red reset button. To access it remove the right side panel. If the fire tries to burn available. back into the feed system or push exhaust up the feed tube, 17.
Castile-B FS Pellet Stove B. Component Locations Heat Output Switch High Med Low Reset Button Reset Button Combustion Blower Convection Blower & Housing Feed Motor Figure 39.1 Heat Exchanger Tubes Cleaning Rods Figure 39.2 Red Call Light is located on top of Junction Box behind the Control Box. FUSE Control Box Vacuum Switch Fuse TERMINAL BLOCK CENTER 2 SCREWS FOR THERMOSTAT WIRES POWER OUTLET Figure 39.
Castile-B FS Pellet Stove C. Warranty Policy R Castile Pellet Insert Hearth & Home Technologies Inc. LIMITED LIFETIME WARRANTY Hearth & Home Technologies Inc., on behalf of its hearth brands (”HHT”), extends the following warranty for HHT gas, wood, pellet, coal and electric hearth appliances that are purchased from an HHT authorized dealer.
Castile-B FS Pellet Stove R Castile Pellet Insert WARRANTY CONDITIONS: !
Castile-B FS Pellet Stove Page 42 7021-130F May 12, 2014
Castile-B FS Pellet Stove May 12, 2014 7021-130F Page 43
CONTACT INFORMATION: Hearth & Home Technologies 1445 North Highway Colville, WA 99114 Division of HNI INDUSTRIES Please contact your Quadra-Fire dealer with any questions or concerns. For the number of your nearest Quadra-Fire dealer log onto www.quadrafire.com CAUTION DO NOT DISCARD THIS MANUAL • Important operating and • Read, understand and follow these instrucmaintenance instructions for safe installations included. tion and operation. • Leave this manual with party responsible for use and operation.