R MT. VERNON PELLET STOVE ADVANCED ENERGY (AE) Owner’s Manual Installation and Operation Tested and Listed by Portland Oregon USA O-T L C US OMNI-Test Laboratories, Inc. Models: MTVERNON-AE-MBK MTVERNON-AE-PMH MTVERNON-AE-CSB MTVERNON-AE-CWL NOTICE • Important operating and • Read, understand and • Leave this manual with follow these instrucparty responsible for use maintenance instructions for safe installaand operation. tions included. tion and operation.
R Mt. Vernon Pellet Stove (AE) Hearth & Home Technologies welcomes you to our tradition of excellence! In choosing a Quadra-Fire appliance, you have our assurance of commitment to quality, durability, and performance. This commitment begins with our research of the market, including ‘Voice of the Customer’ contacts, ensuring we make products that will satisfy your needs.
R Mt. Vernon Pellet Stove (AE) Safety Alert Key: • • • • DANGER! Indicates a hazardous situation which, if not avoided will result in death or serious injury. WARNING! Indicates a hazardous situation which, if not avoided could result in death or serious injury. CAUTION! Indicates a hazardous situation which, if not avoided, could result in minor or moderate injury. NOTICE: Indicates practices which may cause damage to the appliance or to property.
R Mt. Vernon Pellet Stove (AE) 1 Listing and Code Approvals E. BTU & Efficiency Specifications A. Appliance Certification Model Mt. Vernon Pellet Stove AE Laboratory OMNI Test Laboratories, Inc. Report No. 061-S-68-6 Type Solid Fuel Room Heater/Pellet Fuel BurningType Standard ASTM E1509-04, ULC S627-00 and ULC/ORD-C1482-M1990 Room Heater Pellet Fuel Burning type and (UM) 84HUD, Mobile Home Approved. FCC Emissions Rating: EPA Compliance Complies with Part 15 of FCC Rules.
R 2 Mt. Vernon Pellet Stove (AE) Getting Started A. Design, Installation & Location Considerations 1. Appliance Location NOTICE: Check building codes prior to installation. • Installation MUST comply with local, regional, state and national codes and regulations. • Consult insurance carrier, local building inspector, fire officials or authorities having jurisdiction over restrictions, installation inspection and permits.
R Mt. Vernon Pellet Stove (AE) B. Thermostat Wall Control Location E. Pre-Use Check List The thermostat wall control’s location will have some affect on the appliance’s operation. 1. • Maximum wire length from appliance is 100 feet (30.48m) continuous unspliced wire. Recommended 20 gauge wire, solid copper . Place the appliance in a location near the final installation area and follow the procedures below: 2. Open the appliance and remove all the parts and articles packed inside the Component Pack.
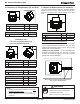
R 3 Mt. Vernon Pellet Stove (AE) Dimensions and Clearances A. Appliance Dimensions 14-1/16 in. (357mm) 5-13/16 in. (147mm) 2-9/16 in. (65mm) 3-13/16 in. (97mm) CL 31-1/6 in. (788mm) 29-3/6 in. (741mm) Figure 7.1 - Top View with Top Vent Adapter and 3 to 6 in (76-152mm) Adapter 10-3/8 in. (264mm) Figure 7.2 - Side View with Top Vent Adapter and 3 to 6 in (76-152mm) Offset Adapter. CL Figure 7.3 - Top View 29-1/16 in. (738mm) 28-1/8 in. (714mm) 26-7/8 in. (683mm) 18-1/2 in.
R Mt. Vernon Pellet Stove (AE) B. Clearances to Combustibles (UL and ULC) Use a non-combustible floor protector, extending beneath appliance and to the front, sides and rear as indicated. Measure front distance “M” from the surface of the glass door. C A C.
R 4 Mt. Vernon Pellet Stove (AE) Vent Information A. Venting Termination Minimum Requirements V N V N Inside Corner Electrical Service N V N V G V A D O V P E L C V B V F FIXED CLOSED FIXED CLOSED OPEN V B OPEN G M V V V Termination Cap I A B B Figure 9.1 H X Air Supply Inlet G Gas Meter V X J or K Restricted Area All minimum clearances are listed with an Outside Air Kit (OAK) installed, unless otherwise noted in table below. A 12 in.
R Mt. Vernon Pellet Stove (AE) B. Avoiding Smoke and Odors Vent Configurations Negative Pressure, Shut-Down and Electrical Power Failure To reduce probability of reverse drafting during shut-down conditions Hearth & Home Technologies strongly recommends: To reduce the probability of back-drafting or burn-back in the pellet appliance during power failure or shut down conditions, it must be able to draft naturally without exhaust blower operation.
R Mt. Vernon Pellet Stove (AE) C. Negative Pressure D. Draft WARNING! Risk of Asphyxiation! Negative pressure can cause spillage of combustion fumes and soot. Draft is the pressure difference needed to vent an appliance successfully. When an appliance is drafting successfully, all combustion byproducts are exiting the home through the chimney. Negative pressure results from the imbalance of air available for the appliance to operate properly. It can be strongest in lower levels of the house.
R Mt. Vernon Pellet Stove (AE) E. Chimney and Exhaust Connection WARNING! RISK OF FIRE! 1. Chimney & Connector: Use 3 or 4 inch (76-102mm) • Only LISTED venting components may be used. diameter type "L" or "PL" venting system. It can be vented vertically or horizontally. • NO OTHER vent components may be used. • Substitute or damaged vent components may impair safe operation. 2. Mobile Home: Approved for all Listed pellet vent.
R Mt. Vernon Pellet Stove (AE) G. Pipe Selection Chart WARNING! RISK OF FIRE! The chart will help you in determining proper venting size according to the equivalent feet of pipe calculated previously and the altitude above sea level of this installation. Figure 13.1. Do NOT pack insulation or other combustibles between firestops. • ALWAYS maintain specified clearances around venting and firestop systems. a. Locate the calculated equivalent feet of pipe on the vertical left side of the chart.
R Mt. Vernon Pellet Stove (AE) 5 Venting Systems A. Alcove A C D B Figure 14.1 Minimum* Inches A B C D Maximum Millimeters Inches Millimeters Height 43 1092 n/a n/a Width 40 1016 n/a n/a Depth n/a n/a 36 914 6 152 n/a n/a To Side Wall *All minimums listed are to a combustible surface. NOTE: • Illustrations reflect typical installations and are FOR DESIGN PURPOSES ONLY. • Illustrations/diagrams are not drawn to scale.
R Mt. Vernon Pellet Stove (AE) B. Through The Wall Horizontal termination cap must be a minimum of 6 inches. (152mm) from the wall. Approved for mobile home installations. Must use 3 or 4 inch (76-102mm) “L” or “PL” Listed pellet venting or Listed double wall pipe and a Quadra-Fire Outside Air Kit in mobile homes. NOTE: In Canada, where passage through a wall or partition of combustible construction is desired, the installation shall conform to CAN/CSA-B365 2 in.
R Mt. Vernon Pellet Stove (AE) We recommend a minimum of 60 inches (1524mm) vertical, however above the eave is preferred. C. Vertical into Existing Class A Chimney Rain Cap All three installations are approved for mobile home installations. Must use 3 or 4 inch (76 to 102mm) “L” or “PL” Listed pellet venting or Listed double wall pipe and Quadra-Fire Outside Air Kit in mobile homes. Single wall pipe is approved for residential installations only. Flashing 12 in.
R Mt. Vernon Pellet Stove (AE) WARNING Fire Risk. Inspection of Chimney: • Masonry chimney must be in good condition. • Meets minimum standard of NFPA 211 • Factory-built chimney must be a minimum 6 inch (152mm) UL103 HT. F. Masonry Concrete Cap Fireclay flue liner with airspace Flashing 1 in. (25mm) clearance with firestop 1 in. (25mm) clearance 3 in. (76mm) minimum to combustible material 6 in.
R Mt. Vernon Pellet Stove (AE) 6 Mobile Home Installation CAUTION You must use a Quadra-Fire Outside Air Kit for installation in a mobile home. 1. THE STRUCTURAL INTEGRITY OF THE MOBILE HOME FLOOR, WALL AND CEILING/ROOF MUST BE MAINTAINED An outside air inlet must be provided for the combustion air and must remain clear of leaves, debris, ice and/or snow. It must be unrestricted while the appliance is in use to prevent room air starvation which causes smoke spillage.
R 7 Mt. Vernon Pellet Stove (AE) Appliance Set-Up A. Leg Leveling System B. Outside Air Kit Instructions 1. Thread Allen bolts through nuts until flush. Figure 19.1. The Allen bolts and nuts are included in the component pack inside the appliance firebox. 2. Slide assembled nuts and bolts into slots on legs with the nuts on the bottom. Figure 19.2. Use a 5/32 in. (3.96mm) Allen wrench to adjust legs up and down to desired level. Figure 19.3.
R Mt. Vernon Pellet Stove (AE) C. Top Vent Adapter Installation 3 to 3 inch (76-76mm) Top Vent Adapter 3 to 6 inch (76-152mm) Top Vent Offset Adapter Installing the Top Vent Adapter 1. Put a layer of high temperature silicone on the 3 inch (76mm) exhaust outlet. Do not put silicone inside of pipe. Figure 20.1. 2. Slide the top vent adapter onto the rear exhaust outlet and adjust the assembly to a vertical position until the top of the flue outlet is centered and is in a level position. Figure 20.1. 3.
R Mt. Vernon Pellet Stove (AE) E. Optional Log Set Placement Instructions 2 PIECE LOG SET INSTALLATION 1. Place the left log as shown. There are 2 indentations in the bottom of the log to fit over the screw heads in the firebox. Figures 21.1 and 21.2. 2. Place the right log in front of the 2 screw heads in the firebox. Figures 21.3 & 21.4. Right Log CAUTION Logs are FRAGILE. Use extreme care when handling or cleaning logs. Log rests in front of screws Figure 21.
R Mt. Vernon Pellet Stove (AE) F. Wall Control Thermostat Installation 1. When mounting the wall control thermostat on the wall, be sure to follow your thermostat wall control’s installation instructions carefully. Wall Control Thermostat Wires Attach to Center 3 Screws Green White NOTE: The wall control thermostat should be mounted on an inside wall and not in direct line with the appliance convection air.
R 8 Mt. Vernon Pellet Stove (AE) Operating Instructions Higher Ash Content Material • Hardwoods with a high mineral content • Fuel that contains bark • Standard grade pellets, high ash pellets, corn and other biomass fuels WARNING Fire Risk. • Do not operate appliance before reading and understanding operating instructions. • Failure to operate appliance properly may cause a house fire. A.
R Mt. Vernon Pellet Stove (AE) Size D. General Operating Information • Pellets are either 1/4 inch or 5/16 inch (6-8mm) in diameter • Length should be no more that 1-1/2 inches (38mm) • Pellet lengths can vary from lot to lot from the same manufacturer • Due to length variations, the flame height (feed rate) may need adjusting occasionally. See page 25 for instructions. Read and understand the Thermostat Wall Control manual for detailed operating instructions.
R Mt. Vernon Pellet Stove (AE) E. Before Your First Fire 2. Comfort Level Selection • First, make sure your appliance has been properly installed and that all safety requirements have been met. Once your fuel is selected, select the temperature at the desired setting on the SET COMFORT LEVEL screen. Figure 10.2. • Pay particular attention to the fire protection, venting and thermostat wall control installation instructions.
R Mt. Vernon Pellet Stove (AE) I. Battery Back-up System (Optional) Wall Control Display CAUTION! The wall control will display the battery icon when operating in the battery back-up mode. Figure 26.2 • Hook up to battery terminals BEFORE you plug battery into appliance. “Maint Burn” will display when the thermostat has reached the set room temperature and will run on low until it reaches its auto-clean cycle time. • Damage to internal electronic components may occur.
R Mt. Vernon Pellet Stove (AE) 2. Soft Start Cycle (SS-Low / SS-Med) K. Ignition Cycles The appliance engine is controlled by the digital thermostat wall control. The digital display on the wall control will tell you what your appliance is doing in the upper left corner (System Status). Figure 27.1.
R Mt. Vernon Pellet Stove (AE) 5. Auto-Clean Cycle The firepot auto-clean system will cycle: WARNING • When the appliance is first plugged in • When the house reaches temperature and the appliance shuts down • At prescribed intervals, depending on the type of fuel selected • When starting up after an electrical interruption If your appliance is running and the auto-clean cycle is initiated, the appliance will revert to shutdown cycle. Fire Risk Do NOT operate appliance: • With appliance door open.
R Mt. Vernon Pellet Stove (AE) L. Quick Start Guide NOTICE: Any button pressed will turn on the backlight. Wall control will automati- cally revert back to the starting screen if there is no activity for 15 seconds; except for the “CONFIRM FUEL CHANGE” screen. CHOOSING FUEL TYPE Buttons Room Temp 73 MENU 12:30 PM READY Up 12:30 PM READY Set at: 73 Set at: 68 71 Down HEAT OUTPUT CHOOSING TEMP UNIT: °F or °C 1. Wall Control for Reference TURNING ON APPLIANCE 1. MENU Fuel Type 2.
R Mt. Vernon Pellet Stove (AE) SETTING HEAT OUTPUT SETTING COMFORT LEVEL HOPPER OUT OF FUEL ERROR LIST 12:30 PM READY Set at: 68 71 MENU 1. MENU 1. Set temperature must be 3 degrees higher than room temperature for appliance to start. 74 ºF 2. 71 HEAT OUTPUT Press and hold “UP” or “DOWN” button to set desired temperature. NOTE: READY Press “HOLD TEMP”. 12:30 PM Min Firepot Temp Set at: 74 Hold HEAT OUTPUT At the starting screen, press “HEAT OUTPUT”. RETRY 1.
R Mt. Vernon Pellet Stove (AE) M. Frequently Asked Questions ISSUES SOLUTIONS 1. Metallic noise 1. Noise is caused by metal expanding and contracting as it heats up and cools down, similar to the sound produced by a furnace or heating duct. This noise does not affect the operation or longevity of your appliance. 2. Ash build-up on glass 2. This is normal. Clean the glass. 3. Glass has turned dirty 3. Excessive build up of ash.
R Mt. Vernon Pellet Stove (AE) 9 Troubleshooting With proper installation, operation, and maintenance your appliance will provide years of trouble-free service. If you do experience a problem, this troubleshooting guide will assist a qualified service person in the diagnosis of a problem and the corrective action to be taken. This troubleshooting guide can only be used by a qualified service technician.
R Mt. Vernon Pellet Stove (AE) 10 Maintaining & Servicing Your Appliance A. Proper Shutdown Procedure Before Servicing Your Appliance 1. Set wall control to OFF on AUTOMATIC / MANUAL SETTING screen. Figure 33.1. CAUTION! SHOCK AND SMOKE HAZARD! 2. Wall control screen will scroll through the following messages after setting to OFF. • Shutdown • Auto-Clean • Off 3. Smoke spillage into the room can occur if the appliance is not cool before unplugging. • Proper Shutdown Procedure must be followed.
R Mt. Vernon Pellet Stove (AE) 2. Ash Removal from Firebox C. General Maintenance and Cleaning • 1. Auto-Clean System Inspection & Cleaning • • Frequency: Monthly or every ton (aprx. 50 bags) or more frequently depending on the type of fuel By: Homeowner • Frequency: Weekly or more frequenctly depending on ash build-up By: Homeowner Be sure the wall control screen says OFF and the appliance is allowed to cool. a. Be sure the wall control screen says OFF and the appliance is allowed to cool.
R Mt. Vernon Pellet Stove (AE) 5. Cleaning Firepot with Firepot Clean-Out Tool • • Tools Needed: A Shop Vac and generic micro cleaning kit; flat head and Phillips screwdriver; 11/32 Nut-driver or wrench. Frequency: Softwood Pellets: Weekly or every 5 bags Hardwood Pellets: Weekly or every 3 bags Alternate Fuel: Daily or everyr 1 bag By: Homeowner a. Be sure the wall control screen says OFF and the appliance is allowed to cool. b.
R Mt. Vernon Pellet Stove (AE) c. Assemble the crevice tool from the micro cleaning kit to attach to a Shop Vac. Figure 36.1. f. Removing the Combustion (Exhaust) Blower 1. The combustion blower is mounted in the bottom right rear of the appliance. Figure 36.3. 2. Remove side panel and then using an 11/32 nut driver to loosen all six nuts, but do not remove. Rotate the blower and remove from the housing. Figure 36.4. 3. Set the blower on the top of the housing. You do not need to disconnect the wires. 4.
R Mt. Vernon Pellet Stove (AE) 7. Cleaning the Hopper 9. Door Latch Inspection • • • • Frequency: Monthly or after burning 1 ton of fuel, (aprx 50 bags) or when changing fuel types By: Homeowner a. Be sure the wall control screen says OFF and the appliance is allowed to cool. b. After burning approximately 1 ton of fuel you will need to clean the hopper to prevent sawdust and/or fines buildup. c.
R Mt. Vernon Pellet Stove (AE) 15. Creosote Formation: Guidance on minimizing 13. Soot and Fly Ash: Formation & Need for Removal in Exhaust Venting System. • • • Frequency: Periodically during heating season By: Qualified Service Technician/Homeowner Frequency: Prior to each burn season and after prolonged shut down. By: Qualified Service Technician/Homeowner • This chimney should be inspected periodically during the heating season to determine if a creosote build-up has occurred.
R Mt. Vernon Pellet Stove (AE) F. Baffle Removal E. High Ash Fuel Content Maintenance • • Frequency: When the ash build-up exceeds the half way point in the firepot By: Homeowner WARNING Cast iron is a very heavy material. The baffle is made of cast iron and therefore is heavy and awkward at times to maneuver. Clear and prepare your work area before you begin.
R Mt. Vernon Pellet Stove (AE) G. Convection Blower Replacement 1. Follow the proper shut down procedures as outlined on page 33, Section 10.A. 2. Remove the left and right side panels by removing the 4 screws using a Phillips head screw driver. Figure 40.1. 3. Depress the tab on the left side and snap out the power supply. You do not need to disconnect any wires. Figure 40.1. Notch Latch 4. Remove the 2 screws at the bottom of the back panel so there will be room to remove the blower. Figure 40.1 5.
R Mt. Vernon Pellet Stove (AE) I. Glass Replacement H. Combustion (Exhaust) Blower Replacement WARNING 1. Follow the proper shut down procedures as outlined on page 33, Section 10.A. • Glass is 5mm thick high temperature heat-resistant ceramic glass. 2. Remove the right side panel by removing the 4 screws using a Phillips head screw driver. Figure 41.1. • DO NOT REPLACE with any other material. 3. It is not necessary or recommended to remove the housing to replace or service the combustion blower.
R Mt. Vernon Pellet Stove (AE) 11 Reference Materials A. Component Functions 1. Auto-Clean Motor E The auto-clean motor is located under and behind the firepot on the left side, inside the convection air chamber. It automatically opens and closes the firepot floor so ashes can fall into the ash pan. 2. Auto-Clean Switch The auto-clean switch is located on top of the auto-clean motor.
R Mt. Vernon Pellet Stove (AE) 17. Power Supply 21. Vacuum Switch The power supply is located at the rear of the appliance. It converts 120 volt AC current to 15 volt DC current to power the appliance. 18. Overheat Sensor (Snap Disc) The overheat sensor is mounted on the back of the drop tube in the center of the appliance and has a reset button. To access it remove the right side panel.
R Mt. Vernon Pellet Stove (AE) B. Component Locations LEFT SIDE Heat Exchanger, Front & Back Power Supply Low Fuel Indicator Drob Tube Baffle Convection Blower Ash Pan Firepot Control Board Thermocouple and Thermocouple Cover Figure 44.2 Figure 44.1 RIGHT SIDE Feed Motor Vacuum Switch Overheat Sensor Wing Nut - Securing Overheat Sensor in place Combustion Blower Figure 44.3 Page 44 Figure 44.
R Mt. Vernon Pellet Stove (AE) C. Exploded Drawings MTVERNON-AE-CSB, MTVERNON-AE-MBK, MTVERNON-AE-PMH MTVERNON-AE-CWL (Sept 2006 thru June 2011) 3 4 1 2 30 5 29 32 31 19 28 27 26 6 25 24 7 8 9 10 21 19 11 20 18 17 12 22 23 16 15 14 13 Part number list on following page. Figure 45.
R Mt. Vernon Pellet Stove (AE) IMPORTANT: THIS IS DATED INFORMATION. When requesting service or replacement parts for your appliance please provide model number and serial number. All parts listed in this manual may be ordered from an authorized dealer. ITEM 1 DESCRIPTION COMMENTS Hopper Top Stocked at Depot PART NUMBER 7034-169 #2 Hopper Lid Assembly 1 2 3 4 5 6 7 2.1 2.2 2.3 2.4 Hopper Lid Matte Black 7034-157MBK Sienna Bronze 7034-157CSB Willow 7034-157CWL Mahogany 7034-157PMH Magnet.
R Mt. Vernon Pellet Stove (AE) IMPORTANT: THIS IS DATED INFORMATION. When requesting service or replacement parts for your appliance please provide model number and serial number. All parts listed in this manual may be ordered from an authorized dealer. ITEM DESCRIPTION COMMENTS Stocked at Depot PART NUMBER #10 Door Assembly 1 2 6 5 3 10 7 4 Door Assembly 7034-006 10.1 Hinge, Female 450-2910 10.2 Door Air Deflector 7034-185 10.
R Mt. Vernon Pellet Stove (AE) Ending Manufacturing Date: Active IMPORTANT: THIS IS DATED INFORMATION. When requesting service or replacement parts for your appliance please provide model number and serial number. All parts listed in this manual may be ordered from an authorized dealer.
R Mt. Vernon Pellet Stove (AE) IMPORTANT: THIS IS DATED INFORMATION. When requesting service or replacement parts for your appliance please provide model number and serial number. All parts listed in this manual may be ordered from an authorized dealer. ITEM DESCRIPTION Stocked at Depot COMMENTS PART NUMBER #35 Auto-Clean Motor/Arm Assembly #34 Firepot Riser Assembly 1 2 3 4 35 1 7 5 2 11 6 3 5 10 4 6 9 7 34 8 Firepot Riser Assembly SRV7034-002 34.1 Thermocouple, K SRV7034-247 34.
R Mt. Vernon Pellet Stove (AE) IMPORTANT: THIS IS DATED INFORMATION. When requesting service or replacement parts for your appliance please provide model number and serial number. All parts listed in this manual may be ordered from an authorized dealer.
R Mt. Vernon Pellet Stove (AE) IMPORTANT: THIS IS DATED INFORMATION. When requesting service or replacement parts for your appliance please provide model number and serial number. All parts listed in this manual may be ordered from an authorized dealer.
R Mt. Vernon Pellet Stove (AE) E.
R Mt. Vernon Pellet Stove (AE) E.
R Mt.
R November 22, 2011 Mt.
R CONTACT INFORMATION: Hearth & Home Technologies 1445 North Highway Colville, WA 99114 Division of HNI INDUSTRIES Please contact your Quadra-Fire dealer with any questions or concerns. For the number of your nearest Quadra-Fire dealer visit our web site at www.quadrafire.com NOTICE • Leave this manual with party responsible for use and operation.