
Owner`s manual


14 7034-276C October 27, 2014
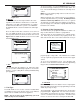
MT. VERNON AE
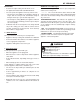
Auto/Manual/Off
User Settings
Fuel Type
MENU
Set Comfort Level
Program
Set Date
Service Info
MENU
Set Day/Time
Figure 14.1
“Set at:” indication will change to “Hold at:” and displays the
operating temperature setting.
4. Notifi cation Icons
The system notifi cation area uses icons to indicate if an ac-
tion needs to be taken. In battery mode it indicates the ap-
proximate charge level of the battery.
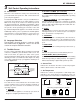
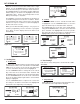
5. Function Buttons
The function buttons have two labels above them in the dis-
play area. Their labels can change depending on the menu
screen. On the main screen the left button will bring up the
system menu and the right button has functionality only in
MANUAL cycle. Figure 14.2.
6. Current Temperature
The current temperature area indicates the temperature of
the room where the wall control is located. The tempera-
ture displayed can be in units of Fahrenheit or Celsius. The
desired units can be selected via the system menu. See
Figure 16.11 on page 16.
D. General Information About Using the Wall
Control
When a button is pressed and the screen changes from the
main screen to one of the other screens, the backlight will il-
luminate the display area. As buttons are pressed, the back-
light continues to be illuminated.
Most screens have a DONE button which can be used to
return to the previous screen ultimately returning to the main
screen.
The wall control will automatically revert back to the starting
screen if there is no activity for 15 seconds except for the
CONFIRM FUEL CHANGE screen. The main screen will be
illuminated for an additional 10 seconds and the backlight
will shut off.
If the wall control is subjected to a static shock, the screen
may go blank. If this happens, wait 25 seconds and press
any button. This will reset the screen restore functionality
and turn on the back light. If this does not work, call your
dealer.
E. The Main Menu
The menu is the heart of customizing the operation of the
pellet appliance system to your personal liking. The choices
on this menu are:
1. Set Comfort Level (Temperature)
The most basic operation of the wall control is to turn the
appliance on or off depending on the requirement for heat.
From the main screen, the SET COMFORT LEVEL screen
can be activated by pressing the UP or DOWN button on the
right side of the display area.
The fi rst time either button is pressed the display changes to
the SET COMFORT LEVEL screen and shows the current
set temperature. Subsequent presses or holding the UP or
DOWN button will change the set temperature. Figure 14.2.
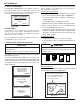
You can override the programming either permanently or
temporarily
. The HOLD TEMP button (lower right) on the
SET COMFORT LEVEL screen is used to override preset
programming. Figure 14.3. By pressing the HOLD TEMP
button, the current set temperature will permanently override
any programmed temperature in the 7 day setback program-
ming. This is a convenient way of overriding a program when
your schedule changes temporarily and you don’t want to
reprogram the setback functions on the wall control.
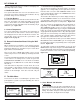
To release the permanent override, press the button labeled
RESUME when in the HOLD TEMP cycle. Pressing the but-
ton again will resume the programming at the next program
interval. Figure 14.4.
To temporarily override the programming, use the UP and
DOWN buttons only and do not press the HOLD TEMP but-
ton. The display will show how long the new temperature will
hold before it returns to the next scheduled programming.
Figure 14.3.
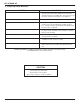
SET COMFORT LEVEL
ON HOLD
RESUME
DONE
74
ºF
Figure 14.3
Figure 14.2
Function Buttons
Buttons
Up
Down
Figure 14.4
2. Auto / Manual / Off Selection
a. Automatic
In the AUTOMATIC cycle the wall control will turn the ap-
pliance on and off automatically and also turns the heat
output level up or down depending on the temperature
setting. The further away the room temperature is from
the set temperature, the higher the heat output.