QRemote/ v.1.4 Quadrox Mobile v. 1.4 QRemote v. 1.0 User manual Quadrox NV | Duigemhofstraat 101 | B-3020 Herent Belgium | Tel: +32 (0) 16 58 25 85 Fax: +32 (0) 16 58 25 86 | http://www.quadrox.com | E-mail: info@quadrox.
QRemote/ v.1.4 Contents 1. Introduction.................................................................................................................................................... 3 2. Installation ...................................................................................................................................................... 3 3. Server configuration.................................................................................................................................
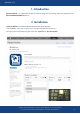
QRemote/ v.1.4 1. Introduction Quadrox Mobile is an application for iPhone and iPad designed for streaming video and recordings from Quadrox WebCCTV/QGuard servers. 2. Installation Quadrox Mobile can be downloaded for free from the Apple AppStore Link on iTunes: https://itunes.apple.com/us/app/Quadrox Mobile/id763433258 The App can be easily found using the search term “Quadrox” or “Quadrox Mobile”.
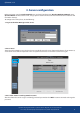
QRemote/ v.1.4 3. Server configuration Before you begin using the Quadrox Mobile app, you should configure your Quadrox WebCCTV/QGuard server. Quadrox Mobile connects to the server, using a special account on the server. Your Administrator’s credentials will not work in the App. To configure the server, please, do the following: 1. Log-in to the Video Manager on the server. 2. Go to “Users”. There you will see “Mobi” user in the list. This user specifically exists for access from mobile devices.
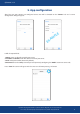
QRemote/ v.1.4 Provide new password, password confirmation and press “Finish”. 4. App overview After Quadrox Mobile was downloaded and installed on your device, you will see the Quadrox icon among your Apps. Tap on it and Quadrox Mobile will start. The splash screen will appear, showing the version number. Tabs: Contains list of mosaics with live streams from cameras Shows recorded video from selected camera Contains list of Quadrox servers, added to app.
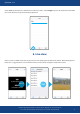
QRemote/ v.1.4 5. App configuration After first start, App contains no configured servers. You will be directed to the “Servers” tab and a server configuration dialog will appear. E L P M A EX Fulfill all required fields: 1. Name: enter any friendly name for your server. 2. IP address or domain: enter IP or domain name of your server. 3. Port: enter port number (80 used by default). 4. Password: enter the same password you used previously configuring the “Mobi” account on server side. Press “Save”.
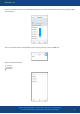
QRemote/ v.1.4 Go to “Live” tab. You will see a default mosaic with one camera, called “Single”. Tap on it to see the live stream from the camera of the server you had previously provided. 6. Live view Until a camera is added to the mosaic, you will see a hint helping you to operate the mosaic. Hold your finger on a black area as suggested and a list of available cameras on the server will appear. Choose the camera.
QRemote/ v.1.4 If you have added new cameras or enabled/disabled them you are able to refresh the camera list just pulling it down and releasing it. You can create new mosaics with different sets of cameras, pressing “+” on the “Live” tab. Mosaics available to choose: 1 Camera 2 Cameras 4 Cameras Quadrox NV | Duigemhofstraat 101 | B-3020 Herent Belgium | Tel: +32 (0) 16 58 25 85 Fax: +32 (0) 16 58 25 86 | http://www.quadrox.com | E-mail: info@quadrox.
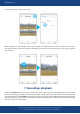
QRemote/ v.1.4 Example of 4 cameras mosaic with saving. When using mosaics with multiple cameras, you can zoom-in and zoom out each camera in the mosaic. Just tap on the selected camera and the image will be maximized. The camera name will appear on top. Tap again to go back to the mosaic. TAP 7. Recordings playback Go to the “Recordings” tab. You will see a default hint about adding a camera and highlighting its name. Choose the camera, holding your finger on the black field.
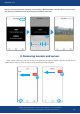
QRemote/ v.1.4 Note that the time of the video recording you are setting in Quadrox Mobile is the time of the server. Consider this when your mobile device and server are placed in different time zones. 8. Removing mosaics and servers If you need to remove any mosaic or server just drag the line you want to remove to the left. You will see the “Delete” button. Tap on it. Server or mosaic can be added again using “+” button.