VCA
VCA Installation and Configuration manual 2 Contents CONTENTS .................................................................................................................................................................................................................... 2 1 INTRODUCTION .......................................................................................................................................................................................................
VCA Installation and Configuration manual 3 1 Introduction This manual is intended for administrators of WebCCTV and is applicable for version 4.8.0.0 or higher. You need to have the WebCCTV Alarm Component installed. WebCCTV can be replaced by GuardNVR in this manual at all times. The WebCCTV server has to be installed in order to use the VCA (Video Content Analysis).
VCA Installation and Configuration manual 4 VCA enabled Camera The configuration of the VCA settings is done through the camera wizard of WebCCV which can be found in WebCCTV Manager under Settings → Cameras → Click ‘Edit’ on the camera you want to configure the VCA settings for. Now you enter the camera wizard, where you will see extra tabs: VCA and VCA Config. Version 4.
VCA Installation and Configuration manual 5 Camera Wizard with VCA tabs You can check if VCA license is activated on your WebCCTV. To do so, open Video Manager and navigate to Info. Check the field Allowed VCA Cameras. This number indicates how many cameras can use VCA on your PC. If you see “None”, then your WebCCTV does not have a VCA license. To obtain a license, you will need to request a VCA token via email: support@quadrox.be or phone: +32 (16) 582585.
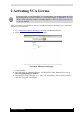
VCA Installation and Configuration manual 6 2 Activating VCA License To activate VCA on your WebCCTV 4.7.7.0 and higher, you should redeem the VCA token and generate a license valid for your specific hardware configuration. You can obtain a VCA activation token by contacting Quadrox office via support@quadrox.be or +32 (16) 582585. After you receive your activation token, you should perform the following steps to obtain and activate your VCA license: 1. Go to http://www.activationmanager.
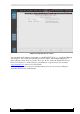
VCA Installation and Configuration manual WebCCTV System Info page – Allowed VCA Cameras 6. Copy the Hardware key from the “VCA Info” page: WebCCTV VCA Info 7. Switch back to Activation Manager page in Internet Explorer. Don’t close Video Manager! 8. Paste the Hardware key you copied from Video Manager: Version 4.
VCA Installation and Configuration manual Activation Manager - Hardware Code Request Page 9. Enter your e-mail address and click “Submit”. 10. You will get a VCA activation code. Copy all symbols of it: Activation Manager – VCA License generation page 11. Switch to Video Manager and paste the activation code into the “License key” field. 12. Click “Apply”. 13. Click “OK” when asked for confirmation: Version 4.
VCA Installation and Configuration manual 9 WebCCTV VCA Info – License Confirmation 14. Restart WebCCTV Video Server. 15. After restart is complete, go back to Info page of Video Manager and check “Allowed VCA Cameras” to see if the activation was successful. Version 4.
VCA Installation and Configuration manual 10 3 Configuration To work, VCA needs to retrieve an absolute minimum of 8 fps (frames/second) in JPEG compression from the camera. We strongly advice to make sure that camera delivers 15 fps or more to get the best result. For H264 and MPEG4 compression you need to use default 15fps for best results. You can check the actual framerate of your camera: open WebCCTVNVR Video Browser’s Live View, hold CTRL button and right-click right on the image.
VCA Installation and Configuration manual 11 VCA enabled Screen If you still need to activate your VCA license, please contact Quadrox support for the activation of this license via support@quadrox.be or +32 (16) 582585. After enabling VCA, click Finish and restart WebCCTV. 3.1.1 Camera Parameters To use the VCA zones and rules correctly, the camera needs to be calibrated. This is done through the camera parameters.
VCA Installation and Configuration manual Use the mouse wheel to set the camera height Click and drag the grid to change the camera tilt angle Click and drag the mimics around to verify sizes of people Each grid square is 2x2 meters 12 The purpose of this is to receive approximately the same view as in the live view of the camera. The green line represents the horizon. If you feel you cannot get the same view; try changing the FOV by reducing or increasing the degrees.
VCA Installation and Configuration manual VCA Configuration screen with tracking 3.2.1 Zones VCA Configuration screen Version 4.
VCA Installation and Configuration manual 14 3.2.1.1 Select zone You can choose from already created zones, or make a new zone. For this, click on Add Zone. A new square will appear. In the Name field, you can now enter a new name for the zone; and you can also change the color you want the zone to be visualized in. To change the shape and position of the zone, you can drag and drop it; place the mouse pointer on a node and move it; or add and remove new nodes (see right, below Add Zone).
VCA Installation and Configuration manual 15 3.2.2.4 Enter and Exit This is a directional rule. The alarm is triggered when the object enters or exits the zone borders. 3.2.2.5 (Dis)Appear The alarm is triggered when the VCA cannot see how the object appears or disappears. E.g. a bird came from behind a tree that was partially in and partially out of the zone; or a person suddenly appears from behind a wall that is present in the zone. 3.2.2.
VCA Installation and Configuration manual 16 A filter can be set up to be not in use, include or exclude any of these object groups. For example, by default you would choose to exclude clutter. 3.2.4 Streaming As for general VCA configuration, the streaming can be put to High and Low, where Low is preferable for remote connections. To be able to save the settings, please click Apply Settings. 3.3 General rules The VCA works best on a camera with framerate of at least 10 fps.