
User Manual
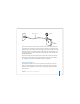

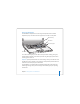
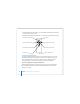
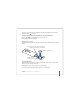

Table Of Contents
- User’s Guide
- Contents
- Getting Started
- Getting to Know Your MacBook Pro
- Adjusting Your Display
- Using Your Power Adapter
- Using the Trackpad
- Using the Keyboard
- Using a Mouse
- Using the Apple Remote and Front Row
- Using the Built-in iSight Camera
- Getting Answers Using Mac Help
- Learning About Mac OS X
- Customizing Your Desktop and Setting Your Preferences
- Using Applications
- When an Application Does Not Respond
- Keeping Your Software Up to Date
- Connecting to a Printer
- Playing a CD and Connecting Headphones
- Connecting a Camera or Other FireWire or USB Device
- Transferring Files to Another Computer
- Using Your MacBook Pro
- Using Universal Serial Bus Devices
- Connecting with FireWire
- Using ExpressCards
- How AirPort Provides Wireless Internet Access
- Using Bluetooth Wireless Technology
- Connecting with Ethernet
- Using External Video Support
- Connecting Speakers and Other Audio Devices
- Using Your SuperDrive
- Understanding Sudden Motion Sensor Technology
- Using Your Battery
- Securing Your MacBook Pro
- Adding Memory to Your MacBook Pro
- Troubleshooting
- Specifications
- Safety, Use, and Care Information
- Connecting to the Internet
- Top Ten Questions
- Communications Regulation Information
- Index

40 Chapter 2 Getting to Know Your MacBook Pro
To use a picture as your buddy picture or account picture:
1 Open Photo Booth and take a picture.
2 Select the picture you’d like to use as your buddy picture or account picture.
3 Click the Buddy Picture or Account Picture icon to automatically update your picture.
More information about Photo Booth is available by choosing Help > Mac Help from
the menu bar, and then choosing Library > Photo Booth Help.
Using Your iSight Camera with iMovie HD
You can capture live video from your built-in iSight camera directly into iMovie HD.
To capture live video:
1 Open iMovie HD by clicking its icon in the Dock (or choose Applications > iMovie HD).
2 Click the mode switch to set iMovie HD to built-in camera mode.
3 Click the camera icon to the left of the mode switch and choose Built-in iSight from the
pop-up menu.
4 Click the “Record With iSight” button in the iMovie monitor to begin recording.
The video you see in the iMovie monitor is recorded as a clip in the iMovie Clips pane.
5 Click the “Record With iSight” button again to stop recording.
You can record video as long as your MacBook Pro has enough disk space to hold it.
More information about iMovie HD is available in Mac Help. Choose Help > Mac Help,
then choose Library > iMovie HD Help from the menu bar.
Mode switch