
User Manual


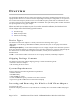
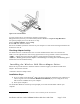
Table Of Contents
- Device Types
- Shipping Package Contents
- System Requirements
- Inserting and Removing the Wireless LAN Client Adapter
- Installing the Wireless LAN Client Adapter Driver
- Confirming the Installation
- Uninstalling the Windows Wireless Drivers
- Service Set Identifiers
- Wireless Bands and Channels
- WZC Overview
- Accessing WZC
- Wireless Security

Figure 1: PC Card Installation
To safely remove the PC card while the computer is powered up:
2 Right-click the system tray icon entitled Safely Remove Hardware or Eject or Stop Hardware.
The system prompts you to select the device to stop.
3 Select Wireless Adapter, and click Stop.
4 Click OK when asked to confirm.
5 Press the CardBus eject button on the side of your computer to release the slot locking mechanism and
slide the PC card out.
Checking Adapter Activity
The LEDs on the PC card indicate the state of current communications. LED 1 is on the left and
LED 2 is on the right when the card is facing up (thick section on top, metallic contact on the bottom):
• LED 1 — Shows solid green when the adapter is associated (connected) to the network.
• LED 2 — Blinks green when the adapter is transmitting or receiving data. The blinking speed
reflects the level of network activity.
Installing the Wireless LAN Client Adapter Driver
Follow the steps in this section to install the software needed to support your Wireless LAN Client
Adapter. The software includes:
• Wireless LAN Client Adapter driver
Installation Steps
1) If you are using a PCIe miniCard
2
, make sure that it is physically installed in your computer (see
“Device Types” section aboveError! Bookmark not defined.). If you are using the PC card,
slide it into the CardBus slot on your computer.
2) Power up the computer.
The Found New Hardware wizard opens and prompts you to insert the installation CD into your
computer.
2
PCIe minCards and appropriate drivers will have been installed by the PC manufacturer.
Installation and User Guide: WFB400 Windows Wireless LAN Client Page 7 of 29