QSec™-800 User Guide D 0 -80 EC UE QS T , 5 R 2 BOOK AP NU ME C Pr elim inar y D r aft D O N O T CO PY
This user guide is based on the alpha version of the QSec™-800 telephone. Software changes may have occurred after this printing. QUALCOMM reserves the right to make changes in technical and product specifications without prior notice. The products and equipment described in this documentation are manufactured under one or more of the following U.S.
DO NOT COPY P r e l i mi n a r y D ra ft
Pr elim inar y D r aft D O N O T CO PY
Contents Before Using Your Phone ................................................................. 9 About your QSec™-800 .............................................................. 9 What’s in your package .............................................................. 9 Charging the battery .......................................................... 10 Getting help ................................................................................ 10 Your service provider ...................................
Understanding secure phone numbers .................................. 35 Entering numbers in your book .............................................. 36 To enter numbers directly into the book ........................ 36 To enter numbers at the end of a call .............................. 38 To enter numbers from history list .................................. 38 To enter numbers from a message callback ................... 39 More advanced ways to enter characters ...............................
To adjust the volume of the key beeps [12] .................... 54 To change length of key beep [31] ................................... 55 Customizing Alerts ................................................................... 55 To adjust volume of message alerts [14] ......................... 55 To set alert for messages [53] ............................................ 55 To set alert for roaming [52] ............................................. 56 To set alert for minute warning during call [51] ......
Removing the battery ................................................................ 72 Installing new battery ............................................................... 73 Disposing battery ...................................................................... 73 Power save mode ....................................................................... 73 Caring for battery ...................................................................... 74 Performance, Maintenance, and Safety ....................
Before Using Your Phone About your QSec™-800 The QSec™-800 is a digital, multi-level secure cellular phone that you can use over existing commercial CDMA cellular/PCS networks. ■ Looks and operates like a commercial cellular phone ■ Provides multi-level security (Type I through Type IV), using FNBDT (Future Narrow Band Digital Terminal) signaling.
■ Rechargeable, internal lithium ion (LiIon) Battery (GXBAT0001), previously installed in your phone ■ Warranty Card Charging the battery C The internal LiIon battery is partially charged when you receive the phone. However, you should fully charge the battery as soon as you can to maximize talk time. If the battery level falls too low, the phone turns off without saving any functions in progress. You do not need to remove the battery to charge it.
■ QUALCOMM Web site at http://www.qualcomm.com ■ U.S. and Canada: 1-800-349-4478 (toll-free, U.S.A. only) ■ Other Countries: 1-619-651-4028 Before requesting support, please try to reproduce and isolate the problem.
Customizing Your Phone, page 51 Tells you how to change your display screen, such as adding a personalized banner, as well as adjusting the volume on the ringer, the earpiece, and alert beeps Voice Mail, Pages, and Text Messages, page 59 Explains types of messages your phone receives and how you can access, save, and respond to them Advanced Features, page 63 Describes the more advanced features for power users, such as using lock codes, entering phone numbers with scratchpad, and setting up three-way
From Menu, select 3>Features; then 7>Ringer Type From the Home screen, select [MENU]. Then press the Right/Left keys to highlight 1>Volume and press the Select key. Then press the Right/ Left keys to highlight 7>Ringer Type and press the Select key. Making selections from menus is described in “To make menu selections” on page 23. To change the sound of your ringer [37] The [37] indicates the menu shortcut. To access this feature, select [MENU] from the Home screen; then press “3” and then a “7.
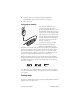
Getting to Know Your Phone Antenna Speaker/ mute button Surveillance port connects phone to surveillance headset Volume buttons adjusts volume Earpiece Display icons D Condor APr 25, Tue BOOK MENU Push-to-Talk/ Push-to-Unmute button (PTT/PTU) Display screens Smart Keys Navigation keys i Send/Talk key sel 1 2abc 3 def 4 ghi 5 jkl 6 mno 7pqrs 8tuv 9wxyz 0 # Select key * Message key C End/Power key Clear key Microphone This art file needs a Q-base art number P re l i m i na ry D
Here’s a quick overview of the keys on your keypad and the display icons appearing at the top of your screen. Most of the keys and icons are discussed in detail later in this guide.
In this section, you’ll learn to ■ Turn your phone on and off (page 16) ■ Use the Push-to-Talk/Push-to-Unmute feature (page 17) ■ Understand display screens (page 18) ■ Understand menus (page 22) Turning your phone on and off To turn the phone on To use your phone or to receive calls, you must turn it on. 1. Hold down the End/Power key for about a second until you see “Searching” on your display and your Home screen appears. Your Home screen appears when you first turn on your phone.
Using the Push-to-Talk/Push-to-Unmute button The Push-to-Talk (PTT)/Push-to-Unmute (PTU) button lets you use your phone like a two-way radio. Press the Speaker mute button to put the phone in PTT/PTU mode. D 0 -80 EC UE QS T , 5 R 2 BOOK AP NU ME Press and hold the Pushto-Talk (PTT)/Push-toUnmute(PTU) button to speak; release it to listen. 1. Press the Speaker mute button at the top of your phone. This puts your phone in PTT/PTU mode.
Note to Reviewers:We need to tell users why they must hold the phone away from face. Above line is from John Forrester per FCC requirements. Understanding display screens While using your phone, you’ll notice different screens appear in your display.
To scroll screens, press the appropriate Navigation key. . Press to move screen up Press to move screen to the left Press to move screen to the right Press to move screen down To use Smart Keys™ Once you learn to navigate screens, you’ll need to make selections from the screen. These selections lead you to other screens or let you select options that change features on your phone. One of the main ways to make such selections is using Smart Keys.
To choose options from screens In addition to selecting Smart Keys to navigate screens and confirm selections and messages, you’ll see screens that let you choose options or make choices about your phone’s settings. For example, you may want to display the time. Once you navigate to the Time screen, you’ll press the Up/Down keys display options (in this instance, yes and no. D SHOW 44 TIME & DATE YES OK to Press the Up/Down keys to view hidden options. The ámeans the option is selected.
This is an important screen to become familiar with because it contains a row of Smart Keys that lead to all the other screens you’ll need while using your phone. All of these Smart Keys and the paths they lead to are discussed later in this guide: Apr 25, Tue 11:37am MENU My Banner Apr 25, Tue 11:37am Apr 25, Tue 11:37am BOOK BOOK INFO INFO Display 2 LOCK Display 2 Four smart keys are available from the Home screen: [MENU], [BOOK], [INFO], and [LOCK]. MENU, page 22.
To use Help Some screens display the Smart Key [HELP]. Selecting HELP displays a Help screen, which provides information about the screen you are using. D 14' 7_ 2. 5( 8! 3& 6) 9? INFO D Selecting [HELP] opens the Help screen. 1. 1-9: Special Character Clear: Return End: Standby To open the screen, press the Left key then press the Select key sel . to select [HELP]; A Help screen appears with information about the previous screen. Help screens provide information about the previous screen.
Selecting [MENU] from the Home screen displays the MAIN MENU. D My Banner Apr 25, Tue 11:37am MENU BOOK Display 2 D MAIN MENU 1 Volume 2 Call Info 3 Features Display 1 . Selecting this option leads to your Main menu, which branches into submenus. This Menu tree (shown on page 26) guides you to most of the screens you’ll use to customize and change the features of your phone. To make menu selections 1. From the Home screen, select [MENU].The Main menu screen appears.
2. Once you select the menu item you want, do one of the following: ❑ Press the Select key ❑ Enter the number of the Menu selection. sel . Note You must provide your lock code to open the Security menu (see page 64). To recognize submenus Each of the menu items from the Main Menu is a menu itself (or a submenu) that leads to other menu selections. To display a screen in which you change a setting on your phone, you must make selections from the Main Menu and its submenu.
1. From the Home screen, select [MENU]. The Main menu appears. 2. Press the menu shortcut numbers. For instance, for the above screen you would press “1” then “1.” The screen you want appears. In this guide Menu shortcuts are bracketed at the end of headings. For instance, “To change ringer volume [11]” means you can press “1” then “1” from the Main menu to open the Ringer Volume screen. Menu tree and shortcuts Here’s a picture of the Menu tree and the selections available for your phone.
Menu Tree 1 Volume 11 Ringer (p. 52) 12 Key Beep (p. 54) 13 Voice (p. 54) 2 Call Info 21 Home Calls (p. 67) 14 Message Alert (p. 55) 22 Roam Calls (p. 67) 15 Mic Type (p. 54) 23 Net Calls (not available) 16 Mute (p. 53) 24 All Calls (p. 67) 3 Features 31 Beep Length (p. 55) 32 One Touch (p. 48) 4 Display 41 Back Light (p. 52) 33 Speed Dial (p.48) 42 Sort Book (p. 48) 34 Scratchpad (p. 68) 43 Banner (p. 51) 35 Any Key (p. 33) 44 Show Time (p. 52) 36 Ring Type (p. 53) 45 Auto Hyphen (p.
Making and Receiving Calls Once you know how to navigate display screens, make selections using Smart keys, and use menus (all covered in “Getting to Know Your Phone” on page 14), you are ready to do some basic tasks on your phone, such as making and receiving calls.
If you do not know your phone’s configuration, check with your TA or do the following: 1. From the Home screen, select [MENU]. 2. Select 7>Sec Admin; then 2>UPV. The type of configuration appears on the screen. Know your PIN Your PIN is an access number distributed by your Terminal Administrator with your phone.If you are a traditional or autosecure user, you will be prompted for this number to make secure calls. 1. From the Home screen, select [MENU]. 2. Select 7>Sec Admin; then 1>Secureuser.
2. Depending on your phone’s configuration and the type of call, press the Send/Talk key in one of the following ways: Clear Calls Secure Calls Traditional Press the Send/Talk key Press and hold the Send/Talk key Autosecure Press and hold the Send/Talk key Press the Send/Talk key Secure-only Cannot make clear calls Press the Send/Talk key If making a clear call: Your phone behaves like a commercial phone, unless the person you are calling has a secure-only phone.
When you make a secure call, your phone searches your phone book and history list to determine the following about the number you are calling: ■ If it has previously been entered as secure in your phone book or has a secure number associated with it in your phone book (Many numbers entered in your book have both a clear number and a secure one).
course, the pattern for pressing the key depends on your phone configuration and the type of call you are making. Clear Calls Secure Calls Traditional Press the Send/Talk key Press and hold the Send/Talk key Autosecure Press and hold the Send/Talk key Press the Send/Talk key Secure-only Cannot make clear calls Press the Send/Talk key Once you initiate the call, whether clear or secure, your phone behaves in the same way described in the section on direct dialing (see page 28).
❑ Missed: Unanswered incoming calls, if caller ID is available. This type does not include call attempts made when the phone was off. ❑ Call Waiting: Incoming calls that occurred while you were on another call. This type of call only occurs if your system supports call waiting. ❑ 3-Way Calling: The second party you dialed during a three-way call. This type of call only occurs if your service provider supports three-way calling. ❑ Emergency: All emergency calls, like 911.
■ Speed dialing (see page 48). With speed dialing, you enter the memory location of the number (assigned in your phone book) and press the Send/Talk key . ■ Touch dialing (see page 48). Similar to speed dialing, with touch dialing, you enter the memory location of the number but you do not need to press the Send/Talk key . Instead you hold down the memory location’s last number. ■ Returning call back numbers left at your message center (see page 61).
Changing security during calls Secure-only users cannot use this feature. Besides making and receiving clear and secure calls, traditional and autosecure users can switch the type of call connection during the call. For instance, if you have established a secure call connection with another party, you can transition the connection to a clear one without hanging up and redialing. You can likewise transition clear connections to secure ones.
Phone Book Your phone contains an electronic phone book in which you can save phone numbers, both clear and secure, with an associated name. There are 99 “memory locations” in the phone book or slots for this information. Each memory location holds up to 32 digits: 10 characters for a clear number, 10 characters for a secure number, and 12 characters for a name.
implemented, you may or may not know the secure number but it is embedded in your phone. When placing a secure call, your phone checks your phone book or history list to determine if you ever made a secure connection with the party you are calling. If so, it continues to place the call. If not, it performs a checking process called “call setup” (see page 29). During this setup, it sends signals to make sure this phone is a secure phone.
❑ To enter a clear phone number, select [SAVE]. ❑ To enter a secure phone number, select [SAVE*]. The Enter Name: screen appears. 3. Enter a name to go with the number. To enter a letter, press the key labeled with the letter you want. For instance, if you press 2 , the letter “A” appears on the display. Press it again and the letter “B” appears; again, and “C” appears; again, and “2” appears. You can continue to press the key to cycle through the letters again.
The phone automatically assigns a memory number (such as “auto=03”). Later, you can use this memory location to speed dial your number (see page 48). 5. Do one of the following: ❑ To save the assigned location, select [SAVE] for clear calls or [SAVE*] for secure calls. In most instances, you accept this location. ❑ To enter your own memory location, enter a two-digit number between 01 and 99 you want and select [SAVE] for clear calls or [SAVE*] for secure calls.
1. From the Home screen, select [BOOK]; then select [HIST]. The history list appears, showing the first three numbers. 2. Press the Up/Down keys to find the name or number you want to save in your book. 3. Select [VIEW]. The information about the phone book entry appears. 4. Select [SAVE] for clear calls or [SAVE*] for secure calls. 5. Follow steps 3-6 on page 37. To enter numbers from a message callback Last, you can enter message callback numbers into your phone book.
To switch between upper and lowercase 1. By default, the letters start out in uppercase. To change to lowercase, select [LOWER] before entering letter. The Smart key changes to [UPPER]. To switch to lowercase, select [LOWER] before entering the letter; then press the key for the letter. D Enter Name OK LOWER To return to uppercase, select UPPER] before entering the letter; then press the key for the letter. D a Enter Name OK UPPER D aA Enter Name OK LOWER 2. Enter the letter you want. 3.
D 14' 7_ 2. 5( 8! 3& 6) 9? Up key INFO Down key D 1* 4" 7< Selecting the [PUNC] Smart key displays the first punctuation screen. Press the Down navigation key to view the other screens. Press the Up navigation key to move up a screen. 2# 5: 8> 3% 6+ 9= Down key D 1$ 4; 7\ 2, 3/ 5@ 6[ 8] 9^ INFO To select from the list, enter the number associated with the punctuation you want. 4.
■ Hard pauses cause the phone to stop dialing until you select [RESUME], which appears on the screen. Hyphens are only for show. You can insert manual hyphens wherever you like, while automatic hyphenation inserts hyphens according to the North American numbering plan. Entering a manual hyphen suspends any automatic hyphenation for that number. To enter a pause or manual hyphen 1. Start entering the number. 2. Select one of the following 3. ❑ [HARD] to insert a hard pause.
There are several ways to search for names and numbers in your book: ■ Scroll through the book ■ Scroll history list and retrieve from book ■ Search by name ■ Search by number ■ Search by memory location To search by scrolling the phone book The simplest way to search for a name or number is to scroll your phone book 1. From the Home screen, select [BOOK]. 2. Press the Up/Down keys 3. When the on-screen cursor appears beside the phone number, press the Send/Talk key to place the call.
D Location ?? ( to view and scroll) NAME 2. HIST Select [NAME]. The following screen appears. D Search for FIND LOWER Displ y 6 3. Do one of the following: Enter the first letter of the name, such as “J” for “Jerry.” Select [FIND]. The memory list displays all the names beginning with “D,” displaying three names at a time. Press the Up/Down keys to scroll through the names. ❑ D 12 J.R. TOLKE 01 JACK FROS 08 JANE FOND VIEW Enter part of a name (such as “BR” for “BRIAN”) and select [FIND].
5. If you want to view information about the name, select [VIEW]. The information about the phone book entry appears 6. To place a call, do one of the following: ❑ Press the Send/Talk key . ❑ Press the memory location number, holding down the last digit. For instance, to phone Brian Jones, press “33” and hold down the second “3.” To search by phone number To search for a number in the phone book, you just need to remember three consecutive digits. 1.
2. Use any of the search methods discussed in this section to find the name you want. 3. Select [VIEW]. The information about the phone book entry appears. 4. Press the Up/Down keys 5. Press the Send/Talk key to see the secure phone number. to place the call. Changing the phone book To edit a phone book entry You can change the phone number, name, and memory location of any non-secret phone number. You can also make non-secret numbers secret. 1. From the Home screen, select [BOOK].
to edit the number, don’t make any changes and then press [SAVE] or [SAVE*]. If you are changing a secure phone number, you are done at this point since you can only change the number 7. Edit the name if you wish; press [SAVE] or [SAVE*] (or bypass). 8. Edit the memory location number if you wish; press [SAVE}or [SAVE*] (or bypass). 9. Save the entry as hidden or non-hidden.Hidden entries won’t display the phone number with incoming calls.
To dial from book 1. Use one of the search methods to go the phone book entry you want to dial (see “Searching the phone book” on page 42). 2. Press the Send/Talk key . To speed dial If you know the memory location of the phone number you want, you can simply enter that number. 1. Make sure that you have enabled your phone to speed dial: ❑ From the Menu, select 3>Features; then 4>Speed Dial. ❑ Make sure the screen says “ENABLE.
3. Press the Up/Down keys #. 4. Select [OK]. to choose alphabetic or location Erasing the Book If you want, you can erase the entire phone book. There is no undo feature. 1. From the Home screen, select [MENU]. 2. Select 6>Access. The Enter Lock Code screen appears. 3. Enter your four-digit lock code.For information on your lock code, see page 65. 4. Select 6>Erase Book. 5. Select [ERASE]. An “Erase all phone book entries?” confirmation screen appears. 6. Select [YES]. You cannot undo.
Phone Book P r e l i mi n a r y D ra f t
Customizing Your Phone You can change settings on your phone to customize your display and the sounds.
5. Select [OK]. To display the date and time [44] 1. From the Main screen, select [MENU]. 2. From Menu, select 4>Display; then 4>Show Time. 3. Press the Up/Down keys 4. Select [OK]. to select yes or no. To adjust the screen’s backlight [41] The backlight illuminates the phone display and keypad. It remains on whenever the phone receives power from an external source, such as the Cigarette Lighter Adaptor or Hands-free Car Kit. 1. From the Main screen, select [MENU]. 2.
D RINGER VOLUME 11 Press the Up/Down keys to the setting you wenches more bars, the louder the ring. Then press the Select key. OK Displ y 3 3. Press the Up/Down keys to select the setting you want (the more bars, the louder the ringer) or to select off. 4. Select [OK]. You can also adjust the ringer prior to a call. The setting you choose will be the permanent setting until you change it again on this screen. To change the sound of your ringer [36] 1. From the Main screen, select [MENU]. 2.
2. From Menu, select 1>Volume; then 6>Mute. 3. Press the Up/Down keys this call, all calls, off. 4. Select [OK]. to select the following options: To unmute calls, return to this screen and select on. Adjusting the earpiece volume You may also need to adjust the audio volume (what you hear) to a comfortable setting. To adjust the earpiece volume while on the phone ■ While on the phone, press the Volume buttons to adjust the volume up or down. To adjust the earpiece volume permanently [13] 1.
To change length of key beep [31] 1. From the Main screen, select [MENU]. 2. From Menu, select 3>Volume; then 1>BeepLength. 3. Press the Up/Down keys ❑ ❑ 4. to select: normal: emits a short beep long: emits a beep as long as you press the key Select [OK]. Customizing Alerts Your phone sends you audio or visual cues, such as beeps and flashing icons, when it wants to alert you of received messages or a low battery.
3. Press the Up/Down keys to choose the kind of alert you want: short beep, long beep, lights only (meaning a flashing LED), vibrate, short + reminder, long + reminder, or off. 4. Select [OK]. To set alert for roaming [52] You can set your phone to alert you when a network service parameter changes. For instance, it alerts you if move out of your service area and start roaming (which could lead to higher costs), or if the call changes from digital to the less-secure analog service. 1.
To turn display flashing on or off [56] 1. From the Main screen, select [MENU]. 2. Select 5>Alerts; then select 6>LED. 3. Press the Up/Down keys display) or no. 4. Select [OK]. to choose yes (to turn on flashing Is flashing LED just for alerts or will this also work if ringer is off? To disable all alerts [57] You may want to turn off all alerts. 1. From the Main screen, select [MENU]. 2. Select 5>Alerts; then select 7>InhibitAll. 3. Press the Up/Down keys 4. Select [OK].
Customizing Your Phone P r e l i mi n a r y D ra f t
Voice Mail, Pages, and Text Messages Depending on your service provider, your phone has a number of messaging features, such as voice mail, paging and text messaging. Messages are ways callers can contact you when you don’t answer the phone. You must turn your phone on to receive messages. Also, the types of message service available to you depends on your service provider.
code to retrieve your messages. Every service provider is different. Usually, press and hold the Message key . Your phone dials your message center and an automated voice menu guides you through these steps. Check with your service provider if you need further assistance. Knowing you have a message You know you have a message when the Message icon appears on your display. If the icon flashes, the message was sent “priority” or “urgent.
❑ To erase the message, select [ERASE]; then, if this is a new message, select [YES]. ❑ To keep the message, select [ERASE]; then select [NO]. The next message appears. ❑ To continue to the next message, select [NEXT]. 5. Continue to view messages or press the End/Power key to return to the Home screen. 6. Scroll to the “Page/Msg” line; then select [OK]. The first new message opens. 7. Select [VIEW] to look at a message.
When the available memory falls below 25% of the total memory, the phone beeps and the message “Warning! Message Memory is almost FULL.” When the phone runs out of memory, it does not accept any new messages. When this happens, erase old or unimportant messages to free up some memory. To erase old messages manually You can erase old messages one at a time, as discussed in “To view a page or text message” on page 60. If you prefer, you can clean out your messages all at once. 1.
Advanced Features After you have mastered the basics of your phone, there are several features for more advanced users. In this section, you’ll learn to ■ Add extra security to your phone by turning on the keyguard, setting up a lock code, or restricting your phone (page 63).
Note You can also turn on the turn on the keyguard by selecting [MENU] from your Home screen and then pressing and holding the Select key. To turn off the keyguard There are two ways to turn keyguard off. The easiest way to turn it off is to do the following: 1. With the Keyguard on screen displayed, press the Select key sel . Another screen appears to confirm you want to unlock the keyguard. D D Keyguard on; Select [ ] to unlock. [ Keyguard ON, Press 1 to unlock.
6. Select [OK]. To restrict your phone [62] Restricting limits your outgoing calls to emergency numbers, designated service provider numbers, and the numbers in the phone book. You may answer incoming calls and view or dial the phone book numbers, but you cannot erase, add, or edit any numbers. 1. From your Home screen, select [MENU]. 2. Select 6>Access.The Enter Lock Code screen appears. 3. Enter your four-digit lock code. For information about your lock code, see page 65. 4. Select 2>Restrict.
Special features provided by service provider Your service provider may offer extra features like caller ID, threeway calling, call forwarding, and call waiting. If you wish to use these features, contact your service provider for details. Your QUALCOMM phone supports all of these options if they are activated on your phone. To use Caller ID Caller ID is a service provider feature that displays the phone number of the person who is calling you.
To use call waiting Call waiting is when you are on a call and you are alerted with two beeps if another call comes in. The display informs you that a call is coming in and shows the caller’s phone number if it is available. 1. Press the Send/Talk key to switch to the incoming call. The previous caller is put on hold. 2. Speak to the incoming call and press the Send/Talk key again to return to the party on hold. 3. You can continue to switch between calls by pressing the Send/Talk key .
4. Once on the screen you want to view, do one of the following: ❑ To view and exit, select [OK] when done. ❑ To reset both number of calls and duration to “0,” select [RESET]. You cannot reset the ALL CALLS screen. To find your phone’s version number [46] While upgrading the software for your phone or talking to technical support, you may need to know the software version and product model of your phone. 1. From the Home screen, select [MENU]. 2. Select 4>Display; then 6>Version.
3. Enter your four-digit lock code.For information on your lock code, see page 65. 4. Select 5>Erase History. 5. Select [ERASE]. An “Erase all calls list entries?” confirmation screen appears. 6. Select [YES]. You cannot undo.
Advanced Features P r e l i mi n a r y D ra f t
Battery Care and Maintenance The phone comes with a rechargeable LiIon battery that is located on the back of the phone. Leave this battery in the phone at all times. Bat te ry The following is typical battery performance: Service Mode Talk Time Standby Time* Digital 4.5 72 hours Analog 2.5 14 hours *Standby time refers to the time your phone is not attached to a charger but is not in use (the times you are carrying it around).
Recharging the battery The Battery Charge icon that appears on your Home screen indicates the how well-charged your battery is. The phone uses all the power in the external battery (if attached) before it starts to use the internal battery. If you have two batteries, the battery icon tracks only one battery at a time—only the internal or the external. It reflects the charge level of the external battery as long as it has a charge. Otherwise, it tracks the internal battery level.
Changing Battery (a) Changing Battery (b) Press and hold the battery release latches; pull off the back of the phone. 3. Pull off the back of the phone and take out battery. Installing new battery Your phone comes with a previously installed LiIon battery. If you need to replace the battery, do the following. 1. If a battery is already installed, turn the power off to prevent losing data and then remove the battery. 2.
When the phone is in power-save mode, you cannot make or receive calls. “Power Save Mode” and the No Signal icon appear on the display. The phone periodically rechecks for a signal. Press any key to manually check for service. When the phone finds a signal, it automatically switches out of power-save mode and displays the Signal Strength icon at the top of the display. Caring for battery ■ To reduce unnecessary drain on your battery, turn backlight to “always off” (see page 52.
Performance, Maintenance, and Safety In this section, you’ll learn to ■ Get good performance for your phone (page 75) ■ Care for your phone (page 75) ■ Understand safety issues (page 76) Getting good performance ■ Do not touch the antenna while you are on a call. ■ If you have trouble making a connection, stand near a window while placing your call or go outside. Caring for your phone ■ Do not let unauthorized personnel install or service your phone or accessories.
Safety Before using your wireless phone, know a few basic safety guidelines. Not following these guidelines may cause personal injury, damage your phone, or be illegal. Radio Frequency (RF) energy Your hand-held portable telephone is a low power radio transmitter and receiver. When it is ON, it receives and also sends out radio frequency (RF) signals. In August 1996, the U.S. Federal Communications Commission (FCC) adopted RF exposure requirements with safety levels for hand-held wireless phones.
belt clips and surveillance kits, since they have been tested and approved for RF safety. For information about these accessories, see page 79. Driving safety ■ Know the laws and regulations on using wireless telephones in areas you drive. ■ Avoid using your hand-held phone while driving. Pull off the road if possible. ■ Avoid emotional or confrontational calls while driving. Pull over immediately to conclude the conversation. ■ Install and use a Hands-free Car Kit.
Hearing aids Some digital wireless phones may interfere with hearing aids. In the event of such interference, you may want to consult your service provider or call the customer service line to discuss alternatives. Other medical devices If you use any other personal medical device, consult the manufacturer of the device to determine if it is adequately shielded from external RF energy. Your physician may be able to help you obtain this information.
Accessories The following optional accessories are available from your service provider. C a u ti o n Allow only authorized personnel to service the accessories. Unauthorized service may invalidate the warranty. Global Travel Charger, # GXTVL0001 Charges your phone’s battery from 110 or 220V. Connect the charger to the bottom of your phone and p lug it into a standard wall outlet. For an illustration and more information, see page 10. This accessory is included with your phone.
Belt Clip, # GXBLC0001 80 Accessories Lets you clip your phone onto your belt. To ensure your exposure to RF electromagnetic energy is within the limits established by the FCC, only use QUALCOMM-approved belt clips, since they have been tested and approved for RF safety. For more information about RF safety, see page 76.
Index A AC adaptor 10 accessories belt clip 80 Car Power Adapter 79 data cable 79 external battery 79 for phone 79 Global Travel Charger 79 Hands-free Car Kit 79 RF safety 76 safety 75 standard battery 79 surveillance kit 79 use QUALCOMM only 75 adjusting alerts 56 backlight 52 date and time 52 earpiece volume 54 keypad beeps 54 message alerts 55 microphone 54 ringer type 53 ringer volume 52 ringer, before call 52 roaming alerts 56 air bags, safety issues 77 aircraft safety 78 alerts adjusting volume of ale
C Call in progress icon 15 Call Info menu 67 call setup 29 call waiting 32, 67 callback numbers returning 61 saving 61 caller ID 66 calls any key to answer 33 call waiting 67 caller ID 66 changing security during 34 clear calls 29, 33 duration 67 ending 33 finding information about 67 forwarding 66 history list 31 knowing configuration 27 making 28 receiving 33 redialing 30 restricting 64, 65 returning callback numbers 61 RF safety 76 saving numbers while talking 68 secure calls 29, 33 security levels 29 sp
touch dialing 48 Clear key button 14 erasing characters 39 moving back a screen 21 commercial secure phone 29 CONF (Confidential) 29 conference calls 66 configuration 28 CPA. See Car Power Adapter credit card dialing 41 CTIA.
erasing history list 68 phone book entries 49 erasing messages automatically 62 manually 62 explosive areas 78 external battery 10, 71, 79 F faxes, using phone 79 Federal Communications Commission (FCC) requirements 76 finding information about calls 67 about version number 68 about your phone number 67 finding secure numbers 45 flashing display, turning on or off 57 forwarding calls 66 fueling car, safety issues 77 G Global Travel Charger 10, 72, 79 H Hands-free Car Kit backlight 52 definition 79 safety 77
changing code 65 default 64 definition 64 LOCK Smart key 21 lowercase, changing phone book 40 M making calls call waiting 67 direct dialing 28 direct dialing, clear calls 29 forwarding 66 hanging up 33 redialing from history list 31 redialing the last number 30 RF safety 76 speed dialing 48 three-way calling 66 touch dialing 48 manual hyphenation, entering 42 medical devices, safety issues 78 memory low 62 out of 62 memory location definition 35 how to save 38 number 37 search by in phone book 45 MENU Smart
Navigation keys 19 returning to Home screen 20, 21 Smart keys 19 with menu shortcuts 24 No service icon 15 O old messages erasing automatically 62 erasing manually 62 one-touch dialing See touch dialing online Help 22 P pacemakers, safety issues 77 Padlock icon 15 pages how they appear 59 viewing 60 pauses entering in numbers 41 hard 41 timed 41 performance phone 75 power save mode 73 PGP fingerprint 30 phone accessories 79 avoid extreme temperatures 75 cleaning 75 keep dry 75 phone book 35–45 definition of
Product support 10 propane, safety 78 PROTEC (Commercial secure or protected) 29 protected phone 29 protecting keypad 63 PTT/PTU picture of button 17 safety 17 unmute button 14 punctuation, entering in phone book 40 Push-to-Talk/Push-toUnmute. See PTT/PTU R radio frequency energy See RF energy receiving calls clear calls 33 secure calls 33 setting any key to answer 33 recent history list.
ending 33 entering numbers into phone book 37 finding numbers 45 first time you make 29 history list 31 levels of security 29 making 28 receiving 33 redialing 30 RF safety 76 speed dialing 48 secure connections 29 secure phone numbers editing in phonebook 46 secure-only phone configuration 27 security changing during call 34 lock code 65 locking your phone 64 restricting calls 65 using keyguard 63 security levels for your phone 27 autosecure 27 how to check 28 secure-only 27 traditional 27 Select key 14 sel
uppercase, changing to 40 V version number, finding 68 vibrator, turning on or off 56 voice mail definition 59 listening to 60 Volume buttons 14 Pr elim inar y D r aft DO NOT COPY Index--89