
Product Manual


ULTRA-JACK
SYSTEM
ULTRA-JACK
INSTRUCTIONS
Customer Support and Ordering Information
781-344-1000 • www.qualcraft.com
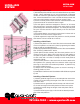
Install Workbench:
1) Install bracket in accordance with instructions
provided with the work bench attachment.
2) The installation of a workbench does not substi-
tute for the upper guardrail as required by Federal
OSHA Regulations.
3) Do not stand on the workbench or use for any
purpose other than providing a work space for tools
and materials.
Instructions for using the Qual-Craft® Ultra-
Jack™
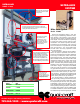
To Raise the Ultra-Jack™:
1) Stand on the walk plank with the jack and pole in
front of you. Lock the crank handle by turning the
handle until the spring lock engages. (Fig. #2)
2) Place your foot in the stirrup and pump slowly until
the platform is raised approximately 1 foot (Fig. #3).
3) Repeat this process with other Ultra-Jacks. Al-
ways keep the work surface level.
4) Lock the Jack by placing the stirrup in the “UP”
position. (g. #1)
To Lower the Ulra-Jack™:
1) With your back to the work wall, face the pole and
raise the stirrup to the “UP” position. (Fig. #1)
2) Insure that the crank handle is in the locked posi-
tion. (Fig. #2)
3) Holding onto the pole, place one foot on the
square pedal of the lower lock, press down and hold
open.
4) Take hold of the crank handle pulling the arm out
to the right and begin turning the handle until the
platform begins to lower (Fig. #4).
5) Continue lowering the platform for approximately
one foot.
6) Lock the Ultra-Jack by turning the handle until the
lock ring is seated and the handle is no longer under
spring tension. Release the square pedal to re-en-
gage the lower safety lock.
7) Repeat procedure with the other jacks until work
platform reaches desired height. Always keep work
surface level.
Fig. #3
Fig. #2
Fig. #1
Fig. #4