
User guide

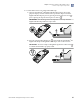
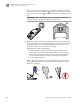
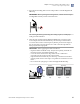
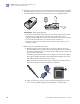

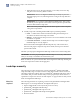
Table Of Contents
- QuantStudio 3D Digital PCR System User Guide (Pub. no. MAN0007720 Rev. C.0)
- Copyright Page
- Contents
- About this guide
- Chapter 1. Getting Started
- About the QuantStudio® 3D Digital PCR System
- Operating the instrument
- Prepare the QuantStudio® 3D Digital PCR System for use
- Connect the QuantStudio® 3D Instrument to a network
- Connect the QuantStudio® 3D AnalysisSuite™ Software
- Chapter 2. Prepare Samples and Load Reactions
- Chapter 3. Perform the PCR
- Chapter 4. Analyze the Prepared Chips
- Chapter 5. Troubleshooting
- Appendix A. Maintenance
- Appendix B. Networking
- Appendix C. Parts and Materials
- Appendix D. Specifications and Layout
- Appendix E. Safety
- Documentation and support
- Back Cover

c.
When the light powers off (approximately ³15 seconds), remove the chip
and place it on a clean, dry, lint-free surface.
IMPORTANT! Remove the Digital PCR 20K Chip assembly only after the
ultraviolet light powers off, indicating that the curing of the Chip Sealant is
complete.
IMPORTANT! Do not squeeze sealed Digital PCR 20K Chips. After curing
the sealant, pressure placed on the surface of the chip lid can expel the PCR
reactions held within the chip wells.
Note: If necessary, insert the chip into the station again to ensure complete
curing of the Chip Sealant.
8.
Visually inspect the sealed Digital PCR 20K Chip
for potential problems:
• Leaks – Confirm that no Immersion Fluid is leaking from the fill port or
around the seal between the Chip Case and lid.
• Bubbles – Confirm that the Chip Case is free of excessive bubbles. One small
air bubble is acceptable.
• Correct lid orientation – Confirm that the Chip Case Lid and the Digital
PCR 20K Chip are correctly aligned.
If the loaded and sealed Digital PCR 20K Chip fails any of the criteria above,
discard it and prepare a duplicate chip. Once sealed, the Chip Case cannot be
opened and resealed.
Thermal cycle the prepared Digital PCR 20K Chips within 2 hours after loading them.
IMPORTANT! Store the prepared Digital PCR 20K Chips in a clean, dry, dark location
until you are ready to load them onto the thermal cycler.
Note: If desired, use a pen to label the back of the Digital PCR 20K Chip
. Marking the
back of the chips will not affect the imaging data.
Load chips manually
The following procedure explains how to load QuantStudio
®
3D Digital PCR 20K
Chips manually using a UV Stylus and UV-Curing Stylus Stand. It can be used as an
alternative method for loading chips if a QuantStudio
®
3D Digital PCR Chip Loader is
unavailable. This procedure assumes that you have prepared your PCR reactions as
explained in “Prepare the reaction mix and samples“ on page 39 and are ready to load
them onto Digital PCR 20K Chips.
The following materials are required to load and seal QuantStudio
®
3D Digital PCR
20K Chips for use on the QuantStudio
®
3D Digital PCR System.
• Prepared digital PCR reactions (from the previous section)
• QuantStudio
®
3D Digital PCR 20K Chips
• QuantStudio
®
3D Digital PCR Chip Case Lids
• QuantStudio
®
3D Digital PCR Sample Loading Blades
• Immersion Fluid
Materials
required
Chapter 2 Prepare Samples and Load Reactions
Load chips manually
2
50
QuantStudio
®
3D Digital PCR System User Guide