
User guide
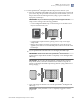

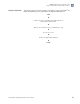


Table Of Contents
- QuantStudio 3D Digital PCR System User Guide (Pub. no. MAN0007720 Rev. C.0)
- Copyright Page
- Contents
- About this guide
- Chapter 1. Getting Started
- About the QuantStudio® 3D Digital PCR System
- Operating the instrument
- Prepare the QuantStudio® 3D Digital PCR System for use
- Connect the QuantStudio® 3D Instrument to a network
- Connect the QuantStudio® 3D AnalysisSuite™ Software
- Chapter 2. Prepare Samples and Load Reactions
- Chapter 3. Perform the PCR
- Chapter 4. Analyze the Prepared Chips
- Chapter 5. Troubleshooting
- Appendix A. Maintenance
- Appendix B. Networking
- Appendix C. Parts and Materials
- Appendix D. Specifications and Layout
- Appendix E. Safety
- Documentation and support
- Back Cover

The following figure shows the workflow for running a single QuantStudio
®
3D
Digital PCR 20K Chip
on the QuantStudio
®
3D Digital PCR Instrument.
Start
q
Load the thermal cycled Digital PCR 20K Chip into the
QuantStudio
®
3D Instrument.
q
Wait for the instrument to detect and image the chip.
q
Review the results.
q
Remove the Digital PCR 20K Chip.
q
Finish
Analysis workflow
Chapter 4 Analyze the Prepared Chips
Using the QuantStudio
®
3D Digital PCR Instrument
4
QuantStudio
®
3D Digital PCR System User Guide
67