Smart Wearable ECG Monitoring Device User Manual V 1.
TABLE OF CONTENTS Safety Notes ...............................................................5 Product Overview ......................................................8 Indication for Use ....................................................................... 8 Package Contents ...................................................................... 9 Product Configurations ....................................................................................... 10 Components ..................................
The Q-COR App .......................................................23 Main Screen .............................................................................. 23 Menu .......................................................................................... 24 History................................................................................................................... 24 Profile .................................................................................................................
Regulatory Marks .................................................................................................
SAFETY NOTES • • • • • • • • • • • • • The Quanta Smart Wearable ECG Monitoring Device is to be used for clinical assessment and personal reference only. The Quanta Smart Wearable ECG Monitoring Device is not intended for diagnostic use. The Quanta Smart Wearable ECG Monitoring Device consists entirely of sophisticated medical electrical parts so maintenance can only be carried out by professional technicians. Unauthorized disassembly of the device by the user is not allowed.
• • • • • • • • • • • • • • • • Pay attention to ensure that the Quanta Smart Wearable ECG Monitoring Device is not swallowed by pets or children. Cardiac pacemakers or other electrical stimulators may affect the accuracy of the measurements for the Quanta Smart Wearable ECG Monitoring Device. The conductive parts of the electrodes and associated connectors for type CF applied parts, including the neutral electrode, should not make contact with other conductive parts including the ground.
• The expected service life of Quanta Smart Wearable ECG Monitoring Device is 3 years.
PRODUCT OVERVIEW Indication for Use The Quanta Smart Wearable ECG Monitoring Device is intended for use in the noninvasive measurement of a functional Electrocardiography (ECG) and heart rate (HR) in hospital, healthcare institute, and home environments by trained medical professionals and trained-adults. The Smart Wearable ECG Monitoring Device will process ECG signals and calculate HR.
Package Contents After purchasing the Smart Wearable ECG Monitoring Device please check the product package to ensure that the following items are included: ECG Sensor x 1 Charger x 1 USB Charging Cable x 1 5V/2A Adapter x 1 Direct Wear Patch x 1 (For Select Models) Body Strap Patch x 1 (For Select Models) Body Strap B1 x 1 (For Select Models) Body Strap B2 x 1 (For Select Models) User Manual Pin x 1 User Manual x 1
Product Configurations The following is a table that lists the various product configurations for the Quanta Smart Wearable ECG Monitoring Device and the components included for each configuration.
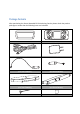
Back 1 2 3 1 1 2 3 Patch Connectors Charging Contacts Bluetooth Pairing Button Charger 1 2 1 2 3 Charging Contacts USB Charging Port Charging Indicator (see LED Indicators for more information) 3
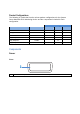
Body Strap Patch Front 1 1 1 Sensor Connectors Back 1 1 1 Electrode Connectors IMPORTANT: If any wear or damage to the wire shielding is found on the patch during use, replace immediately.
Direct Wear Patch Front 1 1 1 Sensor Connectors Back 1 1 1 Electrode Connectors IMPORTANT: If any wear or damage to the wire shielding is found on the patch during use, replace immediately.
Product Requirements In order to properly use the Smart Wearable ECG Monitoring Device the following items are required: • • The ECG Sensor For Wear with the Body Strap B1: (A) The Body Strap Patch and (B) The Body Strap B1 For Wear with the Body Strap B2: The Body Strap B2 For Direct Wear: (A) The Direct Wear Patch and (B) 3 ECG Electrodes* NOTE: For more information on electrode specifications, see ECG Electrode Information. • • A Bluetooth-enabled Android Smartphone* (with Android version 5.
BEFORE YOU START Before you start using the Smart Wearable ECG Monitoring Device you must: 1. Charge the battery on the Sensor 2. Install the Q-COR app on your Android smartphone 3. Enable Bluetooth on your smartphone Charging the Battery To charge the battery: 1. Plug the charger to a power source via the charging cable and adapter. 2. Place the sensor into the charger so that the charging contacts on both the sensor and charger make contact. 3.
GETTING STARTED Once you have completed the steps described in Before You Start, you can begin using the Smart Wearable ECG Monitoring Device by following these steps: 1. Create a profile in the Q-COR app 2. Pair your smartphone to the ECG sensor via Bluetooth 3. Wear the Smart Wearable ECG Monitoring Device Creating a Profile The first time you launch the Q-COR app you will need to create a profile.
Pairing After creating a profile, the Q-COR app will prompt you to pair the sensor to your smartphone. To pair the sensor to your smartphone: 1. Use the pin included in the package to push the Bluetooth pairing button on the sensor. 2. The status indicator on the sensor will alternately flash orange and green indicating that it is in pairing mode. 3. Once the sensor is in pairing mode tap OK on your smartphone. 4. Wait until you get a message on your smartphone indicating that the pairing was successful.
Wearing the ECG Sensor Depending on the model you have purchased you may either wear the ECG sensor using the provided body strap, or wear the ECG sensor directly on your body. IMPORTANT: When wearing the ECG sensor directly you must use separately purchased electrodes for the device to work properly. For more information on electrode specifications see ECG Electrode Information.
Sensor Side Ring Loop NOTE: Once connected, the status indicator on the sensor will light green then slowly flash indicating that the sensor is connected to the patch, but that the patch has not properly made contact with a body. 4. Fold over and adhere the Velcro tabs to close the front pocket of the body strap. 5. Wrap the body strap around your torso and tighten it so that it fits firmly around middle of your torso. 6.
2. Wrap the body strap around your torso and then clip the strap clip to the front of the strap (see image below). Tighten the body strap so that it fits firmly around middle of your torso. 3. Adjust the positioning of the strap so that the pocket is slightly under your pectoral area and the second contact on the strap aligns with the middle of the rib cage (see image below). 4. Once the ECG sensor is properly worn on your body the Q-COR app will start showing an ECG reading.
NOTE: Once connected, the status indicator on the sensor will light green then slowly flash indicating that the sensor is connected to the patch but that the patch has not properly made contact with a body. 3. Unpeel the paper strips on the contact side of each of the ECG electrodes. 4. Adhere the 2 electrodes attached to the sensor side of the patch to under your left pectoral area (see image below).
supply.
THE Q-COR APP Main Screen Once you have successfully paired and worn the ECG sensor, the Q-COR app’s main screen will be displayed on your mobile device. The main screen displays a real-time ECG which you can present to a medical professional for evaluation. The following items can comprise the main screen: 4 5 1 2 3 No 1 Item Menu Button 2 Profile Settings 3 4 Real-Time ECG Battery Status 5 Connection Status Description Tap to access the app menu.
information see Quit. NOTE: The Q-COR will trigger your smartphone to vibrate when the battery on the sensor is low. Menu When you tap the menu button in the Q-COR app’s main screen, the app menu will appear on the left side of the main screen. The menu allows you to: view either the realtime ECG or an ECG history, change profile settings, pair your ECG sensor to an Android smartphone, reset the Q-COR app, or exit the Q-COR app.
1 Date Button 2 Menu Button 3 ECG History Tap to view an ECG from a different date, for more information, see Date. Tap to access the app menu. Displays your ECG history. Swipe left or right to move to forward or backward on your ECG history. Tap to rescale the view of the ECG history, for more information, see Date When you tap the date button in the History screen a calendar view will appear.
Display Options The ECG displayed on the Q-COR app is displayed on a grid where the horizontal axis measures time (in seconds), and the vertical axis measures the electrical activity (in millivolts). Each unit on the grid is 1mm in size. By changing the display options for the ECG history you will be able to rescale the ECG on the grid for either a more detailed or a more general view.
Profile Tap Profile in the Q-COR app menu to change the profile settings used in the Q-COR app. Follow the same instructions in Creating a Profile to change the profile settings. Pairing Tap Pairing in the Q-COR app menu to pair/re-pair the ECG sensor to an Android smartphone.
Pairing to pair the ECG sensor to a smartphone. Reset Tap Reset in the Q-COR app to reset the app so that all previous profile settings and ECG history are deleted. Pairing information will still be stored on the device after resetting. Quit Tap Quit in the Q-COR app to exit the app and return to the Android interface.
ADDITIONAL INFORMATION LED Indicators The following tables describe the indicators on both the sensor and charger: Status Indicator (Sensor) Indicator Color Flashing Orange Alternate Green and Orange (1 min.
• • • Adapter: Stud Biocompatibility: ISO 10993 approved Latex free CE Mark according to MDD93/42/EEC CE Marked Specifications Sensor Specifications Continuous ECG data acquisition and calculation ECG Sensor Measuring Lead: Lead 1 (Lead 2 with direct wear patch) Frequency Response: Monitor 0.1 to 40 Hz (-3db) Heart rate measurement range: 30 – 240 bpm *HR is calculated based on R-R interval of ECG **If HR calculated falls out of 30-240bpm range, Q-COR app will display “--“.
Charger Specifications Charging indicator Green LED: Fully charge Orange LED: Charging in process Input 5V/0.5A Working Temperature 0 – 40°C Storage Temperature -20 – 60°C Weight 25g Dimension 90mm (L) x 34.4mm(W) x 13.66mm(H) Trouble shooting 1. Cannot pair CI3 sensor with Q-COR app: refer to the notes listed in the Pairing chapter. 2.
Federal Communications Commission (FCC) Statement 15.21 You are cautioned that changes or modifications not expressly approved by the part responsible for compliance could void the user’s authority to operate the equipment. This device complies with part 15 of the FCC Rules. Operation is subject to the following two conditions: 1) This device may not cause interference and. 2) This device must accept any interference, including interference that may cause undesired operation of the device. 15.
Manufacture Date The year of manufacture label and format of the wireless home health management system's body sensor, charger and ECG electrodes are shown below: Smart Wearable ECG Monitoring Device (CI3) QUANTA COMPUTER INC. MODEL : CI3 Use dedicated charger to charge.
Supplier’s Declaration The Quanta Smart Wearable ECG Monitoring Device conforms to the international EN 60601-1 and EN 60601-1-2 standards for electromagnetic compatibility with medical electrical devices and systems. Emission Testing Compliant Standard Electromagnetic Environment Guidelines The recommended electromagnetic environment for this instrument is shown in the table below. The customer or user should ensure that this instrument is used in the described environment.
No part of the Quanta Smart Wearable ECG Monitoring Device should be placed near portable and mobile radio-frequency communications equipment. The recommended safety distance can be calculated using the radio frequency and the following formula. Radio-frequency IEC 61000-4-6 3 V/m 150 kHz to 80 MHz [3] V Radio-frequency IEC 61000-4-3 3 V/m 80 MHz to 2.5 GHz [3] V/m Recommended safety distance d=1.17 P P 80 MHz to 800MHz d=2.33 P 800MHz to 2.5 GHz d=1.
0.01 0.12 0.12 0.23 0.1 0.37 0.37 0.74 1 1.2 1.2 2.3 10 3.7 3.7 7.4 100 12 12 23 If the maximum output of the transmitter is not shown in the above table, use the formula to derive the recommended safety distance d (Meter) with P (Watt) being the maximum output of the transmitter. Attention: For frequencies between 80 MHz and 800 MHz, use the higher frequency range. Attention: These guidelines may not be applicable to all situations.
Indicates the manufacturer's name and address To indicate on the rating plate that the equipment is suitable for alternating current only; to identify relevant terminals. Indicates the need for the user to consult the instructions for use for important cautionary information such as warnings and precautions that cannot, for a variety of reasons, be presented on the medical device itself Indicates the need for the user to consult the instructions for use.