Safety And Precautions Emergency services To make an emergency call in any country: ☛ Press 112, . Ask the operator for the service which you require: Police, Ambulance, Fire Brigade, Coastguard or Mountain Rescue Services. Give your location and, if possible, remain stationary to maintain phone contact. The 112 emergency number service is available on every digital network service. The number 999 is an alternative emergency number for UK only, and can only be used with a valid SIM card.
• If you have a weak heart, you should take extra precautions when setting functions such as the Vibrator and Ringer volume functions for incoming calls. • If you set the Vibrator setting to anything other than OFF, be careful that the phone is not near a source of heat (e.g. a heater) and that it does not fall from a desk due to the vibration. • Do not put the phone and its adapters (including the charger) in a heating/cooking device such as a microwave oven, or a pressure cooker.
• ANSI/IEEE C95.1-1992. “Safety levels with respect to human exposure to radio frequency electromagnetic fields, 3kHz to 300 GHz”. The Institute of Electrical and Electronics Engineers Inc., New York, 1991. • FCC Report and Order, ET Docket 93-62, FCC 96-326, Federal Communications Commission (FCC), August 1996. • Radio communications (Electromagnetic Radiation Human Exposure) Standard 2003, Australian Communications Media Authority. Disposing of your used NEC products Copyright ©1998-2005 ACCESS CO.
Important Information Read this information before using your phone Conditions of Use Operation of this NEC mobile phone is subject to the following two conditions; (1) this device may cause harmful interference, and (2) this device must accept any interference received, including interference that may cause undesired operation.
Safety And Precautions Important Information i iv Read this information before using your phone................................. iv Before You Start 1 User's manual conventions......... 1 Accessories and options............. 2 Parts and functions ..................... 2 Keypad shortcuts ........................ 3 Displayed icons for LCD ............. 4 Overview of menu function ......... 6 Getting Started 7 SIM card ..................................... 7 Preparing the battery ..................
i-mode 39 What is i-mode? ........................39 What can be downloaded?........39 i-mode icons ..............................39 i-mode Settings .........................39 iMenu.........................................40 Mail............................................41 Java™ application .....................47 SMS...........................................47 Bookmarks ................................47 Go to webpage ..........................48 Saved pages .............................48 Settings .
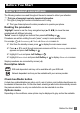
Before You Start User's manual conventions The following markers are used throughout the user’s manual to attract your attention: , This type of paragraph contains important information. 2 This type of paragraph contains information worth noting. ☛ This type of description will contain procedures to operate your phone. Reading the procedure “Highlight” means to use the 4-way navigation keys (▲ ▼ ) to move the area emphasized with different colouring.
Accessories and options Accessories may be included when you purchase your phone. There are also optional items that you can purchase. The following items may be available as accessories or options, depending on the specification at the purchase: 2 • Simple Handsfree (called “headset” or “wired headset” in this manual) • Vehicle Power Adaptor • USB cable There may be unavailable items depending on your operator and location.
Keypad shortcuts The following operations are available from the standby screen.
Displayed icons for LCD 2 1 1 2 3 4 5 6 7 8 9 Inbox for mail/MMS in your phone is full. 2 4 5 6 3 a b c d e f g 4 h 2 1 7 Battery charging status. Battery charging error or stopped due to high temperature. 4 Inbox for SMS in your phone is full. (pink) New mail and/or MMS on the server. (yellow) New mail and/or MMS in your phone. Before You Start Bluetooth on Line status (No ALS or ALS Line 1) Line status (ALS Line 2) 9 SIM memory is full.
Vibrator on Sound off and vibrator on d Meeting mode Pocket mode Car mode 2 No icon appears for the Normal mode. e Call diversion is set. (red, red/green, green) New voice mail messages are on the network (No ALS or ALS Line 1/ALS Line 2). 2 Network name (Displayed in orange when using roaming service.) 3 Help area This area contains time/date information and help information appropriate for the current screen.
Overview of menu function To access each main menu function, press from the standby screen and use and to scroll through the main menu functions. Press again to confirm the main menu. Alternatively, press the main menu key number on the main menu screen (see the following table). 2Pressing 0 from the main menu will display your own number. 2STK (SIM related function) screen is displayed only when your SIM card supports this function.
Getting Started For all the features to work, you must have a valid SIM card (included in the package supplied by your service provider) that also supports these features. Even if you have a fully featured SIM card, any feature not supported by the network transmitting your call will not work. This last point is especially important when you are roaming among networks.
☛ STEP5: Gently open the holder in the direction of arrow ➄, and put the SIM card into place with the metal part facing down. Then close the holder in the direction of arrow ➅. ☛ STEP6: While pressing down on the holder with your finger, slide it in the direction of arrow ➆ until it clicks to lock. . STEP1 STEP2 Cover lock Cover STEP3 Cover STEP4 Holder Battery Finger tab STEP5 STEP6 Holder Holder SIM card SIM card , Do not bend or scratch your SIM card.
Removing a SIM card , Be careful not to pinch your fingertip between the cover lock and the cover. ☛ While pressing down on the holder with your finger, slide it in the direction of arrow ➀ until it clicks to unlock. ☛ Gently open the holder in the direction of arrow ➁ and remove the SIM card.
, Make sure to insert the charger plug with the USB symbol facing up. Otherwise, damage to the charger connector can occur. , Be sure to hold the phone and not the battery charger cable when you have to lift the phone with the battery charger connected. Lifting the phone by holding the battery charger cable may disconnect the charger connector and cause damage to the charger connector or the phone. , DO NOT connect a charger or any other external DC source if the phone's battery is not inserted.
that the tab on the battery fit properly into the notch in the phone. Then press the battery down in the direction of arrow ➃ to click it into place. ☛ STEP4: Attach the cover by sliding it in the direction of arrow ➄ to the position shown in the figure. Then, press the cover lock (➅) and slide the cover a little until the cover lock goes under the cover, release your finger from the cover lock, and slide the cover until it properly fits into place.
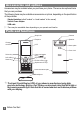
Basic Calls and Phone Use Making an emergency call You may make an emergency call even if your SIM card is not inserted in your phone. ☛ Dial 112 or the emergency number of your local region ➔ . 2 2 For local emergency number, contact your local authorities. On some networks, emergency calls can be made using the 112 number without a SIM card inserted. Dialing calls , Use the full STD area code even if you are calling to a person in the same town.
2 When you use a headset, you can accept a call by pressing or holding the button on it. 2 You can set your phone to answer a call by pressing any key except . See p.19 “Answer options” . 2 If you are making a call, the phone gives priority to receiving a call unless you have already pressed . Rejecting a call ☛ or Right Softkey ➔ The call will be transferred to the voice mail automatically. 2 When you use the headset, you can also reject an incoming call by pressing and holding the button on it.
Options menu (during a call) (Sheet 2 of 2) Call transfer SIM Enables to transfer the call and connect other parties. After transferring the call, your call will be dropped. After dropping from the call with the other two parties, if you have a call waiting, you can proceed the call with it. End Disconnects the highlighted party. Private Call Makes a private call to the highlighted party within the multi-party call. Retrieve Retrieves the call(s). Phonebook Opens the phonebook.
☛ To end both calls, Left Softkey ➔ Hang up all ➔ Left Softkey or . Receiving a second call You can answer a second call while already on the first call if you have subscribed to call waiting service. Your phone will emit a tone to alert you if there is a second incoming call. ☛ To accept the second call, to put the first call on hold and answer the second call. ☛ To toggle between the first and second call, Right Softkey ➔ Swap. ☛ To end the active call, .
Entering international dialing codes ☛ Hold down 0 to display ”+” ➔ Key in the location code (or Left Softkey to access the +List menu and select the desired location), area code, and phone number that you wish to call. For example, the UK country code is always 44, no matter what country you are dialing from.
• if you are currently on the phone and did not activate Call waiting. You will be notified of a voice mail message by an icon in the standby screen. If voice mail service is not included in your service provider's package, you will have to subscribe to the service separately and configure the settings manually. , Contact your service provider for details on your voice mail number. 2 To set up the line to call the voice mail centre, see p.20 “ALS setup” for details.
Call Options Dialed calls/Missed calls/Received calls There is a total of 3 call lists in your phone's memory: Dialed calls, Missed calls and Received calls. ☛ ➔ Phonebook ➔ Call options. ☛ Dialed calls, Missed calls or Received calls 2 2 You can also access the Dialed calls, Missed calls and Received calls list from the standby screen and scrolling to the respective lists using and .
Settings Phone Volume Voice volume To adjust the volume during a call: ☛ or to increase volume and or to decrease volume. When you are not making any calls, use the following procedure: ☛ ➔ Settings➔ Phone ➔ Voice volume to display the Volume screen with a volume slider. ☛ or to increase and or to decrease the volume, or press the number key on the Volume screen ➔ Left Softkey. 2 2 During a call, ▲ or ▼ to adjust the setting of the volume.
Auto key lock You can lock your keypad keys by activating Auto key lock; that way, you may prevent your keypad from being accidentally pressed. If your keypad is not used for 30 seconds, the phone automatically locks the keypad. ☛ ➔ Settings ➔ Phone ➔ Auto key lock ➔ Left Softkey to toggle on/off the feature ➔ A tick in the check box indicates that the function is activated. 2 You can unlock the keys by pressing and holding # from the standby screen.
☛ Highlight either DD/MM/YYYY, DD.MM.YYYY, MM/DD/YYYY, MM.DD.YYYY, YYYY/ MM/DD or YYYY.MM.DD format ➔ Left Softkey to confirm the selection and turn the radio button on. FAK setting FAK (Fast Access Key) is a shortcut to the major functions of the phone by simply pressing the key itself. 2 To set FAK, you can also press the unassigned number key from the standby screen, press Left Softkey twice and select the function to allocate for the number key. ☛ ➔ Settings ➔ Phone ➔ FAK setting.
2 When you change any volume setting while a headset is connected, the changed volume will be valid only when you have a headset connected. Ringer setting ☛ Highlight Ringer setting ➔ Left Softkey to toggle it On/Off. Ringer ☛ Ringer ➔ Highlight the type of calls to change: Any call/Phonebook call/Alarm/ Messages/Friends/Colleagues/Family/Biz partner/VIP. ☛ Left Softkey to access the Sounds folder ➔ Highlight the desired ringtone ➔ Left Softkey to select and return to the Ringer menu screen.
Auto answer Auto answer option is only available for Car mode. The Auto answer feature allows a received call to be connected automatically if you are using your phone as a car phone or with a hands-free kit. Auto answer is only available for the first call. You have to answer the second call manually. To change the Auto answer settings: ☛ Highlight Auto answer ➔ Left Softkey to toggle it On/Off.
☛ Highlight a colour style ➔ Left Softkey to confirm the selection and turn the radio button on. Brightness You can change the brightness of your phone's display screen: ☛ ➔ Settings ➔ Display ➔ Brightness. ☛ Highlight the desired brightness level for your phone: Low/Medium/High/ Max ➔ Left Softkey to confirm the selection and turn the radio button on. Calls The Calls screen allows you to activate Call diversion, Call waiting, Auto redial, and Withhold ID. ☛ ➔ Settings ➔ Calls.
☛ Select Receiving fax or Receiving data ➔ Select Check status for the network to transmit and display the status of the selected condition. ☛ To disable call divert for the selected condition, select Clear ➔ Left Softkey to confirm. , There will be a short delay while the network sends the divert status of your phone. Status check and cancellation of all call diverts Status check allows you to check the current divert status for all the different conditions.
Security The security settings protects your phone from improper and unauthorized use. , These confidential numbers should be kept in a safe place for future access, if required. Code You may be required to enter one of the following security codes as shown below. When the phone prompts you for one of these codes, use the keypad to enter the appropriate number and press Left Softkey to confirm.
PIN activate If the PIN activate is on, you will be prompted to enter your PIN code when you turn the phone on. To enable/disable PIN activate, proceed as follows: ☛ ➔ Settings ➔ Security. ☛ Select PIN activate ➔ Enter your PIN code ➔ Left Softkey ➔ Left Softkey to toggle PIN activate On/Off ➔ Right Softkey to confirm ➔ A tick in the check box beside the option appears if PIN activate is activated. 2 Some SIM cards are set up so that PIN number entry cannot be turned off.
☛ Clear ➔ Enter the bar password to disable ring for the selected type of calls. ☛ Check status for the network to transmit and display the ring status of the selected type of calls. Change password To change the password for barring: ☛ ➔ Settings ➔ Security ➔ Bar calls. ☛ Change password ➔ Enter the bar password ➔ Left Softkey to confirm ➔ Enter a new password ➔ Left Softkey to confirm ➔ Enter a new password again ➔ Left Softkey to confirm the new password.
Set automatic or manual network selection ☛ ➔ Settings ➔ Network ➔ Auto network. ☛ Left Softkey to toggle the automatic network search On/Off ➔ A tick in the check box beside the option indicates the activation of Auto network. , Before you manually select a network, ensure it is covered under the agreement you have with your service provider. Pref. network View/Edit network list When Auto network is activated, the network will be selected according to the ranking order in your Pref. network.
Transfer rate This function allows you to choose an appropriate data transfer rate for your phone. ☛ ➔ Settings ➔ Network ➔ Transfer rate. ☛ Highlight the required band from the menu: 115.2 Kb/s, 57.6 Kb/s, 38.4 Kb/s or19.2 Kb/s ➔ Left Softkey to select and turn the radio button on or Right Softkey to cancel. T9 input See p.31 “T9 input” . Reset settings To revert your phone to its default factory settings: ☛ ➔ Settings ➔ Reset settings. ☛ Enter your phonecode ➔ Left Softkey.
Text Entry This section describes how you can enter text (letters, numbers and symbols). The same method of text entry can be used in all of the phone’s editing display. Mode change In the text entry screen, pressing switches the text entry mode between abc (All lower case), Abc (Sentence case), ABC (All upper case), 123 (Numeric input). Pressing and holding # in the abc/Abc/ABC input mode will toggle T9® input On/Off.
• Right Softkey (Spell): Available when (---) appears as a candidate. Activates the Spell Word field. Input a word in Normal text input and Left Softkey to save the entry and register the new word in the T9® dictionary. • Right Softkey: Deletes the letter to the left of the cursor or cancels the T9 candidate. • / : Places the cursor. • (press or hold): Toggles the different modes of text entry. • #: Activates the symbol list when in Normal text input modes (abc/Abc/ABC).
Messages Messages overview Your phone supports the following messaging services: • SMS (Short Messaging Service) allows you to send short messages (maximum of 160 characters). To send an SMS message, the destination phone number must be a mobile phone with an SMS service subscription. Long text messages (up to 1520 characters) can be transmitted and received via your phone. When long SMS messages are sent or received by the phone, they are automatically broken down into a series of short SMS messages.
2 Depending on the type of message you are viewing, the available options menu may change. Reading a message 2 2 ☛ ➔ Messages ➔ Inbox/Draft/Outbox ➔ Select a message ➔ View. Please review message only after the whole series of SMS has been received by your phone. When the phone has not finished receiving the long message, there will be a popup notification that the message is incomplete and it cannot be viewed.
SMS edit screen options menu (Sheet 2 of 2) Save Saves the edited SMS in Draft. Insert object Inserts pictures, sounds or animations into the edited SMS. Format Changes the format of the fonts. Text formats, Italic and Bold cannot be applied simultaneously to your messages. Predefined text Inserts a predefined user message into the edited SMS. Insert number Inserts a phone number from the Complete Phonebook. Mark text Highlights the text to copy or cancel the marked mode.
Predefined text ☛ ➔ Messages ➔ Predefined text. ☛ Select the desired text ➔ Select to edit the text or View to display the text. ☛ When the editing is done, Left Softkey ➔ Send and save to input the edited text to a new SMS message and save the text, or Save to just save the text. , Once you edit the predefined texts, you cannot return them to the default texts even by the reset setting function. Please be very sure when editing the texts. Message settings ☛ ➔ Messages ➔ Settings.
Memory status The available memory and the used-up memory will be displayed. ☛ ➔Messages ➔Memory status ➔ The SMS memory status of the phone and the SIM memory status is displayed. Cell broadcast ☛ ➔ Messages ➔ Cell broadcast. , When cell broadcast service is activated, the phone operating time will be reduced. 2 The Cell broadcast message display on the standby screen is erased by pressing XXXXX. Message list ☛ Message list ➔ The list of received cell broadcast messages is displayed.
☛ CB languages ➔ The list of currently selected languages are displayed. ☛ To add a new language, Left Softkey ➔ Insert / Add to end ➔ Highlight the desirable language(s) to add to the list ➔ Left Softkey. ☛ To delete a language from the list, select the language to delete ➔ Delete.
i-mode Your phone allows you to use the i-mode feature. You can connect to Internet websites and use the mail function. This chapter guides you through setting up and using i-mode. To access the i-mode service, you need to: • Contact your service provider and subscribe to it. • Set up the i-mode options in your phone. What is i-mode? i-mode is a platform for mobile phone communications.
Ringer time This function allows you to set the length of ringer time when you receive an e-mail or MMS: ☛ ➔ i-mode ➔ Settings ➔ Ringer time. ☛ Key in the preferred time length (3-10 Sec.) ➔ Left Softkey to save the setting. Connections No. This function allows you to select the connection number you have set to connect to the i-mode service. ☛ ➔ i-mode ➔ Settings ➔ Connection No.. ☛ Highlight the preferred setting ➔ to turn the radio button on and activate the number.
Browser options menu (Sheet 2 of 2) Add to phonebook Saves the number on the web page to your phone book. Certificate info Displays the certificate Information of the current web page, which must be a SSL webpage. Go to webpage Goes to the website address or Select form the list. Reload Updates the information on the current webpage. Page info Displays the URL of the current webpage. Create message Creates a message or display a message edit screen.
Compose mail options menu (Sheet 2 of 2) Play/View file Plays the audio file or view the image file. Open phonebk. Accesses the phonebook to add the mailing address. Add To Adds more recipients' addresses. Add Cc Adds carbon copy recipients' addresses. Add Bcc Adds blind carbon copy recipients' addresses. Change to To Changes the Cc. or Bcc recipients to To recipients. Change to Cc Changes To or Bcc recipients to Cc recipients. Change to Bcc Changes To or Cc recipients to Bcc recipients.
Compose menu (for MMS) (Sheet 2 of 2) Remove audio Removes the audio on the current slide. Preview Previews the slideshow. Add slide Adds a new slide after the current slide. Insert slide Inserts a new slide before the current slide. Remove slide Removes the current slide. Text colour Selects the text colour for the current slide. Background colour Selects the background colour for the current slide. Set Fit mode Selects the image layout from Hidden/Fill/Meet/Slice.
Compose MMS options menu (Sheet 2 of 2) Attach sign. Adds a signature after the text. Del. message Deletes the message. Del. mail Deletes the message currently edited. 2 Attach file, Delete attachment and Play/View file are not available for MMS. They are always grayed out. Inbox This function allows you to read and manage received mails and MMS. Read mails/MMS ☛ ➔ i-mode ➔ i-mode ➔ Mail ➔ Inbox. 2 Alternatively, you can access Inbox by pressing and holding Left Softkey from the standby screen.
Inbox options menu (while viewing a message) (Sheet 2 of 2) Reply all Replies to sender and all recipient(s) without quoted messages body. Reply quoted all Replies to sender and all recipient(s) with quoted messages body Forward Forwards the message. Delete Deletes the message. Save address Saves the address of the message into the phone book. Add to phonebook Saves the number on the web page to your phone book, which shows only when there is more than one phone number on the current page.
Sent mail options menu (while viewing a mail) Sent mail options menu (while viewing a mail) Re-edit Re-edits the message. Delete Deletes the message. Save address Saves the address of the message into the phonebook. Add to phonebook Adds the phone number of the message to Phonebook. Create message Creates a new message. Copy message Copies the message for later use. Copy subject Copies the subject for later editing Play Attachment Plays the attached file.
Mail settings (Sheet 2 of 2) Auto reception Sets whether to automatically retrieve a mail after receiving the incoming mail notification. 2 Receive attachment If set to off, you will have to manually retrieve from your i-mode service provider (“Check new mail”). Sets whether to receive the attached image and MIDI file. Attachment data Allows you to receive attached i-mode melody. Check settings Displays all the current settings of all the Mail menu options. Back Returns to the Mail menu.
Go to webpage This function allows you to select to enter a specific URL or select from the URL history list. ☛ ➔ i-mode ➔ i-mode ➔ Go to webpage. Enter address ☛ Enter address to enter the item ➔ ➔ Key in the website address ➔ . ☛ OK to save your entry or Cancel to delete the entry. Address history ☛ Address history ☛ Select the preferred URL ➔ to open the website address entry screen again. ☛ OK ➔ to link to the webpage. Back ☛ Back ➔ The screen returns to the i-mode menu screen.
Saved page options menu (while viewing) (Sheet 2 of 2) Protect On/Off If the screen data is unprotected, the function is turned on. If the data is protected, the function is turned off. Delete Deletes the current page. Settings ☛ ➔ i-mode ➔ i-mode ➔ Setting. Set time out Disconnects the connection after the set time. ☛ Set time out ➔ Select the preferred time out option ➔ OK. Load images Sets whether to display images contained in web pages. ☛ Load images ➔ Select either Yes or No ➔ OK.
Phonebook Lists Your phone can store up to 8 different phonebook lists: Complete (a list of all the numbers stored in the Phone, SIM, and FDN, except SDN numbers), SIM (personal directories (ADN) in the SIM card), Phone (personal directories (ADN) in your phone memory, Own number, SDN (Service dialing numbers), FDN (Fixed dialing numbers), Groups, Voice mail. ☛ ➔ Phonebook ➔ Lists to display the phonebook entries (p.3 for shortcut). ☛ Use / to display other phonebook lists.
, Although SDN is supported by your phone, it must be present on your SIM. Check with your service provider. Fixed Dialing Numbers (FDN) Fixed dialing numbers is a function to limit the numbers that can be called using your phone. With the FDN feature turned ON, only the phone entries you stored in the FDN phonebook and emergency numbers can be called from your phone. 2 If the FDN function is set to ON, only numbers in the FDN directory can be called.
☛ Highlight the Name field ➔ Key in the name. ☛ Highlight the Phone number/Office number/Mobile number/Fax number field ➔ Key in the phone number. To select an area code, Right Softkey to access the +List menu ➔ Select the desired location. ☛ Highlight the E-mail 1/E-mail 2 field ➔ Key in the E-mail address. 2 You can enter ’@’ or ’.’ by pressing 1 or # and choosing an appropriate mark.
☛ / till the Groups list screen is displayed ➔ Select the desired Groups list ➔ View group to display the entries in the selected group. Assigning a ringtone/melody to a group ☛ With the Groups list screen displayed, select the desired group ➔ Set ring tone ➔ 2 The Sounds folder is displayed ➔ Select a sound file. If the personal setting for the ringer is also set, it has priority over that of the Group setting.
2 When the phone number saved in the phonebook contains 8 digits, the name of the caller might not display on the screen when there is an incoming call, or in the missed calls and received calls list. When the phone number saved in the phonebook contains 11 digits and an 8-digit phone number is dialed, the name of the called party might not be displayed under the Dialed calls list.
Moving / Copying from phone to SIM / SIM to phone ☛ Select a record in the SIM / Phone directory ➔ Move to phone (or Move to SIM), Copy to phone (or Copy to SIM) or Copy all to phone (or Copy all to SIM) ➔ Left Softkey to confirm. 2 When moving/copying a phonebook record in the phonebook (Phone) with more than one phone number in one record, the Phone number screen is displayed to choose which number you wish to move/copy.
Camera The integrated digital camera in the phone allows you to take photos and send them out via the Multimedia Messaging Service (MMS) or as an e-mail attachment. The photos will be stored in JPG format in the phone, and can be viewed by most picture viewing programs. Notes on using the camera Handling the Camera , The camera of your phone is manufactured using high-precision technology. 2 2 2 2 However, there may be dots or lines on the screen that appear darker or brighter than the others.
Taking a picture ☛ ➔ Camera. 2 You can also access Camera by pressing and holding from the standby screen. ☛ to capture the picture. ☛ To save the picture you just took, (The picture is saved in the photos folder in My data). ☛ To send the picture, Left Softkey (The picture is automatically saved) ➔ Create a mail (p.41). 2 2 2 The default file name for the picture is image+serial number, for instance image0001. If a call comes in while you are checking or saving a picture, storage is cancelled.
Camera options menu (before taking a picture) (Sheet 2 of 2) Photo size (Quick key 4) Sets the photo size for external usage (e.g., on a PC) regardless of the image shown in the phone display screen. Select from the options: VGA (640 x 480), QVGA (320 x 240) or QQVGA (160 x120). 2 2 Brightness (Quick key 5 or / ) Image quality (Quick key 6) A larger image size will take up more memory space.
My data You can use this menu function to manage all the pictures and sounds saved in the phone. You can playback sound, ringtones or display pictures/wallpapers downloaded from the Internet, or photos captured with the built-in camera function. ☛ ➔ My data (p.3 for shortcut). 2 2 When your phone memory is full, you may not be able to rename the files. Depending on the size of the data, file selector operation may take a long time.
File selector Options menu ☛ ➔ My data ➔ Photos/Pictures/Sounds/Record voice folder ➔ Highlight a file ➔ Left Softkey to display the following options: File selector Options menu View Displays a selected image. Play Plays a sound file/voice memo/recorded call. Send via email Displays the Compose mail screen with the selected image/ringtone/melody attached. Proceed with the mail editing before sending it out (not available for preset wallpaper/ringtone/melody)(not available during a call).
Java™ application You can download and run Java™ applications in your phone. The downloaded Java™ applications are saved under Java™. 2 While the software is active, the Java™ operation icon is displayed (p.4 for icons). ☛ ➔ Java™ (p.3 for shortcut). 2 You can also access Java™ Applications screen from the i-mode menu.
Accessory The Accessory provides you with various functions as listed below: Bluetooth, Organizer (Scheduler, ToDo list, Notepad), Clock (Alarm clock, Auto off, Auto on, Countdown, Stopwatch), Calculator (Calculator, Currency conv.), Composer, Voice memo. ☛ ➔ Accessory. Bluetooth See p.70 “Bluetooth” . Organizer Scheduler The Scheduler allows you to set up reminders and appointments for a particular time and day (up to 50 agendas can be stored, shared with the ToDo list tasks).
☛ Left Softkey to save the agenda settings. 2 If you miss an appointment alarm, you can check it by pressing Right Softkey from the standby 2 screen when there is a note-shaped icon “ ” displayed in the Softkey area. There is a 20 seconds delay before the phone emits an alert tone for the scheduled agenda time.
ToDo list options menu (while an existing reminder/appointment is highlighted) View Displays the details of the selected task. Activate/Deactivate Switches the reminder of the task on/off. Edit Displays an edit screen for the highlighted task. Add new Displays a new entry screen. Delete/Delete all Deletes the selected task or all the existing tasks. Send via Bluetooth Sends the selected agenda to other Bluetooth device (not available during a call).
Notepad options menu (while editing a note) (Sheet 2 of 2) Pastes the text copied by Marked text. Paste Clock Alarm clock The alarm will start ringing at the time you set (even after the phone is switched off). 2 When the alarm sounds, other events will just display on the screen until the alarm stops. , Make sure that the Alarm clock function is not activated when entering premises where use of mobile phone is prohibited.
2 If you miss an alarm, you can check it by pressing Right Softkey from the standby screen when there is a clock-shaped icon “ ” displayed in the Softkey area. Options menu for existing alarm settings ☛ Highlight an existing alarm setting ➔ Left Softkey to display the following options: Alarm settings options menu (while an existing alarm setting is highlighted) Activate/Deactivate Switches the alarm on/off. Edit Displays an edit screen for the highlighted alarm setting.
☛ ☛ ☛ ☛ ☛ To start the stopwatch, Left Softkey. To register the first timing, Left Softkey. To register the next timing, Left Softkey again. To stop the stopwatch, Right Softkey. To reset all time counters, Left Softkey. Calculator Calculator You can perform addition, subtraction, multiplication and division of numbers with the calculator function. You can enter up to 8 digits. The calculator can display a result of up to 9 digits, with a maximum of 6 decimal places.
Rate compute ☛ Rate compute ➔ / to move along the fields ➔ Key in the sum to be converted at either domestic currency or foreign currency field ➔ Left Softkey to convert ➔ The results will be displayed at the other field. Composer You can compose up to five own melodies and use it as your phone’s ringtone. ☛ ➔ Accessory ➔ Composer. Composing a new melody ☛ Select a My Melody field in which you wish to save a new melody. ☛ Left Softkey ➔ Composer ➔ You can compose one main track and three sub tracks.
☛ Edit the title if necessary ➔ Left Softkey to save and return to the Voice memo screen. Play ☛ ➔ Accessory ➔ Voice memo ➔ Play. ☛ Select the file that you would like to play from the list. 2 For details, see p.60 “File selector Options menu” . Data rate ☛ ➔ Accessory ➔ Voice memo ➔ Data rate. ☛ Highlight a desired value (the smaller the value, the longer the recording time allowed) for the data rate ➔ Left Softkey to confirm and turn the radio button on.
Bluetooth Bluetooth function provides the following services: • Dial-up service - You can use your phone as a modem. • Headset/hands-free service - You can make/receive a call using a Bluetooth headset or hands-free kit. • Object push service - You can send or receive the data from Phonebook/Scheduler/ ToDo list/My data (Sounds/Pictures) between your phone and other Bluetooth devices (p.73 “Bluetooth Object Push” ).
Bluetooth settings (Voice/Modem options menu) (Sheet 2 of 2) Pair new device Registers the external Bluetooth devices. Search device Searches for the nearby active Bluetooth devices. Wait for connect Device list Standby your phone to wait for other devices to search for it. 2 Other Bluetooth devices can only detect your phone while your phone is displaying Wait for connect screen. Displays and edits the list of paired devices. ☛ Left Softkey to display the options menu.
Device list Option menu ☛ ➔ Accessory ➔ Bluetooth ➔ Voice/Modem ➔ Device list ➔ Left Softkey or to display the following options: Device list option menu Rename Edits the name of the highlighted device. Service list Displays the list of services available with the highlighted device. Delete Deletes the highlighted device. Link Connects to the highlighted device.
☛ To end the dial-up connection, disconnect from the PC application or pressing Accessory ➔ Bluetooth ➔ Voice/Modem ➔ Disconnect. ➔ Bluetooth Object Push You can send/receive the data from Phonebook/Scheduler/ToDo list/My data (Sounds/ Pictures) between other Bluetooth devices. 2 2 The maximum data size for the Object push service is 100KB or less for other files depending on the file type (33KB for AMR format files). Any files too large will be displayed in gray and not be available.
Receiving data ☛ ➔ Accessory ➔ Bluetooth ➔ Data exchange to set your phone to receive the data from other Bluetooth device. ☛ Start sending data from the other end ➔ If the connection is established, the screen appears asking to accept the data ➔ Left Softkey to accept, Right Softkey to reject. ☛ Once the transmission completes, your phone automatically judges the type of received data and saves the data accordingly.
Index Numerics 4-way navigation keys .....1 A Accessories and options ..2 Accessory...................62 ADN ..........................50 Agenda ......................62 Alarm clock .................65 Alternate Line Service (ALS) 20 Any key answer............19 Auto answer ................23 Auto key lock ...............20 Auto network ...............29 Auto off ......................66 Auto on ......................66 Auto redial ..................25 B Band..........................29 Bar calls ........
Making a second call .... 14 Messages .................. 33 EMS...................... 33 SMS...................... 33 Minute reminder........... 19 Missed calls................ 18 My data ..................... 59 Photos................... 59 Pictures ................. 59 Record voice........... 59 Sounds .................. 59 N Network info ............... 28 Notepad..................... 64 Numeric input.............. 32 O Object push service ...... 70 P Pairing Bluetooth ......... 71 Phone lock ........
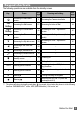
N344i Quick Manual Keypad Shortcuts From the standby screen Key Press Press and hold Main menu screen Camera view finder Mail screen Inbox of Mail Java™ application screen Switching on/off all ▲ Phone modes screen signal tones Java™ application ▼ My data screen screen New SMS message edit screen Accessing a phonebook list Dialed calls list Ends a call or returns Power-off to the standby screen i-mode menu screen , “Select” means to highlight the item and or .
Creating a New SMS 1. . 2. Key in the message ➔ . 3. Key in the destination ➔ . 4. Send. Creating a New MMS 1. ➔ 2. 2. Enter the To and Subject fields. 3. Attachment ➔ Add text/Add image/Add audio ➔ Add each media accordingly. 4. To add more media or slide, ➔ Select the appropriate menu. 5. If you are finished, . 6. Send. 1. ➔ 1. 2. Select the To field ➔ Key in the destination ➔ . 3. Select the Subject field ➔ Key in the subject ➔ . 4. Select the Message field ➔ Key in the message ➔ . 5.