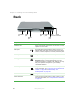
Checking Out Your Gateway M275 1 This chapter introduces you to the basic features of your convertible tablet PC.
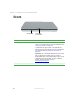
Chapter 1: Checking Out Your Gateway M275 Front Modular bay Component Modular bay Icon LCD panel release latch Description Use this bay for a DVD drive, combination DVD/CD-RW drive, or a secondary battery. For more information, see “Changing modules” on page 110. To determine the type of drive in the modular bay, examine the drive tray’s plastic cover and compare the logo to those listed in “Identifying drive types” on page 112.
Left Side Left Side Kensington lock slot PC Card slot Memory card reader IEEE 1394 port Power switch Speaker Microphone jack Headphone jack Component Icon Description Kensington™ lock slot Secure your convertible tablet PC to an object by connecting a Kensington cable lock to this slot. PC Card slot Insert one Type II PC Card into this slot. For more information, see “Adding and removing a PC Card” on page 258.
Chapter 1: Checking Out Your Gateway M275 Component Icon Description Headphone jack Plug amplified speakers or headphones into this jack. The built-in speakers are turned off when speakers or headphones are plugged into this jack. Power switch Slide to turn the power on or off. You can also configure the power switch for Standby/Resume mode. For more information on configuring the power switch mode, see “Changing power settings” on page 178.
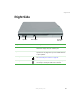
Right Side Right Side Pen Speaker Component Modem jack Icon Kensington lock slot Description Pen Write, tap, and input directly on your convertible tablet PC’s display using the cordless pen. Speaker Provides audio output when headphones or amplified speakers are not plugged into your convertible tablet PC or port replicator. Modem jack Plug a modem cable into this jack. For more information, see “Connecting the modem” on page 47.
Chapter 1: Checking Out Your Gateway M275 Back Ventilation fan USB port Monitor port Component Icon Docking Ethernet Power Status port jack connector indicators USB port Description Ventilation fan Helps cool internal components. Do not block or insert objects into these slots. USB ports Plug USB (Universal Serial Bus) devices (such as a diskette drive, flash drive, Iomega™ Zip™ drive, printer, scanner, camera, keyboard, or mouse) into these ports.
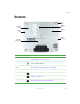
Bottom Bottom Pen latch Battery latch System label Battery bay Reset hole Hard drive bay Memory bay cover Component Icon Description System label Includes the product model number. For more information, see “Identifying your model” on page 10. Reset hole Insert a straightened paper clip into this hole to manually restart your convertible tablet PC. Memory bay cover Open this cover to install a memory module. For more information, see “Adding or replacing memory” on page 261.
Chapter 1: Checking Out Your Gateway M275 Keyboard area For information on using your keyboard, see “Using the keyboard” on page 28. Microphone LCD panel multi-function buttons/status indicators Keyboard multi-function buttons/status indicators Keyboard Touchpad Component 8 Icon Description Microphone Record audio through this microphone. The built-in microphone is turned off while an external microphone is connected.
Keyboard area Component Icon Description Keyboard Provides all the features of a full-sized 86-key keyboard. For more information, see “Using the keyboard” on page 28. Touchpad Provides all the functionality of a mouse. For more information, see “Using the EZ Pad touchpad” on page 35. Keyboard Multi-function buttons Press these buttons to open programs assigned to them. These buttons are set to open your default e-mail program, your default Web browser, online help, and the My Computer window.
Chapter 1: Checking Out Your Gateway M275 Identifying your model Important The labels shown in this section are for informational purposes only. Label information varies by model, features ordered, and location. Gateway model number The label on the bottom of your convertible tablet PC contains information that identifies your convertible tablet PC model and its features. Gateway Technical Support will need this information if you call for assistance. Gateway model number Insert Picture Here 10 www.
Identifying your model Gateway serial number You can locate the Gateway serial number: ■ Printed on a white sticker on the bottom or back of your convertible tablet PC. ■ Printed on the customer invoice that came with your convertible tablet PC. The invoice also contains your customer ID number. Internal wireless label A label similar to the following indicates your convertible tablet PC contains a wireless communications device. The label is located on the bottom of your convertible tablet PC.
Chapter 1: Checking Out Your Gateway M275 Finding your specifications For more information about your convertible tablet PC, such as memory size, memory type, and hard drive size, visit Gateway’s eSupport page at support.gateway.com. The eSupport page also has links to additional Gateway documentation and detailed specifications. For more information, see “Using eSupport” on page 55. 12 www.gateway.
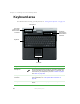
Accessories Accessories Gateway offers accessories that can help you make the most of using your convertible tablet PC. To order accessories, visit the Accessory Store at accessories.gateway.com. Batteries and automobile/airplane power adapters If you run your convertible tablet PC on battery power for extended periods, you may want to buy an additional battery so you can swap batteries when necessary.
Chapter 1: Checking Out Your Gateway M275 A port replicator also provides additional ports and other expansion features not included with your convertible tablet PC. See “Using the Gateway M275 Port Replicator” on page 277 for more information about using a port replicator with your convertible tablet PC. Printers You can attach almost any type of printer to your convertible tablet PC. The most common types are inkjet and laser printers, which print in color or black and white.
Getting Started 2 This chapter provides basic information about your Gateway convertible tablet PC.
Chapter 2: Getting Started Safety instructions Certain precautions should be observed to further reduce the risk of personal injury or damage to your convertible tablet PC. General tips 16 ■ When setting up your convertible tablet PC for work, place it on a level surface. ■ Before you clean your convertible tablet PC, turn if off, unplug it from its power source, and remove the battery. For more information, see “Cleaning your convertible tablet PC” on page 244.
Safety instructions ■ Do not drop your convertible tablet PC or subject it to other physical shocks. ■ To completely turn off all convertible tablet PC power, turn your convertible tablet PC off, remove the battery, and disconnect the AC adapter from the electrical outlet. ■ The bottom of your convertible tablet PC can become warm with use. ■ Do not apply heavy pressure to your convertible tablet PC or subject it to strong impact.
Chapter 2: Getting Started ■ Use only the adapter and power cord approved for use with this convertible tablet PC. Use of another type of adapter may create a risk of fire or explosion. ■ If you use an extension cable with your adapter, ensure that the total ampere rating of the products plugged in to the extension cable does not exceed the ampere rating of the extension cable.
Connecting the AC adapter Connecting the AC adapter You can run your convertible tablet PC using an AC adapter or your convertible tablet PC’s battery. The battery was shipped to you partially charged. You should use the AC adapter right away to fully charge the battery. Allow 24 hours for the battery to fully charge. Important If the battery is not fully charged before you use your convertible tablet PC on battery power for the first time, the battery life may be much shorter than you expect.
Chapter 2: Getting Started 2 Connect the AC adapter to your convertible tablet PC’s power connector. 3 Plug the power cord into a wall outlet. The battery charge indicator turns on (see “LCD panel status indicators” on page 25 for the location of the battery charge indicator). If the battery charge indicator does not turn on, unplug the adapter from your convertible tablet PC, then plug it back in.
Connecting the AC adapter Protecting from power source problems During a power surge, the voltage level of electricity coming into your convertible tablet PC can increase to far above normal levels and cause data loss or system damage. Protect your convertible tablet PC and peripheral devices by connecting them to a surge protector, which absorbs voltage surges and prevents them from reaching your convertible tablet PC.
Chapter 2: Getting Started Starting your convertible tablet PC To start your convertible tablet PC: 1 Press the latch on the front of your convertible tablet PC, then lift the LCD panel. 2 Slide the power switch located on the left side of your convertible tablet PC. The power switch is preset to On/Off mode. However, you can also set it to function in Standby/Resume mode. For instructions on changing the power switch mode, see “Changing power settings” on page 178.
Turning off your convertible tablet PC Waking up your convertible tablet PC When you do not use your convertible tablet PC for several minutes, or if you close the LCD panel without turning your convertible tablet PC off, it may enter a power-saving mode called Standby. While in Standby, the power indicator flashes. If your convertible tablet PC is in Standby mode, slide the power switch to “wake” it up. For more information on changing power-saving settings, see “Changing power settings” on page 178.
Chapter 2: Getting Started Restarting (rebooting) your convertible tablet PC If your convertible tablet PC does not respond to keyboard or touchpad input, you may have to close programs that are not responding. If closing unresponsive programs does not restore your convertible tablet PC to normal operation, you may have to restart (reboot) your convertible tablet PC. To close unresponsive programs and restart your convertible tablet PC: 1 Press the Windows Security button.
Status indicators Status indicators LCD panel status indicators LCD panel status indicators inform you when a drive is being used or indicate the power status of your convertible tablet PC. Memory card reader Disc drive Battery charge Power Hard drive Indicator Icon Description Hard drive The hard drive is in use. Disc drive The DVD or DVD/CD-RW drive is in use. Memory card reader The memory card reader is in use. www.gateway.
Chapter 2: Getting Started Indicator Battery charge Icon Description The LED shows the battery activity and status. LED blue - battery is fully charged. LED purple - battery is charging. ■ LED blinking red - battery charge is very low. ■ LED solid red - battery is malfunctioning. This LED only lights up when your convertible tablet PC is connected to AC power or the battery charge is very low. ■ ■ Power The LED shows your convertible tablet PC’s power status.
Status indicators Keyboard status indicators Keyboard status indicators inform you when a button has been pressed that affects how the keyboard is used. Pad lock Scroll lock Caps lock Indicator Icon Description Caps Lock Caps Lock is turned on. Scroll Lock Scroll Lock is turned on. For more information, see “System key combinations” on page 30. Pad Lock Numeric keypad is turned on. 1 www.gateway.
Chapter 2: Getting Started Using the keyboard Your convertible tablet PC features a full-size keyboard that functions the same as a desktop computer keyboard. Many of the keys have been assigned alternate functions, including shortcut keys for Windows and function keys for specific system operations. You can attach an external keyboard to your convertible tablet PC using a USB port. You do not need to shut down your convertible tablet PC to connect a USB keyboard.
Using the keyboard Key types The keyboard has several different types of keys. Some keys perform specific actions when pressed alone and other actions when pressed in combination with another key. Key type Function keys Icon Description Press these keys labeled F1 to F12 to perform actions in programs. For example, pressing F1 may open help. Each program uses different function keys for different purposes. See the program documentation to find out more about the function key actions.
Chapter 2: Getting Started System key combinations When you press the FN key and a system key at the same time, your convertible tablet PC performs the action identified by the colored text or icon on the key. Press and hold FN, then press this system key... To... Display the power status box in the upper-left corner of your display. The box shows the battery charge level, the BIOS version, and whether the AC adapter is being used. Press the key combination again to close this box.
Using the keyboard Press and hold FN, then press this system key... To... Decrease the brightness of the display. Home Mute the sound. Press the key combination again to restore the sound. For more information, see “Adjusting the volume” on page 102. PgUp Increase the volume. For more information, see “Adjusting the volume” on page 102. PgDn Decrease the volume. For more information, see “Adjusting the volume” on page 102. www.gateway.
Chapter 2: Getting Started Buttons LCD panel buttons Press the LCD panel buttons to control the convertible tablet PC while it is in tablet mode. Brightness boost Screen rotation Button Icon Tablet input panel Windows security Press to... Screen rotation Rotate the display orientation. For more information, see “Changing display orientation” on page 192. Tablet input panel Open the tablet input panel. For more information, see “Tablet Input Panel (TIP)” on page 44. 32 www.gateway.
Buttons Button Icon Press to... Brightness boost Boost the brightness... For more information, see “Adjusting brightness” on page 192. Windows security Open the Windows Task Manager. Also is used for domain authentication or logon screen. Multi-function buttons Press the multi-function buttons to open the programs associated with them. Help Internet E-mail Button E-mail My Computer Icon Press to... Open your default e-mail program. www.gateway.
Chapter 2: Getting Started Button Icon Press to... Internet Open your default Web browser. Help Open online help. My Computer Open the My Computer window. 34 www.gateway.
Using the EZ Pad touchpad Using the EZ Pad touchpad The EZ Pad™ consists of a touchpad, two buttons, and a rocker switch. Left touchpad Right touchpad button button Touchpad Rocker switch When you move your finger on the touchpad, the pointer (arrow) on the screen moves in the same direction. www.gateway.
Chapter 2: Getting Started You can use the EZ-Pad left and right buttons below the touchpad to select objects. You can assign a function to the rocker switch between the touchpad buttons. This function can be to scroll up or down, maximize or minimize the active window, or open and close the Start menu. For more information about programming the rocker switch, see “Changing the touchpad settings” on page 203. Using the touchpad To... Do this... Move the pointer on the screen.
Using the EZ Pad touchpad To... Do this... Access a shortcut menu or find more information about an object on the screen. Position the pointer over the object. Quickly press and release the right button once. This action is called right-clicking. Move an object on the screen. Position the pointer over the object. Press the left button and hold it down, then use the touchpad to move (drag) the object to the appropriate part of the screen. Release the button to drop the object where you want it.
Chapter 2: Getting Started Using the display Your convertible tablet PC’s screen combines the eye-soothing readability of a liquid-crystal display with the responsiveness of a pen controller. The screen provides a hard writing surface, minimizes glare, and increases readability. 38 ■ Unlike other touchscreens and PDAs, your convertible tablet PC’s display responds only to your convertible tablet PC’s pen. Your convertible tablet PC will not respond to a PDA pen or the touch of a fingertip.
Using the display Converting the display from notebook to tablet mode To convert the display from notebook mode to tablet mode: 1 2 Open the LCD panel to the normal viewing position. Locate the rotation direction arrow on the LCD panel hinge. Rotation direction arrow 3 Rotate the LCD panel in the direction of the rotation direction arrow until the panel is backwards. www.gateway.
Chapter 2: Getting Started 4 40 Close the LCD panel onto the keyboard. There is a click when the LCD panel latch locks. www.gateway.
Using the pen Using the pen Your convertible tablet PC’s pen is the only device that can write, tap, and input directly on your convertible tablet PC’s display. Warning A finger-tap or PDA stylus has no effect on your convertible tablet PC’s display, and ink pens and other pointed objects could damage the surface. Always use the pen that came with your convertible tablet PC. You can order extra pens from Gateway. The pen can do everything a mouse does. Just think “tap” instead of “click”.
Chapter 2: Getting Started To remove the pen from our convertible tablet PC: 1 Locate the pen latch on the bottom of your convertible tablet PC. For more information, see “Bottom” on page 7. 2 Slide the pen latch until the pen is release from the pen holder. Calibration The first time you use your convertible tablet PC, you should calibrate your pen for both portrait and landscape orientations. Calibration ensures the accuracy of the pen and adjusts the screen’s performance for different users.
Using the pen To open the calibration program: ■ Double-click/Double-tap click/tap Calibrate. (Tablet and Pen Settings) in the taskbar, then Gestures A gesture is a shape you draw with your convertible tablet PC pen to send a command to your convertible tablet PC. In Input Panel, you can also use gestures to control the insertion point in the active program. When you use these gestures, you get the same result as pressing the corresponding key on a standard keyboard.
Chapter 2: Getting Started Pen button The pen button serves the same function as the right button on a mouse. Press it and tap (button-tap) to open right-click menus when they are available. Tips ■ Hold the pen the same way you hold a writing pen, and steady your writing hand by resting it on the display surface. ■ Line up the pointer before you tap, in cases where the pointer and pen point are out of alignment. The screen reads the position of the pointer, not the tap.
Using the pen TIP tips ■ Open a program for your input (for example, a word processing program or a Web form) before using the writing pad or soft keyboard. ■ To adjust writing pad and keyboard settings, click/tap Tools, then click/tap Options. ■ For security and accuracy when entering masked text (such as passwords), use your convertible tablet PC Input Panel’s soft keyboard instead of the writing pad. www.gateway.
Chapter 2: Getting Started Using speech recognition The Gateway convertible tablet PC is designed to accept and interpret the human voice, both for dictation (speech recognition) and for keyboard-equivalent voice commands. 46 ■ Set up speech recognition through your convertible tablet PC Input Panel’s Tools menu. ■ Learn more about voice commands in the Accessibility section of the Help and Support Center. ■ Use the built-in microphone or an external microphone.
Connecting the modem Connecting the modem Your convertible tablet PC has a built-in 56K modem that you can use to connect to a standard telephone line. Important To reduce the risk of fire, use only No. 26 AWG or larger telecommunications line cord. To connect the modem: 1 Insert one end of the modem cable into the modem jack side of your convertible tablet PC. 2 Insert the other end of the modem cable into a telephone wall jack. The modem will not work with digital or PBX telephone lines.
Chapter 2: Getting Started Connecting to a wired Ethernet network Your convertible tablet PC has a network jack that you can use to connect to a 10/100 wired Ethernet network. Important Your convertible tablet PC may be equipped with a built-in wireless Ethernet emitter or you may have a wireless Ethernet PC Card. For information about connecting to a wired or wireless Ethernet network, see “Networking Your Gateway M275” on page 207.
Installing a printer, scanner, or other peripheral device Broadband Internet connections You can use your convertible tablet PC’s Ethernet jack for more than just networking. Many broadband Internet connections, such as cable modems and DSL modems, connect to your convertible tablet PC’s Ethernet jack. For more information, see “Using the Internet” on page 79 and “Networking Your Gateway M275” on page 207.
Chapter 2: Getting Started 50 www.gateway.
Getting Help 3 This chapter tells you about additional information resources available to help you use your convertible tablet PC.
Chapter 3: Getting Help Help and Support Your convertible tablet PC includes Help and Support, an easily accessible collection of help information, troubleshooters, instructional videos, and automated support. Use Help and Support to answer questions about Windows. To start Help and Support: ■ Click/Tap Start, then click/tap Help and Support. Help and Support opens. You can find help information by clicking/tapping a link, performing a search, or browsing the index.
Do More With Gateway Do More With Gateway Your convertible tablet PC may include Do More With Gateway, a tool that provides additional information about using your Gateway convertible tablet PC for digital music, digital photography, digital video, gaming, and other programs. To access Do More With Gateway, click/tap Start, then click/tap Do More With Gateway.
Chapter 3: Getting Help Online help Many programs provide information online so you can research a topic or learn how to perform a task while you are using the program. You can access most online help information by selecting a topic from a Help menu or by clicking/tapping a Help button. You can search for information by viewing the help contents, checking the index, searching for a topic or keyword, or browsing through the online help. 54 www.gateway.
Gateway Web site Gateway Web site Gateway’s online support is available 24 hours per day, 7 days per week and provides the most current drivers, product specifications, tutorials, and personalized information about your convertible tablet PC. Visit the Gateway eSupport Web site at support.gateway.com. For more information about connecting to the Internet, see “Using the Internet” on page 79.
Chapter 3: Getting Help Support Home To get specific information about your convertible tablet PC, type your serial number into the My Support box, then click/tap Continue, or click/tap Look up my serial number for me. For more information, see “Finding your specifications” on page 12. Click/Tap Support Home, then click/tap All Support Documents to access product documentation, specifications, and guides. By entering your serial number, you get specific documents related to your convertible tablet PC.
Windows Basics 4 Read this chapter to learn how to: ■ Use the Windows desktop ■ Manage files and folders ■ Work with documents ■ Use shortcuts 57
Chapter 4: Windows Basics About Windows XP tablet PC Edition The Microsoft Windows XP tablet PC Edition operating system is a fully functioning version of Windows XP Professional with added pen-based computing features: ■ Tablet and Pen Settings — set properties for the pen, tablet buttons, and display screen ■ tablet PC Input Panel (TIP) — use its writing pad, soft keyboard, and voice recognition for entering data ■ Windows® Journal — hand-write documents, then turn them into text or image files ■
About the Windows environment About the Windows environment After your convertible tablet PC starts, the first screen you see is the Windows desktop. The desktop is like the top of a real desk. Think of the desktop as your personalized work space where you open programs and perform other tasks. Your desktop may be different from this example, depending on how your convertible tablet PC is set up.
Chapter 4: Windows Basics Using the desktop The desktop contains the taskbar, the Start button, and the Recycle Bin icon. Desktop elements Description The taskbar is the bar at the bottom of the computer display containing the Start button on the left and a clock on the right. Other buttons on the taskbar represent programs that are running. Click/Tap a program’s button on the taskbar to open the program’s window.
Using the desktop 3 Click/Tap a file or program to open it. Help and Support For more information about the Windows XP Start menu, click/tap Start, then click/tap Help and Support. Type the keyword Windows Start menu in the Search box , then click/tap the arrow. Adding icons to the desktop You may want to add an icon (shortcut) to the desktop for a program that you use frequently. To add icons to the desktop: 1 Click/Tap Start, then click/tap All Programs. www.gateway.
Chapter 4: Windows Basics 2 Right-click (press the right touchpad button) the program that you want to add to the desktop. -ORButton-tap (press the pen button) the program that you want to add to the desktop. 3 Click/Tap Send To, then click/tap Desktop (create shortcut). A shortcut icon for that program appears on the desktop. Help and Support For more information about desktop icons, click/tap Start, then click/tap Help and Support.
Identifying window items Every program window looks a little different because each has its own menus, icons, and controls. Most windows include these items: Window item Description The title bar is the horizontal bar at the top of a window that shows the window title. Clicking/Tapping the minimize button reduces the active window to a button on the taskbar. Clicking/Tapping the program button in the taskbar opens the window again.
Chapter 4: Windows Basics Working with files and folders You can organize your files and programs to suit your preferences much like you would store information in a file cabinet. You can store these files in folders and copy, move, and delete the information just as you would reorganize and throw away information in a file cabinet. Viewing drives Drives are like file cabinets because they hold files and folders. A convertible tablet PC almost always has more than one drive.
Working with files and folders To see the files and folders on a drive: ■ Double-click/Double-tap the drive icon. If you do not see the contents of a drive after you double-click/double-tap its icon, click/tap Show the contents of this drive. Help and Support For more information about files and folders, click/tap Start, then click/tap Help and Support. Type the keyword files and folders in the Search box , then click/tap the arrow. Creating folders Folders are much like the folders in a file cabinet.
Chapter 4: Windows Basics To create a folder: 1 2 Click/Tap Start, then click/tap My Computer on the Start menu. 3 If you want to create a new folder inside an existing folder, double-click/double-tap the existing folder. If you do not see the contents of the folder, click/tap Show the contents of this drive or Show the contents of this folder. 4 5 Click/Tap File, New, then click/tap Folder. The new folder is created. Double-click/Double-tap the drive where you want to put the new folder.
Working with files and folders Important The clipboard stores whatever you cut or copy until you cut or copy again. Then the clipboard contains the new information only. Therefore, you can paste copies of a file or folder into more than one place, but as soon as you copy or cut a different file or folder, the original file or folder is deleted from the clipboard. To copy a file or folder to another folder: 1 Locate the file or folder you want to copy.
Chapter 4: Windows Basics 5 6 With the pointer inside the destination folder, right-click/button-tap. Click/Tap Paste. The file or folder you moved appears in its new location and is removed from its old location. Help and Support For more information about copying files and folders or moving files and folders, click/tap Start, then click/tap Help and Support. Type the keyword copying files and folders or moving files and folders in the Search box , then click/tap the arrow.
Working with files and folders Help and Support For more information about deleting files and folders, click/tap Start, then click/tap Help and Support. Type the keyword deleting files and folders in the Search box , then click/tap the arrow. To recover files or folders from the Recycle Bin: 1 Double-click/Double-tap the Recycle Bin icon. The Recycle Bin window opens and lists the files and folders you have thrown away since you last emptied it.
Chapter 4: Windows Basics Browsing for files and folders A file or folder that you need is rarely right on top of your Windows desktop. It is usually on a drive inside a folder that may be inside yet another folder, and so on. Windows drives, folders, and files are organized in the same way as a real file cabinet in that they may have many levels (usually many more levels than a file cabinet, in fact). So you usually will have to search through levels of folders to find the file or folder that you need.
Searching for files 3 Continue double-clicking/double-tapping folders and their subfolders until you find the file or folder you want. Help and Support For more information about browsing for files and folders, click/tap Start, then click/tap Help and Support. Type the keyword files and folders in the Search box , then click/tap the arrow.
Chapter 4: Windows Basics Using the Windows Search utility To find files and folders using the Search utility: 72 1 Click/Tap Start, then click/tap Search. The Search Results window opens. Click/Tap All files and folders. 2 If you want to search by file or folder name, type in all or part of the file or folder name in the name box in the left pane of the window. ■ If you type all of the name, Search will list all files and folders of that name.
Searching for files 3 Click/Tap Search. When the search is completed, Windows lists the files and folders whose names contain the text that you searched for. 4 Open a file, folder, or program by double-clicking/double-tapping the name in the list. Help and Support For more information about searching for files and folders, click/tap Start, then click/tap Help and Support. Type the keyword searching in the Search box , then click/tap the arrow.
Chapter 4: Windows Basics Working with documents Computer documents include word processing files, spreadsheet files, or other similar files. The basic methods of creating, saving, opening, and printing a document apply to most of these types of files. The following examples show how to create, save, open, and print a document using Microsoft® WordPad. Similar procedures apply to other programs such as WordPerfect, Microsoft Word, and Microsoft Excel.
Working with documents Saving a document After you create a document, you need to save it if you want to use it later. To save a document: 1 Click/Tap File, then click/tap Save. The Save As dialog box opens. Save in list File name 2 Click/Tap the arrow button to open the Save in list, then click/tap the folder where you want to save the file. If you do not see the folder you want, browse through the folders listed below the Save in list. 3 4 Type a new file name in the File name box.
Chapter 4: Windows Basics Opening a document To view, revise, or print an existing document, first you need to open it. Open the document in the program that it was created in. To open a document: 1 2 3 Start the program. Click/Tap File, then click/tap Open. Click/Tap the arrow button to open the Look in list, then click/tap the folder you want to open. If you do not see the folder you want, browse through the folders listed below the Look in list.
Working with documents Printing a document To print a document, you must have a printer connected to your convertible tablet PC or have access to a network printer. For more information about installing or using your printer, see the printer documentation. To print a document: 1 2 3 4 Make sure that the printer is turned on and loaded with paper. Start the program and open the document. Click/Tap File, then click/tap Print. The Print dialog box opens. Set the print options, then click/tap OK.
Chapter 4: Windows Basics Keyboard shortcuts The following table shows a few shortcuts that you can use in Windows and almost all programs that run in Windows. For more information about shortcuts, see your Windows or program documentation. To... Do this... Copy a file, folder, text, or graphic Click the item, then press CTRL + C. Cut a file, folder, text, or graphic Click the item, then press CTRL + X.
Using the Internet 5 This chapter provides information about the Internet and the World Wide Web.
Chapter 5: Using the Internet Learning about the Internet The Internet is a worldwide network of computers linked together to provide information to people everywhere. The two most popular services on the Internet are e-mail and the World Wide Web. You can access this network by connecting your convertible tablet PC to a telephone, DSL (Digital Subscriber Line), or cable line and signing up with an Internet service provider (ISP).
Setting up an Internet account If you want to access the Internet you need: ■ A modem – a device that connects your convertible tablet PC to other computers or servers using a telephone, DSL, or cable line. ■ An Internet service provider – a company that provides access to the Internet through an ISP server. When you connect to an ISP, the ISP server lets you access the Internet and your e-mail messages. ■ A Web browser – a program that displays information from the World Wide Web.
Chapter 5: Using the Internet Accessing your Internet account To connect to your America Online Internet account: 1 2 Click/Tap Start, All Programs, then click/tap America Online. Complete the member name and password information, then click/tap Connect. Your convertible tablet PC dials the Internet account telephone number. After connecting, the Welcome window opens. If you are using a service other than America Online, check with your ISP for the correct procedure for connecting.
Using the World Wide Web Using the World Wide Web The World Wide Web is a multimedia window to the Internet that gives you access to millions of information sources. Information on the Web comes to you on Web pages, which are electronic documents that you view using a Web page display program called a browser.
Chapter 5: Using the Internet Connecting to a Web site After you set up an account with an Internet service provider (ISP) such as America Online, you can access the many information sources on the World Wide Web. To connect to a Web site: 1 Connect to your Internet account. After your convertible tablet PC connects, a default opening page or welcome screen opens.
Using the World Wide Web Downloading files Downloading is the process of transferring files from a computer on the Internet to your convertible tablet PC. To protect your convertible tablet PC against viruses, make sure that you scan the files you download. For more information, see “Protecting your convertible tablet PC from viruses” on page 233. To download files or programs from a Web site: 1 2 Connect to your Internet account.
Chapter 5: Using the Internet Using e-mail E-mail (electronic mail) lets you send messages to anyone who has an Internet connection and e-mail address. E-mail is usually a free service of your Internet account. The Internet never closes, so you can send e-mail messages at any time. Your e-mail messages arrive at most e-mail addresses in minutes. An e-mail address consists of a user name, the @ symbol, and the Internet domain name of the Internet service provider (ISP) or company that “hosts” that user.
Using e-mail Checking your e-mail To check your e-mail using America Online: 1 2 3 Connect to your America Online account. Click/Tap Read. Double-click/Double-tap the message you want to read. For more information about managing and organizing your e-mail messages, see the online help in your e-mail program. Help and Support For general information about using e-mail, click/tap Start, then click/tap Help and Support. Type the keyword e-mail in the Search box , then click/tap the arrow. www.gateway.
Chapter 5: Using the Internet 88 www.gateway.
Sending and Receiving Faxes 6 Microsoft Fax lets you send and receive faxes using the modem. Read this chapter to learn how to: ■ Install and configure Fax ■ Create and send a new fax ■ Set up a fax cover page template ■ Fax a document you scanned or created in another program ■ Receive, view, and print a fax Help and Support For more information about sending and receiving faxes, click/tap Start, then click/tap Help and Support. Type the keyword Fax in the Search box , then click/tap the arrow.
Chapter 6: Sending and Receiving Faxes Installing and configuring Fax Important Your modem cable must be installed before you can send and receive faxes. You cannot use your standard telephone modem to connect to the Internet while sending and receiving faxes. Installing Fax Microsoft Fax lets you send and receive faxes using your modem. When Windows XP was originally installed on your convertible tablet PC, Fax was not installed. You need to install Fax from your blue Operating System CD.
Installing and configuring Fax Configuring Fax Before you send your first fax, you need to set up your user information. Your fax cover sheets and fax headers contain this information, some of which is required by law. The Fax Configuration Wizard opens the first time you try to send a fax. Important The first time you run the Fax Configuration Wizard, you may need to provide information in the Location Information and the Phone and Modem Options dialog boxes.
Chapter 6: Sending and Receiving Faxes 4 Click/Tap the arrow to open the Please select the fax device list, then click/tap the modem you are using to send and receive faxes. 5 If you want the modem to automatically answer the telephone in order to receive faxes, click/tap the Enable Receive check box. 6 Click/Tap Next. The Transmitting Subscriber Identification (TSID) screen opens. 7 Type the transmitting fax identifier information. This identifier information is required by law.
Sending a simple fax 10 If you set up your convertible tablet PC to receive faxes, select a folder you want to store received faxes in and a printer you want to print received faxes on, then click/tap Next. The Configuration Summary screen opens. 11 Click/Tap Finish. Sending a simple fax You can use the Send Fax Wizard to send a simple one-page fax to one or more recipients. To send a simple fax: 1 Click/Tap Start, All Programs, Accessories, Communications, Fax, then click/tap Send a Fax.
Chapter 6: Sending and Receiving Faxes 94 5 If you want to send your fax to more than one recipient, click/tap Add and type the name and fax number of the next recipient. 6 When you have added all your recipients, click/tap Next. The Preparing the Cover Page screen opens. 7 Click/Tap the arrow to open the Cover page template, then click/tap the cover page template you want to use. 8 9 Type the subject text in the Subject line area. Type the message text in the Note area, then click/tap Next.
Setting up your cover page template Setting up your cover page template You can create your own cover page template that you can use in place of the cover page templates that Microsoft Fax provides for you. To create a cover page template, you use the Fax Cover Page Editor. On this template, you insert information fields that automatically import values you enter in both the Send Fax Wizard and the Fax Configuration Wizard when you send your fax.
Chapter 6: Sending and Receiving Faxes Faxing from programs To fax a document directly from most programs: 1 2 3 Open your document in the program it was created in. 4 5 Click/Tap Print or OK. The Send Fax Wizard opens. Click/Tap File, then click/tap Print. The Print dialog box opens. Click/Tap the arrow button to open the Name list, then click/tap the Fax printer. Complete the wizard by following the instructions in “Sending a simple fax” on page 93.
Receiving and viewing a fax Receiving and viewing a fax To receive and view a fax: 1 Click/Tap Start, All Programs, Accessories, Communications, Fax, then click/tap Fax Console. The Fax Console opens. When the Fax Console is open, it detects incoming faxes and stores them in the Inbox. 2 To view a fax, click/tap Inbox, then double-click/double-tap the fax you want to view. The fax viewer opens, where you can view and print the fax.
Chapter 6: Sending and Receiving Faxes Automatically retry sending a fax You can set up Fax so it continues to try sending your fax if the receiving fax machine is busy. Important Fax is automatically set up to retry three times at ten minute intervals. To automatically retry sending a fax: 1 Click/Tap Start, then click/tap Control Panel. The Control Panel window opens. 2 If your Control Panel is in Category View, click/tap Printers and Other Hardware.
Automatically cancelling a fax Automatically cancelling a fax If your convertible tablet PC tried to send a fax and failed to connect to a fax machine, you can automatically cancel a failed fax. To automatically cancel a failed fax: 1 Click/Tap Start, then click/tap Control Panel. The Control Panel window opens. 2 If your Control Panel is in Category View, click/tap Printers and Other Hardware. Click/Tap View installed printers or fax printers. The Printers and Faxes window opens.
Chapter 6: Sending and Receiving Faxes 100 www.gateway.
Using Multimedia 7 This chapter provides information on using the multimedia capabilities of your convertible tablet PC.
Chapter 7: Using Multimedia Adjusting the volume You can use the volume controls to adjust the overall volume and the volume of specific sound devices in your convertible tablet PC. To adjust the overall volume level using hardware controls: ■ If you are using external speakers, turn the knob on the front of the speakers. -ORUse the mute and volume control buttons on the keyboard. For more information, see “System key combinations” on page 30.
Adjusting the volume 3 Click/Tap the Volume tab. 4 Drag the Device Volume slider to change the volume or click/tap to select the Mute check box, then click/tap OK. Help and Support For more information about adjusting the volume, click/tap Start, then click/tap Help and Support. Type the keyword adjusting volume in the Search box , then click/tap the arrow. To adjust specific volume levels: 1 Click/Tap Start, then click/tap Control Panel. The Control Panel window opens.
Chapter 7: Using Multimedia 3 Click/Tap the Volume tab. 4 Click/Tap Advanced in the Device volume area. If the device you want to adjust does not appear in the window, click/tap Options, Properties, the check box next to the audio device you want to adjust, then click/tap OK. 104 5 Drag the volume level and balance sliders for the device you want to adjust. For more information about the controls, click/tap Help in the window. 6 Click/Tap X in the top-right corner of the window to close it. www.
Recording and playing audio Recording and playing audio Use the following instructions to make an audio recording by speaking into the built-in microphone or an optional external microphone. To make an audio recording: 1 Plug a microphone into the Microphone jack on your convertible tablet PC or port replicator. For the location of the Microphone jack, see “Left Side” on page 3 and “Back” on page 280. -ORUse the built-in microphone located on the LCD panel.
Chapter 7: Using Multimedia To play an audio recording in Sound Recorder: 1 2 3 4 Open the Sound Recorder. Click/Tap File, then click/tap Open. The Open dialog box opens. Click/Tap the file you want to play, then click/tap Open. Play the file by clicking/tapping clicking/tapping (stop). Help and Support (play), then stop playing the file by For more information about making or playing an audio recording, click/tap Start, then click/tap Help and Support.
Playing audio and video files with the Windows Media Player Playing audio and video files with the Windows Media Player The Windows Media Player can play several types of audio and video files, including WAV, MIDI, MP3, AU, AVI, and MPEG formats. For more information about using the Windows Media Player, click/tap Help. To play a file using the Windows Media Player: 1 Click/Tap Start, All Programs, then click/tap Windows Media Player. The Windows Media Player opens.
Chapter 7: Using Multimedia 3 4 Click/Tap the file you want to play, then click/tap Open. Play the file by clicking/tapping clicking/tapping (stop). Help and Support (play), then stop playing the file by For more information about playing audio and video using the Windows Media Player, click/tap Start, then click/tap Help and Support. Type the keyword Media Player in the Search box , then click/tap the arrow.
Using S/PDIF digital audio 3 Open the Master Volume window. For more information, see “Adjusting the volume” on page 102. 4 Click/Tap Advanced in the Master Volume area. If the Advanced button does not appear in the Master Volume area, click/tap Options, then Advanced Controls. 5 Click/Tap Enable SPDIF. www.gateway.
Chapter 7: Using Multimedia Changing modules Your convertible tablet PC’s modular bays support different bay modules, such as a DVD or combination DVD/CD-RW drive, or a secondary battery. Module bay screw Module bay latch To change bay modules: 110 1 2 If you are removing a drive, make sure that the drive is empty. 3 4 Close the LCD panel. 5 Turn your convertible tablet PC over so the bottom is facing up. Turn off your convertible tablet PC (do not place it in Standby or Hibernate mode).
Changing modules 6 Remove the module bay screw. Screw 7 Slide and hold the module bay latch. The module may move out slightly. 8 9 Slide the module out. 10 Firmly push the new module straight into the bay until the latch clicks into place. Replace the module bay screw. www.gateway.
Chapter 7: Using Multimedia Using the DVD or DVD/CD-RW drive You can use your convertible tablet PC to enjoy a wide variety of multimedia features. Identifying drive types Your Gateway convertible tablet PC may contain one of the following drive types. Look on the front of the drive for one of the following logos: If your drive has this logo... This is your drive type... Use your drive for... DVD drive installing programs, playing audio CDs, playing DVDs, and accessing data.
Using the DVD or DVD/CD-RW drive Inserting a CD or DVD Eject button Manual eject hole Activity indicator Important Some music CDs have copy protection software. You may not be able to play these CDs on your convertible tablet PC. To insert a CD or DVD: 1 Press the eject button on the DVD or DVD/CD-RW drive. After the disc tray opens slightly, pull the tray completely open.
Chapter 7: Using Multimedia 3 Push the tray in until it is closed. Listening to CDs You can use the DVD or DVD/CD-RW drive on your convertible tablet PC to listen to music CDs. Important Some music CDs have copy protection software. You may not be able to play these CDs on your convertible tablet PC. Listening to CDs Use the Windows Media Player to listen to CDs. For more information about using the Windows Media Player, click/tap Help. You can also use MUSICMATCH to listen to CDs.
Listening to CDs To play a CD: 1 Insert a CD into the DVD or DVD/CD-RW drive. Important 2 If the drive you want to use is not in the modular bay, you need to swap modules. For more information about swapping modules, see “Changing modules” on page 110. If a dialog box opens with a list of CD players, click/tap Windows Media Player. The Windows Media Player opens. - OR If a dialog box does not open with a list of CD players, click/tap Start, All Programs, then click/tap Windows Media Player.
Chapter 7: Using Multimedia If you do not hear sound or you want to change the volume, see “Adjusting the volume” on page 102. Help and Support For more information about playing CDs, click/tap Start, then click/tap Help and Support. Type the keyword playing CDs in the Search box , then click/tap the arrow.
Using MUSICMATCH 2 Insert the music CD into the DVD or DVD/CD-RW drive on your convertible tablet PC. Important 3 If the drive you want to use is not in the modular bay, you need to swap modules. For more information about swapping modules, see “Changing modules” on page 110. If an Audio CD dialog box opens, click/tap Play Audio CD using MUSICMATCH Jukebox, then click/tap OK. The musicmatch window opens, the CD begins playing, and the names of the music tracks appear in the playlist area.
Chapter 7: Using Multimedia Creating MP3 music files Using MUSICMATCH, you can copy the tracks from a music CD to your convertible tablet PC’s hard drive as MP3 files. MP3 (MPEG Layer 3) is a standard for digitally compressing high-fidelity music into compact files without noticeably sacrificing quality. MP3 files end in the file extension .MP3. Important Some music CDs have copy protection software. You cannot copy tracks from these CDs.
Using MUSICMATCH 3 If an Audio CD dialog box opens, click/tap Play Audio CD using MUSICMATCH Jukebox, then click/tap OK. The musicmatch window opens. - OR If a dialog box does not open, click/tap Start, All Programs, MUSICMATCH, then click/tap MUSICMATCH Jukebox. The musicmatch window opens. 4 5 If the CD is playing, click/tap Stop. 6 Click/Tap to clear the check box for any track you do not want to record. In the MUSIC CENTER area, under COPY, click/tap CD -> Files. The MUSICMATCH recorder opens.
Chapter 7: Using Multimedia 7 8 Click/Tap Start. When a message appears that tells you the CD drive needs to be configured, click/tap OK. After the drive is configured, MUSICMATCH records the tracks to your hard drive as MP3 files. A progress bar appears next to each track as it is recorded. Editing track information After you add a CD track as an MP3 file to your music library, you can edit the track’s information. To edit track information: 1 2 3 4 120 Open MUSICMATCH.
Using MUSICMATCH 5 6 Enter information such as track title, lead artist, album, and genre. Click/Tap OK. The new track information appears in the MUSICMATCH playlist, music library, and recorder window. Building a music library Use MUSICMATCH to build a music library. You can organize your music tracks by categories, find a track quickly by using the sort features, and add information to a music file.
Chapter 7: Using Multimedia Changing the music library display settings To change the music library display settings: 122 1 In MUSICMATCH, click/tap Options, then click/tap Settings. The Settings window opens. 2 Click/Tap the Music Library tab. 3 Click/Tap an arrow button to open a column list, then click/tap the category that you want to display in the column. 4 When you have finished selecting categories, click/tap OK. www.gateway.
Using MUSICMATCH Listening to Internet radio To listen to an Internet radio station: 1 2 3 Connect to the Internet, then open MUSICMATCH. In the MUSIC CENTER area, under PLAY, click/tap Online Music. To select one of the MUSICMATCH Internet radio stations, click/tap Featured Radio Stations or Radio Stations, the radio station, then click/tap the arrow in the play this station box. MusicMatch connects to the station and plays the audio.
Chapter 7: Using Multimedia Playing a DVD A Digital Versatile Disc (DVD) is similar to a standard CD but has greater data capacity. Because of this increased capacity, full-length movies, several albums of music, or several gigabytes of data can fit on a single disc. You can play DVDs with the InterVideo DVD Player program or Windows Media Player. For more information about playing DVDs, click/tap Help in the DVD player program.
Creating CDs using Roxio Easy CD Creator Help and Support For more information about playing DVDs, click/tap Start, then click/tap Help and Support. Type the keyword playing DVDs in the Search box , then click/tap the arrow. Creating CDs using Roxio Easy CD Creator You can use your DVD/CD-RW to create data CDs, music CDs, or copies of CDs. For more information about your drive’s capabilities, see “Identifying drive types” on page 112. Creating data CDs Use Roxio Easy CD Creator to create data CDs.
Chapter 7: Using Multimedia To create a data CD: 1 Insert a blank, writable CD into your recordable CD drive. Important 2 If the drive you want to use is not in the modular bay, you need to swap modules. For more information about swapping modules, see “Changing modules” on page 110. If a CD Drive dialog box opens, click/tap Create a CD using Roxio Easy CD Creator, then click/tap OK. The Select a Project window opens.
Creating CDs using Roxio Easy CD Creator 3 Move your pointer over make a data CD, then click/tap dataCD project. The Easy CD Creator window opens. Select Source Files Source Pane 4 Add Click/tap the arrow button to open the Select Source Files list, then click/tap the drive or folder where the files you want to add to the writable CD are located. If you do not see the folder you want, browse through the folders in the Source pane. www.gateway.
Chapter 7: Using Multimedia 5 Click/tap the file you want to record (hold down the CTRL or SHIFT key when you click/tap to select multiple files) in the Source pane, then click/tap Add. record 128 www.gateway.
Creating CDs using Roxio Easy CD Creator 6 After you have added all of your files, click/tap record. The Record CD Setup dialog box opens. Start Recording 7 Click/tap Start Recording. Help and Support For more information about creating CDs, click/tap Start, then click/tap Help and Support. Type the keyword creating CDs in the Search box , then click/tap the arrow. www.gateway.
Chapter 7: Using Multimedia Creating music CDs Use Roxio Easy CD Creator to create music CDs from other music CDs or MP3 files. For information on creating data CDs, see “Creating data CDs” on page 125. Important We recommend that you do not use your convertible tablet PC for other tasks while creating CDs. Important If you record copyrighted material to a CD, you need permission from the copyright owner.
Creating CDs using Roxio Easy CD Creator 2 If a CD Drive dialog box opens, click/tap Create a CD using Roxio Easy CD Creator, then click/tap OK. The Select a Project window opens. - OR If a dialog box does not open, click/tap Start, All Programs, Roxio Easy CD Creator, then click/tap Project Selector. The Select a Project window opens. make a music CD musicCD project www.gateway.
Chapter 7: Using Multimedia 3 Move your pointer over make a music CD, then click/tap musicCD project. The Easy CD Creator window opens. Select Source Files Source pane 4 132 Add Click/tap the arrow button to open the Select Source Files list, then click/tap the drive or folder where the music files that you want to add to the writable CD are located. If you do not see the folder you want, browse through the folders in the Source pane. www.gateway.
Creating CDs using Roxio Easy CD Creator 5 Click/tap the file you want to record (hold down the CTRL or SHIFT key when you click/tap to select multiple files) in the Source pane, then click/tap Add. Tips & Tricks You can add any combination of music tracks or MP3 files to a music CD project. You can add up to 99 tracks and files, or up to 650 MB (74-minute CD) or 700 MB (80-minute CD) of tracks and files to a music CD project. record www.gateway.
Chapter 7: Using Multimedia 6 After you have added all of your tracks and files, click/tap record. The Record CD Setup dialog box opens. Start Recording 7 Click/tap Start Recording. When the recording is complete, you may see a Record Complete dialog box. Select the appropriate option. Help and Support For more information about creating CDs, click/tap Start, then click/tap Help and Support. Type the keyword creating CDs in the Search box , then click/tap the arrow.
Creating CDs using Roxio Easy CD Creator To copy a CD: 1 Insert the CD you want to copy into your recordable drive. Important 2 3 If the drive you want to use is not in the modular bay, you need to swap modules. For more information about swapping modules, see “Changing modules” on page 110. If a dialog box opens, click/tap Take no action. If a CD Drive dialog box opens, click/tap Create a CD using Roxio Easy CD Creator, then click/tap OK. The Select a Project window opens.
Chapter 7: Using Multimedia 4 Move your pointer over CD copier, then click/tap CD copier. The CD Copier window opens. Copy 5 On the Source and Destination tab, click/tap the arrow button to open the Copy from list, then click/tap the recordable drive. 6 Click/Tap the arrow button to open the Record to list, then click/tap the recordable drive. 7 Click/Tap Copy.
Creating CDs using Nero Express Important We recommend that you do not use your convertible tablet PC for other tasks while creating CDs. Important If you record copyrighted material on a CD, you need permission from the copyright owner. Otherwise, you may be violating copyright law and be subject to payment of damages and other remedies. If you are uncertain about your rights, contact your legal advisor. Important Some CDs have copy protection software.
Chapter 7: Using Multimedia Creating a data CD To create a data CD: 1 Click/Tap Start, All Programs, Burn a CD or Data DVD, Nero Programs, then click/tap Nero Express. Nero Express opens. 2 Insert a blank, writable CD into your recordable drive. Important 3 138 If the drive you want to use is not in the modular bay, you need to swap modules. For more information about swapping modules, see “Changing modules” on page 110. If a dialog box opens, click/tap Take no action, then click/tap OK. www.
Creating CDs using Nero Express 4 Move your pointer over Data, then click/tap Data Disc. The Disc Content screen opens. www.gateway.
Chapter 7: Using Multimedia 140 5 Click/Tap Add. The Select Files and Folders dialog box opens. 6 Browse to the folder that contains the files you want to add. You can click/tap the arrow to open the Location list, then click/tap a drive or folder, or you can click/tap folders in the Name list. Press and hold the CTRL key to select multiple files. 7 8 Click/Tap Add. You can continue to select files and click/tap Add. After you select all your files, click/tap Finished. www.gateway.
Creating CDs using Nero Express 9 Click/Tap Next. The Final Burn Settings screen opens. 10 Click/Tap the arrow to open the Current recorder list, then click/tap your recordable drive. 11 Click/Tap Burn. The Burning Process screen opens and Nero Express burns the files to the CD. 12 13 14 When a message tells you that the recording is complete, click/tap OK. Click/Tap Next to return the main Nero Express screen. Click/Tap Exit. www.gateway.
Chapter 7: Using Multimedia Copying a CD To copy a music CD or data CD: 1 Click/Tap Start, All Programs, Burn a CD or Data DVD, Nero Programs, then click/tap Nero Express. Nero Express opens. 2 Click/Tap Copy entire disc. The Select source and destination screen opens. 3 Insert the music CD or data CD you want to copy into your recordable drive. Important 4 142 If the drive you want to use is not in the modular bay, you need to swap modules.
Creating CDs using Nero Express 5 Click/Tap the arrow to open the Destination drive list, then click/tap your recordable drive. 6 Click/Tap Burn. The Nero’s Title and CD Database dialog box opens. www.gateway.
Chapter 7: Using Multimedia 7 Wait until the dialog box closes. - OR Click/Tap Cancel. The Burning Process screen opens. Nero Express copies the tracks or files to your hard drive. 8 9 10 11 144 A message prompts you to insert a CD. Remove the source CD, insert a blank, writable CD, then wait for the message box to close. Nero Express copies the files from your hard drive to the writable CD. When a message tells you that the recording is complete, click/tap OK.
Creating CDs using Nero Express Copying music tracks To copy music CD tracks to your hard drive: 1 Click/Tap Start, All Programs, Burn a CD or Data DVD, Nero Programs, then click/tap Nero Express. Nero Express opens. 2 Insert the music CD that has the tracks you want to copy into your CD drive. Important 3 4 If the drive you want to use is not in the modular bay, you need to swap modules. For more information about swapping modules, see “Changing modules” on page 110.
Chapter 7: Using Multimedia 5 Click/Tap the Save Tracks icon. The Nero’s Title and CD Database dialog box opens. 6 Wait until the dialog box closes. - OR Click/Tap Cancel. 146 www.gateway.
Creating CDs using Nero Express 7 If a message box opens, click/tap OK. The Save Tracks dialog box opens. 8 Click/Tap the arrow button to open the Output file format list, then click/tap the format you want for the saved tracks. 9 To record all the tracks, click/tap GO. The recording process begins. - OR To record selected tracks, hold down the CTRL key, click/tap the tracks you want, then click/tap GO. The recording process begins. 10 After the recording is complete, click/tap Close. www.gateway.
Chapter 7: Using Multimedia Creating a music CD To create a music CD: 1 Click/Tap Start, All Programs, Burn a CD or Data DVD, Nero Programs, then click/tap Nero Express. Nero Express opens. 2 Insert a blank, writable CD into your recordable drive. Important 3 4 If the drive you want to use is not in the modular bay, you need to swap modules. For more information about swapping modules, see “Changing modules” on page 110. If a dialog box opens, click/tap Take no action, then click/tap OK.
Creating CDs using Nero Express The screen you use to add files opens. www.gateway.
Chapter 7: Using Multimedia 150 5 Click/Tap Add. The Select Files and Folders dialog box opens. 6 Browse to the folder that contains the files you want to add. You can click/tap the arrow to open the Location list, then click/tap a drive or folder, or you can click/tap folders in the Name list. Press and hold the CTRL key to select multiple files. 7 8 Click/Tap Add. You can continue to select files and click/tap Add. After you select all your files, click/tap Finished. www.gateway.
Creating CDs using Nero Express 9 Click/Tap Next. The Final Burn Settings screen opens. 10 Click/Tap the arrow to open the Current recorder list, then click/tap your recordable drive. 11 Click/Tap Burn. The Burning Process screen opens and Nero Express burns the files to the CD. 12 13 14 When a message tells you that the recording is complete, click/tap OK. Click/Tap Next to return the main Nero Express screen. Click/Tap Exit. www.gateway.
Chapter 7: Using Multimedia Advanced features In addition to Nero Express, you can use: ■ Nero BackItUp to create a backup of files on your hard drive, then use BackItUp to restore the files you backed up in case of a hard drive failure, virus, or other problem. ■ Nero CD-DVD Speed to test your DVD and DVD/CD-RW drives for transfer rates, load and eject times, seek and access times, and more.
Using the optional diskette drive Tips & Tricks If you need to use a diskette drive, Gateway recommends purchasing a USB diskette drive. To order a USB diskette drive, visit the Accessory Store at accessories.gateway.com. Diskette activity indicator Diskette eject button To use a diskette: 1 Plug the diskette drive into a USB port on your convertible tablet PC or port replicator. For the location of your USB ports, see “Back” on page 6, “Left side” on page 279, and “Back” on page 280.
Chapter 7: Using Multimedia Using the memory card reader You can use memory cards to transfer pictures from a digital camera to your convertible tablet PC. You can also use the memory card reader to transfer data between your convertible tablet PC and a device that uses memory cards, such as a PDA, MP3 player, or cellular telephone. Memory card types The memory card reader supports the following card types: 154 ® ■ Memory Stick ■ MultiMediaCard™ ■ Secure Digital™ ■ SmartMedia™ (3.3V only) www.
Using the memory card reader Using a memory card To insert a memory card: 1 Insert the memory card into the memory card slot with the label facing up and the arrow on the label pointing towards your convertible tablet PC. Important 2 Insert the SmartMedia card with the label facing down. Your convertible tablet PC only accepts 3.3V SmartMedia cards. To access a file on the memory card, click/tap Start, then click/tap My Computer.
Chapter 7: Using Multimedia Important Do not use the remove hardware to remove the memory card. icon in the taskbar Connecting a digital camera You can connect most digital cameras to your convertible tablet PC’s USB port to transfer pictures. To connect a digital camera: 1 156 Connect one end of the USB cable to your digital camera, and connect the other end of the cable to the USB port on the right side of your convertible tablet PC. www.gateway.
Connecting a digital camera 2 Use the program that came with your digital camera to transfer the pictures to your convertible tablet PC. -ORUse the Scanner and Camera Wizard to transfer the pictures to your convertible tablet PC. -ORIf your digital camera appears as a drive on your convertible tablet PC in the My Computer window, see “Working with files and folders” on page 64 for information about moving files to your hard drive.
Chapter 7: Using Multimedia Connecting a digital video camera Your convertible tablet PC has an IEEE 1394 (also known as Firewire or i.Link) port that can be used to connect to a digital video camera. To find the location of the IEEE 1394 port, see “Left Side” on page 3. To connect a digital video camera: ■ 158 Connect one end of the IEEE 1394 cable to your external source, such as a video camera, and connect the other end of the cable to the IEEE 1394 port on the side of your convertible tablet PC.
Editing videos Editing videos Pinnacle Expression is a video capture program that lets you capture and edit full-motion video, single images, and audio through the IEEE 1394 port. You can also use Pinnacle Expression to create video DVDs. For more information about using the Pinnacle Expression, see its online help. To edit a video: 1 Click/Tap Start, All Programs, Pinnacle Expression, then click/tap Pinnacle Expression. The program starts. 2 Use Pinnacle Expression to edit your video.
Chapter 7: Using Multimedia Viewing the display on a projector or monitor You can use your notebook for giving presentations by connecting an external monitor or projector to your monitor (VGA) port. Your notebook supports simultaneous LCD and CRT display. Simultaneous display allows you to control the presentation from your notebook and at the same time face your audience. To use a projector or external monitor: 160 1 2 Turn off your convertible tablet PC. 3 4 Turn on your convertible tablet PC.
Viewing the display on a projector or monitor 6 Click/Tap the Settings tab. 7 Right-click/Button-tap the second monitor icon (labeled 2), then click/tap Attached. 8 9 10 Click/Tap Apply. Adjust properties such as Screen Resolution or Color Quality if necessary. Click/Tap OK. Important Press FN+F3 to switch between viewing the display on the LCD panel and viewing the display on the projector or monitor.
Chapter 7: Using Multimedia Viewing the display on a television The S-Video out jack on your optional port replicator lets you view your convertible tablet PC display on a television screen using a standard S-Video cable. Important To turn on external video by default, connect the television (or other external video device) before starting your convertible tablet PC. Important Audio is not transmitted through the S-Video out jack.
Viewing the display on a television 7 Click/Tap the Settings tab. 8 Click/Tap Advanced. The Multiple Monitors and Intel Properties dialog box opens. 9 10 Click/Tap the Intel Extreme Graphics tab. Click/Tap the Graphics Properties button. The Intel Graphics Controller Properties dialog box opens. www.gateway.
Chapter 7: Using Multimedia 11 Click/Tap the Television button. Important 12 13 Click/Tap the arrow button to open the Colors list, then click/tap True Color. 14 Click/Tap the arrow button to open the Video Standard list, then click/tap NTSC-M. Click/Tap the arrow button to open the Screen Area list, then click/tap 640 by 480. Important 164 If the Television button is grayed out, your convertible tablet PC has not detected the television.
Viewing the display on a television 15 Click/Tap Apply. Your LCD panel will blank out and what was on your LCD panel now appears on your television. Important 16 Your television may be able to run at a higher resolution. If the icons and screen area appear too large on your television, try a different Screen Area value. Click/Tap OK.
Chapter 7: Using Multimedia 166 www.gateway.
Managing Power 8 While your convertible tablet PC is running on battery power, you should manage power consumption to get the most use out of the battery.
Chapter 8: Managing Power Monitoring the battery charge Closely monitor the battery charge. When the battery charge gets low, change the battery or connect to AC power immediately to prevent losing any unsaved work. Monitor the battery charge by: ■ Double-clicking/Double-tapping the power cord icon in the taskbar. The Power Meter dialog box opens. Important or battery icon If the power cord or battery icon does not appear on the taskbar, click/tap the show hidden icons button.
Recharging the battery Recharging the battery Both the main and the optional secondary batteries recharge while they are installed and your convertible tablet PC is connected to AC power. While the batteries are recharging, the battery charge indicator turns purple and the battery icon in the taskbar has a lightning bolt . Important If the power cord or battery icon does not appear on the taskbar, click/tap the show hidden icons button.
Chapter 8: Managing Power Recalibrating the battery If your convertible tablet PC unexpectedly goes into Standby mode while you are using it but the battery charge is not low, you may need to recalibrate your battery. You should also recalibrate the battery periodically to maintain the accuracy of the battery gauge. To recalibrate the battery: 1 2 Connect the AC adapter, then turn on your convertible tablet PC. 3 4 Open the Advanced menu.
Changing batteries Changing batteries If your convertible tablet PC is plugged into an AC outlet or if it has a charged secondary battery installed, you can change the main battery while the convertible tablet PC is turned on. If your convertible tablet PC has only one battery and it is not plugged into an AC outlet, you must turn the convertible tablet PC off while changing the batteries. Warning Danger of explosion if battery is incorrectly replaced.
Chapter 8: Managing Power Replacing the main battery To replace the main battery: 1 If your convertible tablet PC is on and is connected to AC power or has a charged secondary battery installed, go to Step 2. -ORIf your convertible tablet PC is on and is not plugged into an AC outlet and does not have a charged secondary battery installed, save your work and turn off the convertible tablet PC. 172 2 3 Close the LCD panel. 4 5 Turn your convertible tablet PC over so the bottom is facing up.
Changing batteries 6 Lift the battery out of the bay. 7 Place a recharged battery into the bay and press down until it snaps into place. 8 9 Slide the battery lock to the locked position. 10 Turn your convertible tablet PC over and reattach the optional port replicator. Open the LCD panel and slide the power switch. www.gateway.
Chapter 8: Managing Power Installing a secondary battery Your convertible tablet PC’s modular bay accepts a secondary battery. The secondary battery charges when the convertible tablet PC is connected to AC power. Warning Danger of explosion if battery is incorrectly replaced. Replace only with a Gateway M275 battery (M275DAZ or equivalent). Discard used batteries according to the manufacturer’s instructions. The battery used in this device may present a fire or chemical burn hazard if mishandled.
Changing batteries 6 Remove the module bay screw. Screw 7 Slide and hold the module bay latch. The module may move out slightly. 8 9 Slide the module out. 10 Firmly push the secondary battery straight into the bay until the latch clicks into place. Replace the module bay screw. www.gateway.
Chapter 8: Managing Power Extending battery life Conserving battery power While using the battery to power your convertible tablet PC, conserve power by: ■ Dimming the display as low as is comfortable. ■ Removing PC Cards when you do not need them. Many PC Cards use a small amount of power while inserted, even if they are not being used. ■ Modifying the power management settings for maximum power savings. For more information, see “Changing power settings” on page 178.
Extending battery life Changing power modes You can use the following power modes to lengthen the life of your convertible tablet PC’s battery: ■ Standby - while your convertible tablet PC is in Standby, it switches to a low power state where devices, such as the display and drives, turn off. ■ Hibernate - (also called save to disk) writes all current memory (RAM) information to the hard drive, then turns your convertible tablet PC completely off.
Chapter 8: Managing Power Changing power settings You can change the function of the power switch, Standby system key, and power-saving timers by changing power settings on your convertible tablet PC. You can customize power settings from the Windows Control Panel by selecting power schemes, setting power alarms, adjusting advanced power settings, and activating Hibernate mode.
Changing power settings Changing the power scheme To change the power scheme: 1 Click/Tap Start, then click/tap Control Panel. The Control Panel window opens. If your Control Panel is in Category View, click/tap Performance and Maintenance. 2 Click/Double-click/Tap/Double-tap the Power Options icon. The Power Options Properties dialog box opens. 3 Click/Tap the arrow button to open the Power Schemes list, then click/tap the power scheme you want.
Chapter 8: Managing Power Help and Support For more information about changing the power scheme, click/tap Start, then click/tap Help and Support. Type the keyword power scheme in the Search box , then click/tap the arrow. Changing alarm options To change the alarm options: 180 1 Click/Tap Start, then click/tap Control Panel. The Control Panel window opens. If your Control Panel is in Category View, click/tap Performance and Maintenance. 2 Click/Double-click/Tap/Double-tap the Power Options icon.
Changing power settings Help and Support For more information about changing the alarm options, click/tap Start, then click/tap Help and Support. Type the keyword alarm options in the Search box , then click/tap the arrow. Changing advanced settings To change advanced power management settings: 1 Click/Tap Start, then click/tap Control Panel. The Control Panel window opens. If your Control Panel is in Category View, click/tap Performance and Maintenance.
Chapter 8: Managing Power 5 Click/Tap OK. Help and Support For more information about changing the power management settings, click/tap Start, then click/tap Help and Support. Type the keyword power management in the Search box , then click/tap the arrow. Activating and using Hibernate mode To activate Hibernate mode: 182 1 Click/Tap Start, then click/tap Control Panel. The Control Panel window opens. If your Control Panel is in Category View, click/tap Performance and Maintenance.
Changing power settings 4 Click/Tap the Enable hibernation check box, then click/tap Apply. Hibernate mode is now an option you can select on the Advanced tab in the Power Options Properties dialog box and in the Turn Off Computer or Shut Down Windows dialog box. To use Hibernate mode: ■ As an automatic power savings mode: Open the Power Options Properties dialog box, then click/tap the Power Schemes tab.
Chapter 8: Managing Power 184 www.gateway.
Traveling With Your Gateway M275 9 These tips can make traveling with your convertible tablet PC more convenient and trouble-free. Read this chapter to learn about: ■ Using the modem ■ Using your radio frequency wireless connections ■ Transferring files ■ Protecting your convertible tablet PC from loss and theft ■ Managing your convertible tablet PC’s power efficiently Tips & Tricks You can download an electronic copy of this guide from support.gateway.com/support/manlib/.
Chapter 9: Traveling With Your Gateway M275 Packing your convertible tablet PC ■ Remove all peripheral devices and cables. Remember to pack those you will need while traveling, and do not forget to pack at least one convertible tablet PC pen. ■ Protect the pen by keeping it in your convertible tablet PC’s pen holder during travel. For more information, see “Right Side” on page 5.
Modem Modem ■ Take a telephone cord to connect the modem to telephone jacks. If you are traveling internationally, take telephone jack adapters or an acoustic handset coupler. ■ Take a telephone line protector. ■ Take a telephone line tester to check for unsafe lines, especially if you are traveling internationally. ■ Take remote access information with you so you can connect to your ISP while outside of your usual calling area.
Chapter 9: Traveling With Your Gateway M275 Files ■ Copy your working files from your desktop computer to your convertible tablet PC before you travel. ■ If you need to access your desktop computer files from your convertible tablet PC while traveling, set up your desktop computer for remote access. Contact your network administrator for more information about remote access. ■ Take extra recordable media for transferring files between computers and backing up files.
Power To create a startup password: 1 Restart your convertible tablet PC. As soon as you see a startup screen, press F2. The BIOS Setup utility opens. 2 Open the Security menu, then highlight Set Supervisor Password, then press ENTER and follow the instructions. You must set the supervisor password in order to set the user (startup) password. 3 Highlight Set User Password, then press ENTER and follow the instructions. This is the password you need to enter at startup.
Chapter 9: Traveling With Your Gateway M275 Additional tips 190 ■ If you plan to use several USB peripheral devices, take a portable USB hub to provide additional USB ports. ■ Take a network cable if you need to connect to a network. Some hotels provide Internet connectivity only through their networks. ■ If your convertible tablet PC has been exposed to cold temperatures, allow it to warm to room temperature before turning it on.
Customizing Your Gateway M275 10 This chapter provides information about customizing your convertible tablet PC by changing settings in Windows.
Chapter 10: Customizing Your Gateway M275 Using the display Changing display orientation You can change the display orientation from the default, landscape (horizontal), to portrait (vertical) or secondary landscape (180 degrees from the default) Screen Rotation button. For more information, see “LCD panel buttons” on page 32. To change display orientation: ■ Press Screen Rotation button to step through display orientations.
Adjusting the screen and desktop settings Adjusting the screen and desktop settings Adjusting the color depth and screen area are two of the most basic display settings you may need to change. You can also adjust settings such as the screen background and screen saver. Adjusting the color depth Color depth is the number of colors your screen displays. Various image types require various color depths for optimum appearance.
Chapter 10: Customizing Your Gateway M275 3 Click/Tap the Settings tab. 4 Click/Tap the arrow button to open the Color quality list, then click/tap the color depth you want. 5 To save your changes, click/tap OK, then click/tap Yes. Help and Support For more information about adjusting display settings, click/tap Start, then click/tap Help and Support. Type the keyword changing display settings in the Search box , then click/tap the arrow. 194 www.gateway.
Adjusting the screen and desktop settings Adjusting the screen resolution You can increase the screen resolution to fit more icons on your desktop, or you can decrease the resolution to make reading the display easier. The higher the resolution, the smaller individual components of the screen (such as icons and menu bars) appear. To adjust the screen resolution: 1 Click/Tap Start, then click/tap Control Panel. The Control Panel window opens.
Chapter 10: Customizing Your Gateway M275 Help and Support For more information about adjusting screen resolution, click/tap Start, then click/tap Help and Support. Type the keyword changing screen resolution in the Search box , then click/tap the arrow. Changing the colors on your Windows desktop You can change the colors of Windows desktop items, such as the background color and dialog box title bars. To change desktop colors: 196 1 Click/Tap Start, then click/tap Control Panel.
Adjusting the screen and desktop settings 4 Click/Tap the arrow button to open the Color scheme list, click/tap the color scheme you want, then click/tap OK. The new colors appear on your desktop. - OR If you want to create a new color scheme as part of a desktop theme: a b Click/Tap Advanced. The Advanced Appearance dialog box opens. c d e Change the color or font settings for the item. Click/Tap the arrow button to open the Item list, then click/tap the item you want to change.
Chapter 10: Customizing Your Gateway M275 3 Click/Tap the Desktop tab. 4 Click/Tap a background picture in the Background list. - OR Click/Tap Browse to select a background picture from another location. 5 If you want the picture you chose to cover the entire screen, click/tap the arrow button to open the Position list, then click/tap Stretch or Tile.
Adjusting the screen and desktop settings Selecting a screen saver You can use a screen saver to keep others from viewing your display while you are away from your convertible tablet PC. Windows supplies a variety of screen savers that you can choose from, and many more are available from the Internet and as commercial products. To select a screen saver: 1 Click/Tap Start, then click/tap Control Panel. The Control Panel window opens.
Chapter 10: Customizing Your Gateway M275 6 If you want to display the Welcome (Login) screen whenever you exit the screen saver, click/tap the On resume, display Welcome screen check box. 7 If you want to change the time before the screen saver is activated, click/tap the up or down arrows next to the Wait box. 8 Click/Tap OK. Help and Support For more information about selecting a screen saver, click/tap Start, then click/tap Help and Support.
Programming the buttons Programming the buttons Most of the LCD panel buttons on your convertible tablet PC’s can be reprogrammed with new functions. For more information, see “LCD panel buttons” on page 32. To reprogram button functions: 1 Double-click/Double-tap the Tablet and Pen Settings icon The Tablet and Pen Properties dialog box opens. 2 3 Click/Tap the Tablet Buttons tab. in the taskbar. Change the button settings, then click/tap OK. www.gateway.
Chapter 10: Customizing Your Gateway M275 Adjusting the Tablet PC Input Panel Settings To adjust writing pad, writing tools, and speech settings: 202 1 2 Click/Tap 3 Click/Tap a tab, then change the input panel settings. (the Keyboard icon). Click/Tap Tools, then click/tap Options. www.gateway.
Changing the touchpad settings Changing the touchpad settings You can adjust the double-click speed, pointer speed, left-hand or right-hand configuration, and other touchpad settings. To change your touchpad settings: 1 Click/Tap Start, then click/tap Control Panel. The Control Panel window opens. If your Control Panel is in Category View, click/tap Printers and Other Hardware. 2 Click/Double-click/Tap/Double-tap the Mouse icon. The Mouse Properties dialog box opens. www.gateway.
Chapter 10: Customizing Your Gateway M275 3 Click/Tap the Device Settings tab, then click/tap Settings to change your touchpad settings. 4 To modify a touchpad setting, click/tap the + in front of a setting, then modify the setting. 5 To assign a function to the rocker switch, click the + in front of Buttons, click the up or down button, then click the action you want. 6 Click/Tap OK to save changes.
Adding and modifying user accounts Adding and modifying user accounts You can create and customize a user account for each person who uses your convertible tablet PC. You can also switch (change) user accounts without turning off your convertible tablet PC. User account tips ■ If you want to create an account for someone, but you do not want that user to have full access to your convertible tablet PC, be sure to make that account limited.
Chapter 10: Customizing Your Gateway M275 To switch user accounts: 206 1 Click/Tap Start, then click/tap Log Off. The Log Off Windows dialog box opens. 2 3 Click/Tap Switch User. The Windows Welcome screen opens. Click/Tap the user account that you want to use. When you switch between user accounts, any programs that were running for the previous user continue to run. www.gateway.
Networking Your Gateway M275 11 Connecting your home, small office, or home office computers lets you share drives, printers, and a single Internet connection among the connected computers.
Chapter 11: Networking Your Gateway M275 Benefits of networking A network lets you: ■ Share a single Internet connection ■ Share computer drives ■ Share peripheral devices ■ Stream audio and video files ■ Play multi-player games Sharing a single Internet connection Each computer that is connected to the network can share the same broadband connection or modem and telephone line and access the Internet at the same time.
Benefits of networking Sharing peripheral devices Each computer that is connected to the network can share the same peripheral devices, such as a printer. Select print from the computer you are currently using and your file is automatically printed on your printer no matter where it is located on your network. Help and Support For more information about sharing network devices, click/tap Start, then click/tap Help and Support. Type the keyword sharing in the Search box , then click/tap the arrow.
Chapter 11: Networking Your Gateway M275 Selecting a network connection The biggest decision you need to make when creating your network is what type of connection you will use. Gateway supports both wired and wireless Ethernet networks. Use the following criteria as a guide when selecting a network connection.
Using a wired Ethernet network Using a wired Ethernet network A wired Ethernet network consists of two or more computers connected together through an Ethernet cable. This connection type is commonly used in offices around the world and can be used to build computer networks in the home. Ethernet, Fast Ethernet, or Gigabit Ethernet Ethernet is available at three different speeds. Standard Ethernet runs at 10 Mbps, Fast Ethernet runs at 100 Mbps, and Gigabit Ethernet runs at 1000 Mbps.
Chapter 11: Networking Your Gateway M275 Example wired Ethernet network The following is an example of a wired Ethernet network. The network is made up of a router, a cable or DSL modem, your computers, and cables connecting each of these components. The router is the central control point for the network. Attached to the router are all of your computers or Ethernet-ready devices. Also connected to the router is a cable or DSL modem that provides access to the Internet.
Using a wired Ethernet network Equipment you need for a wired Ethernet network For a wired Ethernet network you need: ■ An Ethernet jack on each desktop computer, notebook, tablet PC, and convertible tablet PC. - OR An Ethernet card (also called network interface cards or NICs) installed in each desktop computer. - OR An Ethernet PC Card installed in each notebook or convertible tablet PC. ■ An Ethernet router.
Chapter 11: Networking Your Gateway M275 Using a wireless Ethernet network A wireless Ethernet network is ideal for creating a home or office network or adding mobility to an existing wired Ethernet network. A wireless Ethernet network allows you the freedom to move about your home or office with your notebook, tablet PC, or convertible tablet PC. For example, you can take your notebook, tablet PC, or convertible tablet PC from your home office to your patio without having an Ethernet jack available.
Using a wireless Ethernet network Wireless Ethernet speed and frequency Wireless Ethernet is available at two different speeds and at two different frequencies. The following table compares the various wireless Ethernet network types. Network Type Speed Frequency Advantages Disadvantages IEEE 802.11a 54 Mbps 5 GHz Less possible interference than IEEE 802.11b and IEEE 802.11g ■ ■ IEEE 802.11b 11 Mbps 2.4 GHz ■ ■ ■ IEEE 802.11g 54 Mbps 2.
Chapter 11: Networking Your Gateway M275 Example access point wireless Ethernet network By using an access point, you can join a wireless Ethernet network and access a wired Ethernet network. The following example shows how an access point also lets you access the Internet. The following is an example of an access point wireless Ethernet network. The network is made up of an access point, a cable or DSL modem, and your computers. The access point is the central control point for the network.
Using a wireless Ethernet network Equipment you need for an access point wireless Ethernet network For an access point wireless Ethernet network you need: ■ A wireless Ethernet PCI card installed in each desktop computer - OR A wireless Ethernet USB adapter attached to each desktop or notebook computer, or convertible tablet PC - OR A notebook, tablet PC, or convertible tablet PC with wireless Ethernet built-in - OR A wireless Ethernet PC Card installed in each notebook or convertible tablet PC that does
Chapter 11: Networking Your Gateway M275 Example peer-to-peer wireless Ethernet network Use a peer-to-peer (also known as ad hoc) wireless Ethernet network if you are setting up or joining a temporary computer-to-computer network. This type of network does not include access into a wired network or the Internet. You can create this type of network to quickly move files from one computer to another. 218 www.gateway.
Using a wireless Ethernet network Equipment you need for a peer-to-peer wireless Ethernet network For a peer-to-peer wireless Ethernet network you need: ■ A wireless Ethernet PCI card installed in each desktop computer - OR A wireless Ethernet USB adapter attached to each desktop or notebook computer or convertible tablet PC - OR A notebook, tablet PC, or convertible tablet PC with wireless Ethernet built-in - OR A wireless Ethernet PC Card installed in each notebook or convertible tablet PC that does not
Chapter 11: Networking Your Gateway M275 Using your convertible tablet PC on a network Installing and configuring your convertible tablet PC for Ethernet networking The Setting Up Your Windows Network guide has been included on your hard drive. It provides instructions for installing and configuring both wired and wireless Ethernet networking on your convertible tablet PC. To access this guide, click/tap Start, All Programs, then click/tap Gateway Documentation.
Using your convertible tablet PC on a network To turn the wireless Ethernet emitter on or off: 1 Click/Tap Start, then click/tap Control Panel. The Control Panel window opens. If your Control Panel is in Category View, click/tap Network and Internet Connections. The Network and Internet Connections window opens. 2 Click/Double-click/Tap/Double-tap Network Connections. The Network Connections window opens.
Moving From Your Old Computer 12 If your new convertible tablet PC is replacing an old computer, you may have personal data files, Internet settings, a printer or other peripheral devices, and other unique computer settings that you want to move from your old computer to your new one.
Chapter 12: Moving From Your Old Computer Using the Files and Settings Transfer Wizard You can move your data files and personal settings, such as display, Internet, and e-mail settings, from your old computer to your new one by using the Files and Settings Transfer Wizard. The wizard also moves specific files or entire folders, such as My Documents, My Pictures, and Favorites.
Transferring files To find files in the My Documents folder: 1 In Windows XP, click/tap Start, then click/tap My Documents. The My Documents window opens and displays many of your saved personal data files. Go to Step 4. - OR In Windows 98, Windows Me, or Windows 2000, double-click the My Computer icon on the desktop. Go to the next step. 2 3 4 Double-click/Double-tap the C:\ drive icon. Double-click/Double-tap the My Documents folder.
Chapter 12: Moving From Your Old Computer To find files using Find or Search: 1 In Windows XP, click/tap Start, then click/tap Search. The Search Results window opens. - OR In Windows 98, Windows Me, or Windows 2000, click Start, Find or Search, then click For Files or Folders. The Search Results window opens. 2 Use Windows Find or Search to locate data files by file name or file type. For help on finding files, click/tap Help, then click/tap Help and Support Center or Help Topics.
Installing your old printer or scanner To use the Internet Connection Wizard: 1 Click/Tap Start, All Programs, Accessories, Communications, then click/tap New Connection Wizard. The New Connection wizard opens. 2 Configure your Internet settings by following the on-screen instructions. Help and Support For more information about setting up an Internet connection, click/tap Start, then click/tap Help and Support. Type the keyword Internet connection in the Search box , then click/tap the arrow.
Chapter 12: Moving From Your Old Computer If you have trouble after you install the software for your old devices, you can use System Restore to restore your convertible tablet PC’s previous settings. Help and Support For information about restoring your convertible tablet PC’s previous settings, click/tap Start, then click/tap Help and Support. Type the keyword System Restore in the Search box , then click/tap the arrow.
Installing your old programs Help and Support For more information about installing a printer, click/tap Start, then click/tap Help and Support. Type the keyword installing a printer in the Search box , then click/tap the arrow. See your peripheral device’s user guide for installation information and tips. Because most installation software is periodically updated, you should also check the manufacturer’s Web site for software updates.
Chapter 12: Moving From Your Old Computer 228 www.gateway.