Table of Contents
TOSHIBA CORPORATION IMPORTANT NOTE: PLEASE READ BEFORE USING YOUR MOBILE PHONE BY ATTEMPTING TO USE ANY SOFTWARE ON THE SUPPLIED HANDSET THIS CONSTITUTES YOUR ACCEPTANCE OF THESE EULA TERMS. IF YOU REJECT OR DO NOT AGREE WITH ALL THE TERMS OF THIS EULA, PLEASE DO NOT ATTEMPT TO ACCESS OR USE THE SUPPLIED SOFTWARE.
ACCEPT THAT SOFTWARE MAY NOT MEET YOUR REQUIREMENTS AND NO WARRANTY CAN BE GIVEN THAT OPERATION OF THE SOFTWARE WILL BE UNINTERRUPTED OR ERROR-FREE. 5. LIMITATION OF LIABILITY.
Warranty and Safety This section addresses important warranty and safety issues. You should read and thoroughly familiarise yourself with this section before using your phone. After Sales Service Your Toshiba mobile telephone contains no user serviceable parts. For further information on service, please contact your retailer or service provider. Safety Guidelines Follow the guidelines below to use your phone in a safe and legal manner.
more information. • Your phone may interfere with some hearing aids. If this happens you should contact your service provider or doctor. • Your phone may interfere with the functionality of inadequately shielded medical devices. Consult a physician or the device manufacturer to ensure safe procedure. • Your phone may interfere with the functionality of any inadequately shielded electronic system in a motor vehicle. Examples include air-bags and fuel injection systems.
• Do not use or store the phone in dusty or dirty locations as the movable parts of the phone can be damaged. • Do not use or store the phone in excessively hot places. High temperatures will shorten the life-span of the phone, damage the battery or warp/melt the plastic used in the phone's manufacture. • Do not store the phone in excessively cold places.
there is no guarantee that interference will not occur in a particular installation If this equipment does cause harmful interference to radio or television reception, which can be determined by turning the equipment off and on, the user is encouraged to try to correct the interference by one or more of the following measures: -Reorient or relocate the receiving antenna. -Increase the separation between the equipment and receiver.
accessory and are not holding the phone at the ear, position the handset a minimum of 1.5 cm from your body when the phone is switched on. SAR Information Your (Model name) meets all EU requirements and recommended limits for exposure to radio waves. These limits were developed and established by independent scientific organisations.
1. Setting up the Phone This section describes basic operations such as inserting your SIM card, charging the battery, and entering your PIN. The following must be completed before you begin using the phone: • Ensure that the battery is inserted • Ensure that the SIM card is inserted • Charge the phone's battery 1.1 Battery The battery included with your phone is not charged. Before you can switch on your phone for the first time, you need to install the phone's battery and charge it. 1.1.
Battery nearly empty Battery full Battery half When the battery is fully discharged, the charging indicator is not displayed and will not appear after the phone has recharged sufficiently. For safety information regarding the battery, see “Battery Safety” on page 5. Note: Always turn off the phone before removing the battery. 1.2 SIM Card Your SIM card identifies your phone on the network and stores your details, including your PIN, call history, and subscription information.
圖M Step 3: Push the memory card locker to right to unlock and lift it up. 圖N Step 4: Insert your memory card into the memory card holder with the card's metallic connector in contact with the phone’s and the notched corner on the right. (To remove your memory card, simply lift it off from the memory card holder.) 圖O Step 5: Gently press down the memory locker and push it to the left to lock.
3. General Information This section gives you a grand tour about your phone. Get familiarize yourself with the phone before you start using it. 3.1 Parts and Functions 請用圖P Keys Each of the keys on your phone has one or more functions, as explained in the table below. Key Function(s) 4-way key To navigate the phone's menu system. For more information, see ”The 4-Way Keys” on page 13.
2-9 key Press to access shortcut functions. For more information, see ”Shortcuts” on page 26. * key From the idle screen, press and hold to lock the keypad. During text editing, press to switch entry method. # key During text editing, press to change entry modes. In idle screen, press to bring up the Profiles menu.
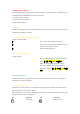
The 4-Way Keys Your phone has an easy-to-use menu system that you can navigate using the 4-way key. ▲ Up z To scroll up lists or move the cursor upwards. z To access Voice Dialing menu from the idle screen. z To increase brightness level in the camera preview mode. <Left z Right> z To scroll left or move the 請參考SI4黑白放大的圖樣 cursor to the left of the cursor to the right of the screen. screen. z z To access Messages from z To zoom out under the To zoom in under the camera preview mode.
Quick keys To Key Sequence Mode View recent calls Press call key once Standby Call voice mail Press and hold 1 key Standby Access Messages Press Left Softkey or < key Standby Access My Files Press > key Standby Access Phonebook Press ▼ key Standby Access Voice Calling Press ▲ key Standby Quick dial a phonebook number Enter the number of Position in Standby SIM and press # key to quickly display the number. Press Call key to dial the number.
Main menu Your phone's menu structure starts with the 12 Main menu icons in a grid view. Press Centre key to access press Main Menu from the idle screen. Navigate to the desired menu by using the 4-way navigation keys, then press Centre key or Select to access the sub-menu. 請客戶提供螢幕抓圖,類似以下 Settings Browser Tools Camera Messages Entertainment Contacts Music My Files Calls STK Shortcuts , Menu Description Settings Includes a variety of phone settings.
information, see “My Files” on page 56. Calls Records a list of call histories. For more information, see “Calls” on page 57. STK Provides SIM related functions (depending on your SIM card). Shortcuts Allows you to quickly access some features. For more information, see “Shortcuts” on page 26. Menu Structure Note: Under the Main Menu screen, you may press 4-way keys to scroll to the desired option. Alternatively, you can press the number keys (0-9), *key and # key to access any menu directly.
key Main Menu 2ed Level 1 Settings General Display Sounds Connectivity 2 Browser Homepage Bookmarks Settings 3.
7 Contacts View contacts View groups Special numbers Quick call Advanced Memory status 8 Music Track Last Played Playlists 9 My Files SIM card Memory card *key Calls Call history Clear history Call Settings 0 STK* SIM related functions #key Shortcuts Fast keys Hot keys * The feature is subscription dependent. Please contact your service provider. Icons 請客戶提供螢幕show全icon圖 Your phone has one 262000-colour LCD. The icons displayed on the screen are explained below. 放螢幕全icon show 圖,類似以下 No.
2 3.2 Basic Phone Use Making an Emergency Call Emergency calls can be made without credit on your phone and in some cases without a SIM card inserted. To make an emergency call, dial 112, 999 or, if available, press SOS, followed by Yes. Making/Ending a Call Before you can make a call, you need to insert your SIM card and make sure your phone is switched on. To make/end a call (Steps 1-3): 1. Enter a phone number (including area codes if necessary) using keypad keys. 2.
Receiving/Rejecting a Call When there is an incoming call, the phone rings/vibrates (depending on your Profile) and the screen displays the name (if recorded in the Contacts) or phone number of the caller (this feature is network dependent). To receive a call, press call key or Options > Accept call. To reject a call, press Power key, Reject or Options> Reject call. Holding a Call A call may be put on hold. To place a call on hold: During a call, press Hold. Also press Options and select Hold.
To turn T9 predictive text input on/off, press and hold * key in an edit screen. To change entry method, press * key to switch between the following modes: T9 Entry Method Normal Entry Method T9 Abc Abc T9 abc abc T9 ABC ABC 123 123 T9 Language Your phone supports T9 predictive text input in a number of languages. To select a T9 language (Steps 1-3): 1. Press◎ > Settings > Language > T9 language. 2. Scroll to the desired language. 3. Press Select.
Normal Entry Method To enter "Act" in your edit screen (Steps 1-3): 1. Press once to enter "A". 2. Press three times to display to jump to "c". 3. Press once for "t." Numeric Entry Method Press the numeric key to enter the number. Character Table Numeric keys have different functions under different entry methods. Please refer to the following table for details Lower case # Upper case Press once to bring up the symbol chart; press and hold to turn T9 text entry on/off.
4. Settings You may customise your phone by changing the following options in Settings: The Settings menu is divided into four submenus: General, Display, Sounds and Connectivity. After entering Settings menu, you may press key to scroll to the desired submenu. 4.1 General Under the General submenu, you may define the following settings: Language, Time & date, Security, Voice control, Auto keypad lock, Shortcuts, Default storage, Flight mode, Profiles, and Default settings.
1. Press ◎ >Settings > General > Time & date > Time format. 2. Press Change to switch between 12 hours and 24 hours. To set Date format (Steps 1-2): 1. Press ◎ Settings > General >Time & date > Date format. 2. Press Select or ◎ to choose a format (DD/MM/YYYY, MM/DD/YYYY, YYYY/MM/DD, YYYY.MM.DD, DD.MM.YYYY, YYYY-MM-DD, DD-MM-YYYY). To set Power-on/Power-off time (Steps 1-4): 1. Press ◎ > Settings > General >Time & date > Power-on time or Power-off time. 2.
1. Press ◎ > Settings > General > Security > Change PIN. 2. Enter your PIN. 3. Press OK. To change PIN/PIN2/lock code (Steps 1-5): 1. Press ◎ > Settings > General > Security > Change PIN/PIN2/lock code. 2. Key in the current code. 3. Key in the new code. 4. Enter the new code again. 5. Press Ok. Phone Lock This feature allows you to enable phone lock feature, preventing from the unauthorised use. Note that the default phone lock code is 123456#. To turn on your phone lock (Steps 1-2): 1.
5. Press Save. Auto keypad lock This feature allows you to lock the phone keypad automatically or after a desired period of time. To set the Auto keypad lock (Steps 1-2): 1. Press ◎ > Settings > General > Auto keypad lock. 2. Press Select to choose the following settings: Off, After 1 minute, After 2 minutes, and After 5 minutes. Shortcuts Shortcuts allows you to quickly access phone functions by pressing (and holding) keypad keys—including numeric keys and 4-way navigation keys.
To customize a profile (Steps 1-7): 1. Press ◎ > Settings > General > Profiles. 2. Select a profile and press Options > Personalise. 3. Define an alert type: Ring only, Vibrate only, Ring & Vibrate, Vibrate then ring or None. 4. Set the Key sound On/Off by press Select. 5. Select Ringtones for a specific event. 6. Set the Ring Volume. 7. Press Back when you finish setting. Default settings This feature allows you to restore default values for your phone.
Backlight duration To set phone’s backlight level (Steps 1-3): 1. Press ◎ > Settings > Display > Backlight duration. 2. Scroll up/down to select from 1 minute, 30 seconds, and 15 seconds. 3. Press Select. Greeting This feature provides a text greeting when the phone is switched on. When the text greeting is on, the animation is disabled. To set a text greeting (Steps 1-3): 1. Press ◎ > Settings > Display > Greeting. 2. Select On to open the text edit screen. 3. Enter the text and press Ok. 4.
Key sound To set Key sound (Steps 1-2): 1. Press ◎ > Settings > Sounds > Key sound. 2. Press Select to turn the Key sound On/Off. Shutter sound To set Shutter sound (Steps 1-2): 1. Press ◎ > Settings > Sounds > Shutter sound. 2. Press Select to turn the Shutter sound Off or select Shutter sound 1/2. 4.4 Connectivity In addition to the network and phone connection setting, Connectivity submenu also provides Call options, Message settings, Bluetooth, USB features, and Memory card features.
incoming/Total outgoing/ All voice calls 2. Press Ok to return to the previous screen or Reset to clean the history record. Call Waiting To Activate/Cancel Call waiting: 1. Press ◎ > Settings > Connectivity > Call options > Call Services > Call waiting 2. Scroll up/down to select Activate/Cancel by pressing Select. To check status, press ◎ > Settings > Connectivity > Call options > Call Services > Call waiting > Check status. Caller ID To Hide ID (Steps 1-2): 1.
To set Call divert (Steps 1-2): 1. Press ◎ > Settings > Connectivity > Call options > Call divert. 2. Select Call divert condition: All voice calls, If not answered, If out of reach, When no reply, If busy, Divert all data calls active, or Cancel all. To check Call divert status, press ◎ > Settings > Connectivity > Call options > Call divert > Check status. Call barring This feature allows you to bar different types of calls made or received on your phone.
Message settings This menu includes setting options for Text message, Multimedia message, E-mail, and Voice mail. For detailed Message settings, see “Messages” on page 43. Network Network menu provides the following settings. Select network This feature allows you to search the network automatically. To Select network automatically (Steps 1-2): 1. Press ◎ > Settings > Connectivity > Network > Select network. 2. Press Yes to Search for available networks.
Select line To select a phone line (Steps 1-3): 1. Press ◎ > Settings > Connectivity > Network > Line > Select line. 2. Select a line from Line 1 and Line 2. 3. Press Select. To set the line under protection, press ◎ > Settings > Connectivity > Network > Line > Protected and select On/Off. Browser This menu includes browser setup options and Push message messages. For detailed Browser settings, see “Browser” on page 33.
To create a Bluetooth connection (Steps 1-3): 1. Press ◎ > Settings > Connectivity > Bluetooth. 2. Select Activate >Search for devices. 3. When the list of detected devices appears, select one to connect. Note: If you will not use Bluetooth for an extended period of time, you may deactivate it to save your phone’s power. Options for Bluetooth menu include: z Activate: Turn the Bluetooth feature on/off.
To view the synchronized data, press ◎ > Settings > Connectivity > Synchronization > Data. To view the synchronization history, press ◎ > Settings > Connectivity > Synchronization > History. To change synchronization settings (Steps 1-3): 1. Press ◎ > Settings > Connectivity > Synchronization > Settings. 2. Scroll to Frequency or Profile and press Select. 3. Enter the detailed information. 4. Press Ok.
5. Browser Your phone provides WAP service, enabling you to get up to date information, content and downloads. The use of WAP service depends on your service provider and the WAP settings in your phone. When you are connected to the WAP browser, the predefined starting browser page will be displayed. The available menu options depend on the page you connect to. To end the connection, long press Power key to terminate the WAP connection. WAP setup To select WAP connection profiles (Steps 1-3): 1.
6. Tools Tools menu provides a great variety of personal features so that get the most out of your phone. Press ◎ > Tools to access this menu, which allows you to utilize the following features: z Calendar, Appointments, Tasks, and Notes z Alarm, and Countdown z Voice memo z Calculator, and Unit converter 6.1 Calendar To view calendar in day/week format (Step 1-2): 1. Press ◎ > Tools > Calendar. 2. Select Options> View day/ View week. To create a new meeting agenda (Steps 1-4): 1.
4. Scroll to week day indicators and press Change to select alarm frequency. 5. Press Save. To set an Alarm tone (Steps 1-3): 1. Press ◎ > Tools > Alarm > Alarm tone. 2. Select Ring tones from Phone memory or Memory card. 3. Press Select. 6.3 Appointments This feature allows you to create an appointment in your phone and reminds you of it later. Note that the phone will power on automatically if the appointment alarm is set to on at a specific time. To create an appointment (Steps 1-4): 1.
z Edit: Edit the note. z New entry: Create a new entry. z Delete: Delete a note. z Delete all: Delete all notes. z Send: Sends the note. z Capacity: Check the maximum and free memory space. 6.6 Voice memo This function allows you to record a voice clip (of up to 36 seconds) using your phone's microphone. You may send the recorded voice clip as an MMS message attachment. To record a voice clip (Steps 1-6): 1. Press ◎ > Tools > Voice memo. 2. Press Record or ◎ to start recording. 3.
6.8 Unit converter This function allows you to enter a unit/ currency exchange rate and convert from one unit/currency to another. To set an exchange rate (Steps 1-3): 1. Press ◎ > Tools > Unit converter 2. Press to scroll to a desired unit (Velocity, Mass, Area, Volume, Power, Time, Pressure, Length, Temperature, Currency, and Energy). 3. Enter a number and press Change. 6.9 Countdown To start Countdown (Steps 1-4): 1. Press ◎ > Tools > Countdown. 2. Select Options > Change. 3.
7. Camera Your phone has an integrated camera that allows you to take pictures or shoot a video clip and send them as an MMS message/attachment. The pictures are taken and saved in JPEG format, which can be viewed by most picture viewing programmes. Note: Do not apply force to your camera lens, it might get damaged. 7.1 Camera mode To take a picture (Steps 1-4): 1. Press ◎ > Camera to launch Camera. 2. Press Centre key to take a picture. 3. The picture you just taken will be saved automatically. 4.
2. Press Centre key to record a video clip and press again to stop. 3. The video you just recorded will be saved automatically. 4. Press Back to go back to the camera's view finder screen. Options for the saved video clips include: z Play: Play the recorded video clip. z Send: Send the saved imaged Via multimedia msg, Via Bluetooth, or Via e-mail. z Record new video: Select this option to go back to the camera’s view finder screen. z Delete: Delete the image.
8. Messages Messages offers a variety of messaging functions, including text messages, multimedia messages, E-mail and Messenger. This chapter guides you through each messaging function and setting options. The messages you received and created are saved in three folders: Inbox (the received messages), Outbox (the sent messages), and Drafts (the messages that haven't been finalised and would be sent later).
Continue. 4. Or press Options > Save as draft. For more information on entry methods, see “Text Entry” on page 20. Options for Text Message editing include: 1. Continue: Continue to send the messages by selecting recipients from Contacts or enter phone number(s) manually. 2. Add symbol: Display the symbol chart for selection. 3. Insert object: Insert objects from Sounds, Animations, My animations, My pictures, My sounds, Text template, Contact number, and Bookmark. 4.
8.2 Multimedia Messages You can send a multimedia message, which includes a multimedia files and texts. Creating/Sending/Saving Multimedia Messages To create a new Multimedia message (Steps 1-4): 1. Press ◎ > Messages > Create > Multimedia message. 2. Insert multimedia objects by pressing Options > Insert object or Insert new. 3. When done, press ◎ and add phone number(s) from the Contacts or manually. Alternatively, press Options > Continue. 4. Or press Options > Save as draft.
z Expiry time: When the expiry time is due, the message will be deleted. Set the Expiry time: 1 hour, 3 hours, 6 hours, 12 hours, 1 day, 1 week, and Maximum. z Retrieval: Set the Retrieval mode--Automatic, Deferred, and Auto. homenet. z Spam filter: Set the Spam filter to be on/off to reject/receive junk messages. 8.3 E-mail Creating/Sending/Saving E-mail To compose E-mail (Steps 1-4): 1. Press ◎ > Messages > Create > E-mail. 2. Enter the text. 3.
To create an account (Steps 1-3): 1. Press ◎ > Messages > Settings > E-mail> Account. 2. Edit the details. 3. Press Save. The Account includes the following details: z User name: Enter a user name. z Address: Enter the E-mail address. z Signature: Create your own signature and send it with E-mail. 8.4 Templates Templates menu provides a list of predefined text for you to add into your text/multimedia messages. To add a template (Steps 1-3): 1. Press ◎ > Messages > Templates > Text template. 2.
Settings include the following options: z Account: Select to edit Account name, Address, User ID, Password, and GPRS profiles. z Preferences: Select to edit Automatic login (On/Off), Message alert (Activate, Off), Alert with sound (Yes, No), Alert with vibration (Yes, No), Alert with popup (Yes, No), and Online info alert (Activate, Off). 8.6 Cell info This feature is network dependent. You need to register with your service provider. To access this feature, press ◎ > Messages >Cell info.
9. Entertainment Your phone provides various entertaining features: Games that include default games and Java games, Melody composer that allows you to create your personal music, and FM Radio. 9.1 Games Default Games Your phone has a number of pre-installed games. To play a game (Steps 1-3): 1. Press ◎ > Entertainment > Games > Default games. 2. Scroll to the game you would like to play. 3. Press Select > Options > New Game. Options for a game include: z New game: Select to start a new game.
z Switch On/Off: Turn the FM Radio on/off. z LoudSpeaker: Turn the loud speaker on/off. z Volume: Press key to decrease/increase the volume. z Set Frequency: Set frequency by using keypad keys. z Save Channel: Enter Channel ID (from Ch1-Ch10), Channel Name and Frequency. z Erase Channel: Enter the Channel ID to erase the channel. z AutoSwitchOff: Select AutoSwitchOff on/off. When on, you must define the Linger time. z Display RDS: RDS stands for Radio Data System.
10. Contacts Contacts menu is where you names, phone numbers, and other personal details. There are two storage areas: SIM card and phone memory. Contacts saved in the phone memory allow you to store more information (E-mail, RUL, Street, Post code, City and Country). The space available for these SIM card may vary according to the manufacturer. To access phonebook lists, press ◎ > Contacts > View contacts. Alternatively, press ▼ from the idle screen. 10.
z Move contact: Move the contact to phone. z Select multiple: Select to add contacts one by one or all to Move to phone, Copy to phone, Delete, and Send contact. 10.2 View groups This feature allows you to manage your contacts orderly so that you can assign images and/or ringtones to a group of contacts and send messages to the group of members. To view group contacts (Steps 1-3): 1. Press ◎ > Contacts > View groups. 2. Scroll up/down to a desired group. 3. Press Options > View.
10.5 Advanced This menu provides a list of options so that you can view and edit your contacts. Options for the Advanced menu include: z Select address book: Switch between contacts record on the SIM card and Phonebook. z Sort names: Find a contact by searching his/her First name or Last name. z Picture in contacts: Turn the display of the caller’s ID on/off. z Copy to SIM: Copy all the contacts to SIM card. z Copy to phone: Copy all the contacts to phone memory.
11. Music Your phone allows you to download music from the network, save the music files, edit the Playlist, and play the music. Your phone will automatically stop playing the music when there is an incoming call. The supported music format includes MP3, AAC and AAC+. 11.1 Tracks You may play the downloaded music from Phone memory or Memory card. For example, to play tracks from a memory card (Steps 1-3): 1. Press ◎ > Music > Tracks > Memory card. 2. Scroll up/down to the desired track. 3.
Options for Playlists include: z Open: Open the selected Playlist. z Play: Play the tracks in the selected Playlist. z Delete: Delete the selected Playlist. z Rename: Rename the selected Playlist. z Help: Help information about Playlists.
12. My Files My Files allows you to properly manage the files in your phone. You may separate them into different folders. Moreover you may check the Phone memory or Memory card to see the memory capacity of your phone. 12.1 Managing files Generally, My Files in the Phone memory are separated into four folders: Pictures, Videos, Sounds, and Others. For example, to create a new folder under My Files in Phone memory (Steps 1-5): 1. Press ◎ > My Files. 2. Scroll to select the Phone memory. 3.
13. Calls Features under the Calls menu are mostly operator and/or subscription dependent and require either a PIN2 code or a phone code. For more information about PIN codes, see “Security” on page 24. 13.1 Call history Call history is where keeps a record of your dialed, received and missed calls. To see a call history (Steps 1-3): 1. Press ◎ > Calls. 2. Scroll to switch among four Call history lists: All calls, Missed calls, Answered calls, and Outgoing calls. 3.
To turn Auto Answer on/off (Steps 1-2): 1. Press ◎ > Calls > Call settings > Auto Answer. 2. Press Change to turn the Auto Answer On/Off. Any key answer To turn Any key answer on/off (Steps 1-2): 1. Press ◎ > Calls > Call settings > Any key answer. 2. Press Change to turn the Any key answer On/Off. Minute Reminder To turn Minute Reminder on/off (Steps 1-4): 1. Press ◎ > Calls > Call settings > Minute Reminder. 2. Press Change and key to turn the Auto Answer On/Off. 3.
2. Enter the rater Per unit and Per minute. To set Maximum cost (Steps 1-2): 1. Press ◎ > Calls > Call settings > Call Services > Cost settings > Maximum cost. 2. Press Edit to turn Display credit On/Off and specify the Maximum cost by using keypad keys. To set Auto display (Steps 1-2): 1. Press ◎ > Calls > Call settings > Call Services > Cost settings > Auto display. 2. Set the Auto display to be Off or show Cost/Duration/Both.
2. Select a barred call type: All outgoing, All international, Only here & home, All incoming, Incoming if abroad, and Cancel all.. To check Call barring status, press ◎ > Calls > Call settings > Call barring > Check status. Fixed dialling Fixed dialing allows you to only dial certain predefined numbers. To turn on Fixed dialling (Steps 1-3): 1. Press ◎ > Calls > Call settings > Fixed dialling. 2. Enter PIN2 code. An activating/deactivating message will be displayed on the screen. 3. Press OK.