Quantum Scalar 50 Tape Drive Installation Instructions Introduction 3 Tape Drive Numbering ................................................................................ 3 Scalar 50 Tape Drive Upgrade Kits ............................................................ 4 Required Tools ..............................................................................................
Quantum Scalar 50 Tape Drive Installation Instructions Document 81-81769-01 B01 September 2007 Made in the USA. Quantum Corporation provides this publication “as is” without warranty of any kind, either express or implied, including but not limited to the implied warranties of merchantability or fitness for a particular purpose. Quantum Corporation may revise this publication from time to time without notice. COPYRIGHT STATEMENT © Copyright 2007 by Quantum Corporation. All rights reserved.
Quantum Scalar 50 Tape Drive Installation Instructions Document 81-81769-01 B01 September 2007 Introduction 0 This document provides instructions for adding a tape drive to an Scalar 50 tape library. The tape drive upgrade procedure consists of the following steps: Note: Tape Drive Numbering 0 Half-height tape drive canisters are ONLY available in Scalar 50 tape libraries.
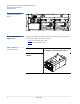
Quantum Scalar 50 Tape Drive Installation Instructions Document 81-81769-01 B01 September 2007 Figure 2 Scalar 50 Cable Configuration (Half-Height Drives) Tape drives 3 and 4 Tape drives 1 and 2 Back of Library Scalar 50 Tape Drive Upgrade Kits Table 1 Tape Drive Upgrade Kits (SDLT) 0 The tape drive upgrade kit differs depending on the tape drive type needed for the library.
Quantum Scalar 50 Tape Drive Installation Instructions Document 81-81769-01 B01 September 2007 Table 2 Tape Drive Upgrade Kits (LTO) LTO Part Number PC-KUCQA-YF (LTO-3 HH SCSI, single drive) PC-KUC1A-YF (LTO-3 HH SCSI, dual drive) PC-KUKQC-YF (LTO-3 HH Native Fibre, single drive) PC-KUKQ1-YF (LTO-3 HH Native Fibre, dual drive) PR-UU3QA-YF (HP LTO3, SCSI) PR-UU5QC-YF (HP LTO3, Native Fibre) PC-KUMQA-YF (HP LTO4, SCSI) PC-KUGQC-YF (HP LTO4, Native Fibre HP-LTO2/3/4 Tape Drive Module LTO-3 HalfHeight Tape
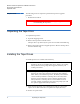
Quantum Scalar 50 Tape Drive Installation Instructions Document 81-81769-01 B01 September 2007 Required Tools 0 The following tools are required to perform the tape drive upgrade procedure: • Flat blade screwdriver Use appropriate electrostatic discharge (ESD) precautions when installing the tape drive. Caution: Unpacking the Tape Drive 0 To unpack the tape drive: 1 Open the shipping carton. 2 Remove the tape drive from the carton.
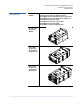
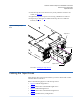
Quantum Scalar 50 Tape Drive Installation Instructions Document 81-81769-01 B01 September 2007 3 Insert the tape drive into the drive bay slowly until the connectors are seated (see figure 3). 4 Tighten the tape drive captive screws using a flat blade screwdriver. 5 Repeat steps 1 through 4 to install another tape drive in a different location, if desired. Figure 3 Installing a Tape Drive Tape drive 1 Captive screw Tape drive 2 Captive screw Proceed to Cabling the Tape Drives.
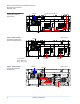
Quantum Scalar 50 Tape Drive Installation Instructions Document 81-81769-01 B01 September 2007 Figure 4 Scalar 50 Cable Configuration (SCSI Full Height Drives) System Controller Board Ethernet Tape drive 2 SCSI host Tape drive 1 Back of Library Power Figure 5 Scalar 50 Cable Configuration (Native Fibre Channel Full Height Drives) Power LTO Tape drives shown.
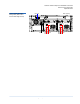
Quantum Scalar 50 Tape Drive Installation Instructions Document 81-81769-01 B01 September 2007 Figure 7 Scalar 50 Cable Configuration (Native Fibre Channel Half-Height Drives) Ethernet Back of Library Tape drives 3 and 4 Power Fibre Channel host/SAN Cabling the Tape Drives Tape drives 1 and 2 Fibre Channel host/SAN 9
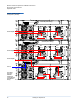
Quantum Scalar 50 Tape Drive Installation Instructions Document 81-81769-01 B01 September 2007 Figure 8 Scalar 50 Cable Configuration (Stacked) Scalar 50 (slave library) Tape drive 2 Tape drive 1 Host computer Scalar 50 (slave library) Tape drive 2 Tape drive 1 Host computer Host computer Scalar 50 (master library) Ethernet Tape drive 2 The library host and Ethernet network are connected only to the Master library.
Quantum Scalar 50 Tape Drive Installation Instructions Document 81-81769-01 B01 September 2007 Setting the Tape Drive SCSI ID 0 The next step in the installation procedure is to set the required SCSI ID for the new tape drive. Note: The library assigns SCSI IDs based on the drive order. Drive bay 1 = SCSI ID 1, drive bay 2 = SCSI ID 2, and so forth. It is only necessary to perform the steps in this section if you need to set the tape drive SCSI ID to an ID other than the default.
Quantum Scalar 50 Tape Drive Installation Instructions Document 81-81769-01 B01 September 2007 Figure 11 Host Bus Options Screen 4 Use the up and down arrows to highlight the tape drive receiving the new SCSI ID and press Enter. 5 Use the up and down arrows to select a SCSI ID and press Enter to set the ID. 6 When you have completed setting the SCSI IDs, press Exit to return to the Cabinet screen. 7 From the Ops screen, use the up and down arrows to highlight Drive Operations and press Enter.
Quantum Scalar 50 Tape Drive Installation Instructions Document 81-81769-01 B01 September 2007 3 Enter the username and password and click OK. Note: The default username and password is admin. The Overview page displays (see figure 13): Figure 13 Overview Page Banner area Quick status Navigation area Content area 4 Click the Setup tab. The Setup tab displays. 5 Click on the SCSI tab at the top of the Setup tab. The SCSI page displays (see figure 14).
Quantum Scalar 50 Tape Drive Installation Instructions Document 81-81769-01 B01 September 2007 6 To change a SCSI ID, enter the ID number in the field next to the device and click Apply. 7 From the Operations page, click on the Drives tab. The Drives page displays (see figure 15): Figure 15 Drives Page Drive operations 8 Enter the new tape drive number 9 Select shutdown and click Apply. The tape drive powers down. 10 Enter the new tape drive number 11 Select Power on and click Apply.
Quantum Scalar 50 Tape Drive Installation Instructions Document 81-81769-01 B01 September 2007 Determining the WWNs World Wide Names Table 3 Library World Wide Names 0 • Determining the WWNs World Wide Names • Verifying Library Connectivity The media changer (robot) and tape drives within the library have WWNs World Wide Names assigned to them by the system controller board (SCB). The WWNs must be determined and recorded both for the customer and for Quantum customer support.
Quantum Scalar 50 Tape Drive Installation Instructions Document 81-81769-01 B01 September 2007 Figure 16 Overview Page 4 Click Setup from the contents frame. The management frame displays the Setup page (see figure 17). Figure 17 Setup Page 5 Click on the SCSI/Fibre tab. The SCSI/Fibre page displays (see figure 18).
Quantum Scalar 50 Tape Drive Installation Instructions Document 81-81769-01 B01 September 2007 Figure 18 SCSI/Fibre Page Connectivity type Media changer Tape drives 6 For the Media Changer and Tape Drives, click Fibre under the Connectivity type. The Media Changer (see figure 19) and Tape Drive Configuration (see figure 20) screen displays.
Quantum Scalar 50 Tape Drive Installation Instructions Document 81-81769-01 B01 September 2007 Figure 20 Tape Drive Configuration Screen World wide names (port 0 and port 1) 7 Record the WWNs for the media changer and tape drives in table 3. Note: • These numbers are the world wide NODE names for the library and tape drives. The World Wide Port Name is very similar to the World Wide Node Name, however, the last hex byte is 01h greater than the last hex byte of the node name.
Quantum Scalar 50 Tape Drive Installation Instructions Document 81-81769-01 B01 September 2007 • Connect Via a Web Browser Note: The information below applies to a Brocade SAN switch. For other SAN switches, contact the SAN administrator. 0 Connect Via a Telnet Session To connect via a Telnet session to a SAN switch: 1 Connect the service laptop to the SAN switch using an Ethernet crossover cable, or by connecting to the LAN (if available). 2 On the service laptop, open a command prompt window.
Quantum Scalar 50 Tape Drive Installation Instructions Document 81-81769-01 B01 September 2007 If the world wide names are visible from the nsshow command, the connectivity is verified. Connect Via a Web Browser 0 To connect via a web browser: 1 Connect the service laptop to the SAN switch using an Ethernet crossover cable. 2 On the service laptop, launch a web browser such as Internet Explorer.
Quantum Scalar 50 Tape Drive Installation Instructions Document 81-81769-01 B01 September 2007 e If you are still unable to view the Fibre Channel devices, launch the SANsurfer SANblade manager and click Connect. Accept the default “localhost” entry. The SANblade manager displays (see figure 22). Figure 22 SANblade Manager The SANblade manager should display all connected Fibre Channel devices. If the library and tape drives do NOT display, check the cabling and connection status.
Quantum Scalar 50 Tape Drive Installation Instructions Document 81-81769-01 B01 September 2007 To display the SCSI ID assignments: 1 From the SANblade manager program, click Configure. The port configuration screen displays (see figure 23). Figure 23 Port Configuration Screen SCSI ID assignment The port configuration screen allows you to change the SCSI ID order if the Fibre Channel HBA drive supports persistent bindings. Click on the drop down ID box to change the SCSI ID assignment as desired.
Quantum Scalar 50 Tape Drive Installation Instructions Document 81-81769-01 B01 September 2007 Fibre Channel Connectivity Troubleshooting 23
Quantum Scalar 50 Tape Drive Installation Instructions Document 81-81769-01 B01 September 2007 *81-81769-01 B01* 81-81769-01 B01 24 Fibre Channel Connectivity Troubleshooting