802R-PCI Video Test Generator User Guide
802R-PCI Video Test Generator User Guide Revision A (25-Nov-2003) Updates to this document are available at www.quantumdata.com/support/downloads/. Copyright 2003 Quantum Data. All rights reserved. The information in this document is provided for use by our customers and may not be incorporated into other products or publications without the expressed written consent of Quantum Data.
Contents Chapter 1 Getting Started Installing generator . . . . . . . . . . . . . . . . . . . . . . . . . . . . . . . . . . . . . . . . . . . . . . . . . . . . . . 2 Connector pin-outs . . . . . . . . . . . . . . . . . . . . . . . . . . . . . . . . . . . . . . . . . . . . . . . . . . . . . . 3 VGA connector . . . . . . . . . . . . . . . . . . . . . . . . . . . . . . . . . . . . . . . . . . . . . . . . . . . . . . 3 EGA connector . . . . . . . . . . . . . . . . . . . . . . . . . . . . . . . . . . . . . . .
iv Chapter
1 Getting Started Topics in this chapter: • Installing generator • Connector pin-outs • Using Video Generator Manager 802R-PCI Video Test Generator User Guide (Rev A) 1
Installing generator To install the generator: 1. Turn off your computer and monitor to protect the generator from possible electrical damage. Leave the power cord connected with the computer, until step 4. 2. Remove the cover from the computer. 3. Touch the metal part of the power supply case inside the computer to discharge any static electricity that you might have. 4. Disconnect the power cord from the computer, even though the computer is turned off. 5.
Connector pin-outs VGA connector Pin Description Pin Description 1 Analog red video 9 DDC/EDID +5 VDC out 2 Analog green video 10 Digital ground 3 Analog blue video 11 No connection 4 No connection 12 DDC/EDID serial data 5 Digital ground 13 Horizontal sync 6 Red analog video ground 14 Vertical sync 7 Green analog video ground 15 DDC/EDID data clock 8 Blue analog video ground Pin Description 1 Ground 2 Red intensity 3 Red EGA connector 4 Green 5 Blue 6 Green i
Using Video Generator Manager Video Generator Manager (VGM) is a Microsoft Windows-based program used to operate the generator. The 802R-PCI generator requires VGM 3.0.4 or later. VGM is available on the Resource CD included with the generator, and from http://www.quantumdata.com/support/downloads/. Installing VGM To install VGM: 1. Log onto Windows with Administrator privileges. 2. Locate setup.exe from the Resource CD or Quantum Data website. 3. Follow the on-screen instructions.
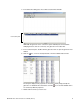
4. In the Select Port dialog box, choose PCI Card, and then click OK. Connections pane VGM adds the generator to the connections pane. VGM may be connected with multiple generators, but can control only one generator at the same time. 5. In the connections pane, double-click the generator name to open the generator view window. 6. Click the icon, if it is not already selected, to list the available video formats.
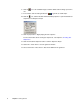
8. Click the use. icon to list available images, and then double-click the image you want to 9. In the toolbar, click the video gate buttons to gate R, G, and B output. 10. Click the icon, and then double-click the NewSeq sequence to open the default test sequence in the Sequence Player. 11. Click the play button to begin playing the test sequence. For more information about creating test sequences, see Chapter 3, “Creating Test Sequences.” 12.
2 Operating Procedures Topics in this chapter: • Viewing system information • Installing firmware and gateware upgrades • Initializing the generator • Calibrating the generator • Downloading bitmap images • Advanced tasks 802R-PCI Video Test Generator User Guide (Rev A) 7
Viewing system information Use the GenStats image to view information about your generator, including versions of installed software, and memory usage. To view system information: 1. Connect the generator with VGM. 2. Display the GenStats image.
Installing firmware and gateware upgrades This section describes how to install firmware and gateware upgrades, which are available at http://www.quantumdata.com/support/downloads/. Firmware is an executable program, which controls the user inteface, defines built-in formats and images, and other functions. Gateware code is used to program the FPGA in the generator. VGM 3.0.4 or later is required to install install firmware and gateware updates.
2. Select Tools > Archiver > Gateware Upgrade. 3. Click Browse, and then specify the gateware file (*.xsvf) you want to install. 4. In the Generator Selection box, select the target generator, and then click Program. VGM displays this message when the update is complete. After VGM copies the gateware file to the generator, VGM will disconnect from the generator. 5. Read the release notes provided with the gateware update before proceeding.
Initializing the generator Initializing the generator restores it to factory settings, and erases all user-created objects. To initialize generator: 1. Start VGM. Connecting VGM with the generator is not necessary. 2. Select Generator > Special > Forced Init. 3. Choose the PCI Card option, specify the port used by the generator you want to initialize, and then click OK. 4. Confirm that you want to initialize the generator, and delete any user-defined objects from the generator. 5.
Calibrating the generator About self-calibration The generator can calibrate itself. Once calibrated, the generator does not require periodic calibration. There are no physical controls to adjust. All calibration is electronic. Self-calibrating generators output very accurate analog video swings; more accurate then can be measured with most oscilloscopes.
Calibrating frequency All frequencies associated with the generator are derived from a common frequency reference, which can be calibrated using the rate calibration command RATC. To reduce all frequency errors to zero: 1. Measure any convenient frequency from the generator using a very accurate frequency counter. For example, measure the horizontal TTL separate sync frequency with the DMT0660 format loaded and the horizontal rate temporarily set to 100KHz.
Downloading bitmap images Use VGM to download 8-bit or 24-bit bitmap (.bmp) images to the generator. Images cannot be stored on the generator. To download a bitmap image: 1. Connect generator with VGM. 2. Load the Raster (flat black) image, which clears the display. 3. If the image uses 24-bit color, send the PELD 32; FMTU commands to set the generator into 24-bit mode. Otherwise, no commands are necessary. The PELD command temporally changes the color depth of the current format.
Advanced tasks Creating video formats and images Use VGM to create or modify video formats, and to create images. The images provided with the generator cannot be modified. For information about creating formats and images, see VGM help. Automating generator The Quantum Data SDK provides an Application Programming Interface (API) that you can use to create Windows-based applications that control the generator automatically.
16 Chapter 2 Operating Procedures
3 Creating Test Sequences Topics in this chapter: • Overview • Using VGM to create a test sequence 802R-PCI Video Test Generator User Guide (Rev A) 17
Overview In a production environment, where you might need to test several combinations of format and images, a test sequence can be used to automate the process of selecting formats and images. A test sequence consists of steps. Each step specifies the format and image to display, and the duration of the step. You can create multiple test sequences, and store them in the non-volatile memory of the generator. About 1500 steps, from all sequence files, can be stored.
Using VGM to create a test sequence You can use VGM to create and run test sequences. To create a sequence using VGM: 1. Connect VGM with the generator. 2. Double-click the generator name to open the generator window. 3. In the generator window, right-click the NewSeq object, and then choose Edit. 4. In the Recall Data dialog box, click Yes. 5. ]In the Sequence Editor, select your generator from the Generator list. 6.
7. Select the field you want to change, then double-click a new value from the list on the left. 8. Select Edit > Edit Sequence Name, and then specify a name for the sequence. This name is displayed as the sequence name on the generator. 9. Select File > Save to save the sequence (.seq) file to your computer. This name is used only as the name of the file stored on your computer, and may be different than the name of the sequence. 10. Select File > Close to close the Sequence Editor. 11.
12. In the Data Transfer dialog box, select the generator on which you want to install the sequence (in case multiple generators are connected with VGM), and then click OK. The sequence file is now stored on the generator. To play a sequence: 1. Connect VGM with your generator. 2. Double-click the generator name. 3. In the generator window, right-click the sequence you want to run, and then choose Open. 4. Use the Sequence Player to run the sequence. 5.
22 Chapter 3 Creating Test Sequences