Quick Setup Guide Model: QN-H-220 High Performance 802.
Copyright Information Copyright & trademark specifications are subject to change without prior notice. Copyright © 2018 Quantum NetworksTM (SG) Pte. Ltd. All Rights Reserved. Quantum NetworksTM & the logo are trademarks of Quantum NetworksTM (SG) Pte. Ltd. Other brands or products mentioned may be trademarks or registered trademarks of their respective owners.
Contents Before You Begin .......................................................................................................................4 Package Contents......................................................................................................................4 Set up Requirements .................................................................................................................4 Connect AP ...................................................................................
This Quick Setup Guide provides step-by-step instructions on how to set up Quantum NetworksTM Access Point. After completing the steps described in this Guide, you will be able to install the Access Point (AP) on site and provide wireless network access to users. Before You Begin Your Quantum NetworksTM Access Point can be managed by “QUANTUM RUDDER “ (Quantum NetworksTM Cloud Controller) or can work in “Standalone” Mode.
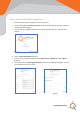
Step 1- Access Point Initial Configuration Provide internet access to WAN port of the Access Point. Access point default SSID QN_XX: XX will broadcast. (Where XX: XX are last four digits of Access Point MAC Address). Connect QN_XX: XX SSID and browse access point default IP 169.254.1.1. Below screen appears. Figure 1 Click on Start Configuration (Figure1). Do IPv4 setup by selecting required option DHCP, Static or PPPoE and click on Next. (Figure2).
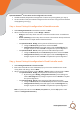
Quantum NetworksTM Access Point can be configured in two modes. Standalone Mode (Independent management of each Access point) (please go to step 2) Cloud Controller mode (Centralized management of Access Points using Quantum Network cloud) (please go to step 3) Step 2- Access Point quick configuration in Standalone mode Select Management Mode as Standalone and click on Next. Admin can select AP operation mode as Bridge or Router.
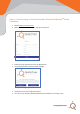
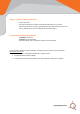
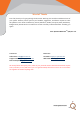
Step 4 – Account setup on Quantum Rudder (Quantum NetworksTM Cloud Controller) Browse https://cc.qntmnet.com. Click on “Create New Account” to sign up a new account. Figure 4 Follow the steps as guided on screen for Registration. Successful registration will show below message. Figure 5 Verify QN account from registered email id. Your Account on Quantum Rudder (QNTM Cloud Controller) is now ready to use.
Step 5 – How to Factory Reset AP o o o Power on the AP Push the reset button provided on side panel and hold it for 10 seconds. AP will reset to factory setup. (It will wipe entire AP configuration and store it to factory default setup / Cloud configuration will remain same. ) Access Point Default login detail User Name: Quantum Password: Auto Generated Password will be sent to registered email on Cloud Controller.
FCC Statement: This device complies with part 15 of the FCC rules. Operation is subject to the following two conditions: (1) this device may not cause harmful interference, and (2) this device must accept any interference received, including interference that may cause undesired operation. Changes or modifications not expressly approved by the party responsible for compliance could void the user’s authority to operate the equipment.
Word of Thanks First of all, thank you for going through the document. We hope, this would have addressed most of your queries. However, we are open for your feedback, suggestions, and feature requests to make this platform more robust to address any vertical, Education, SOHO, Hot-Spots, NGOs, Healthcare, Budget Hotels, Hostels and so on. Feel free to contact us directly on below addresses. Thanking you again! Team Quantum NetworksTM (SG) Pte. Ltd. Contact us: Resources: Sales Team: sales@qntmnet.