
User's Guide


Quantum Bezel Replacement Guide
Document 81-81252-05 A01
October 2006
8
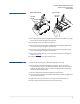
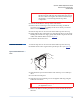
Figure 2 SDLT 320 Removal
3 Press down gently on the top right bezel tab and slowly pull the top right
bezel corner out just enough to clear the slot.
4 Turn the tape drive over onto its right side.
5 Press down gently on the bottom left bezel tab and pull the bottom left
bezel corner out just enough to clear the slot.
6 Press down gently on the top left bezel tab and slowly pull the top left
bezel corner out just enough to clear the slot.
7 Press down on the three top-cover bezel tabs so they move out of their
slots (see figure 2
).
8 Gently remove the bezel from the tape drive.
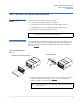
Install the New Bezel 0 1 Place the drive on its rear so the front of the drive faces up.
2 Press inward on the left and right top bezel tabs. At the same time,
position the three top-cover bezel tabs into their slots. Lower the bottom
of the bezel until the three top-cover tabs and the top left and top right
bezel tabs slide into their slots.
3 Press the bottom left and bottom right bezel tabs inward.
4 Lower the bottom of the bezel until the bottom left and bottom right bezel
tabs snap into their slots.
5 Make sure all seven bezel tabs are securely locked into their slots.
6 Make sure the bezel dust door opens and closes freely.
Top right
tab slot
Bottom right
tab slot
Top-cover
tab slots
Top-cover tabsBottom right bezel tab