
Installation manual


8
Ducting the System
Weatherhood Installation
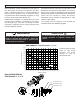
To maximize airflow in the duct system, all ducts should
be kept short and have as few bends or elbows as
possible. Forty-five degree elbows are preferred to 90°
elbows. Use “Y” tees instead of 90° elbows whenever
possible.
All duct joints must be fastened with screws, rivets or duct
sealant and wrapped with a quality duct tape to prevent
leakage. We recommend aluminum foil duct tape.
Galvanized ducting should be used whenever possible,
although flexible ducting can be used in moderation if
necessary.
All ducts running through attics and unheated spaces must
be sealed and insulated to code.
It is the responsibility of the installer to ensure all ductwork
is sized and installed as designed to ensure that the
system will perform as intended. All air movement devices
have a performance curve. The amount of air (cfm) that
the system will exhaust is directly related to the total
external static pressure (esp) of the system. Static
pressure is a measure of resistance imposed on the fan by
the length of duct work plus the number of fittings used in
the duct system. Proper duct sizing methods should be
used to determine the correct duct diameter to handle the
airflow.
Stale air should be exhausted from the points in the house
where the worst air quality problems occur (i.e. bathrooms,
kitchen and laundry room.)
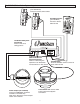
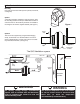
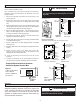
1/4" (6 mm) SCREEN
(front view)
EXTERIOR
WALL
SCREEN
(side view)
COLLAR IS SUPPLIED TO
ENSURE VAPOUR BARRIER
IS 100% SEALED TO
WALL PLATE
12" galvanized
pipe supplied
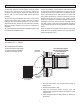
1. Thermal collar slides over the galvanized sleeve of
weatherhood.
2. Fasten thermal collar to belt.
3. Slide the insulated flexible ducting over the
weatherhood’s galvanized sleeve and fasten it to the
thermal collar.
4. Hood is hinged to allow for easy access for cleaning of
bird screen.
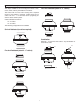
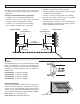
Weatherhoods (not included)
Part # 99-187 two - 7” diameter
The weatherhoods are labelled
Supply and Exhaust and include
12” sleeves and thermal collars
(2 sleeves and collars per kit).