
User's Guide


Quick Start Installation Autoloader Components
14
Autoloader Components
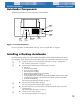
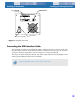
The following describes the major components of the autoloader.
Figure 1.
Front Panel Components
For more information on LEDs and their meaning, see “Front Panel LEDs” on page 37.
Installing a Desktop Autoloader
Use the following procedure to install a desktop autoloader. Print this page and check each step as
you complete it. If you need more information about a step, turn to the section referenced in the step.
❑
1.
Unpack the contents of your drive package, and check for missing or damaged items.
See “Unpacking and Inspection” on page 16.
❑
2.
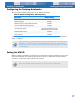
Review the drive’s default settings and change them if necessary:
• SCSI ID: 6
• Parity Checking: Enabled
• Terminator Power: Disabled
• Data Compression: Enabled
• Media Recognition (DDS-4 drives only): Enabled
• Power On Self Test (POST): Enabled
• Host Operating System: Windows 98 SE/ME/XP/NT/2000/Windows Server 2003
• SCSI Interface Compatibility: Ultra 2 Wide SCSI for DDS-4 and DAT 72 autoloader
•Vendor ID: SEAGATE DAT
See“Configuring the Desktop Autoloader” on page 17.
❑
3.
Connect a SCSI interface cable to the drive.
See “Connecting the SCSI Interface Cable” on page 18.
❑
4.
Be sure the tape drive is not the last device on the SCSI bus (the drive does not provide
SCSI termination).
See “Installing SCSI Termination” on page 19.
❑
5.
Connect a power cable to the drive.
See “Connecting the Power Cord” on page 19.
Clean
LED
(green)
Media
LED
(green)
Drive LED
(amber)
LCD
Display
ENTER
button
SELECT
button
EJECT
button
Clean
LED
(green)
Media
LED
(green)
Drive LED
(amber)
EJECT
button
LCD
Display
SELECT
button
ENTER
button